BLTouch is a bed-leveling probe designed for FDM/FFF 3D printers that automates the process of measuring the build surface and compensating for small height variations. Instead of relying on manual knobs and repeated paper tests, BLTouch uses a retractable pin and an internal sensor to detect when the nozzle is at a known distance from the bed. The printer firmware then creates a “mesh” or a set of reference points that it uses to adjust Z height while printing the first layers. When the mechanics are sound and the firmware is configured correctly, BLTouch can turn a frustrating first-layer routine into a predictable, repeatable start. That reliability is a big reason the BLTouch name appears so frequently in upgrade lists for popular machines like the Ender series, Prusa-style kits, and many custom builds.
Table of Contents
- My Personal Experience
- What BLTouch Is and Why It Became a Standard Upgrade
- How BLTouch Works: Pin Deployment, Triggering, and Repeatability
- BLTouch Benefits for First Layer Quality and Long Prints
- BLTouch Compatibility: Printers, Boards, and Firmware Considerations
- Installing BLTouch: Mounting Position, Offsets, and Physical Alignment
- Wiring BLTouch Safely: Signal Integrity, Grounding, and Cable Management
- Firmware Setup for BLTouch: Marlin and Klipper Configuration Principles
- Calibrating Z Offset with BLTouch: Methods That Produce Consistent Results
- Expert Insight
- Creating and Using a Bed Mesh with BLTouch: Practical Workflow
- Common BLTouch Problems and How to Diagnose Them Without Guesswork
- BLTouch vs Inductive and Capacitive Probes: Choosing the Right Sensor
- Maintenance and Long-Term Reliability: Keeping BLTouch Accurate Over Time
- Integrating BLTouch into Start G-code and Daily Printing Habits
- When BLTouch Doesn’t Fix the First Layer: Mechanical Checks That Matter
- Final Thoughts on Getting the Most from BLTouch
- Watch the demonstration video
- Frequently Asked Questions
- Trusted External Sources
My Personal Experience
I added a BLTouch to my Ender 3 after getting tired of chasing the perfect first layer every time I swapped nozzles or moved the printer. The install was straightforward, but I underestimated how much time I’d spend on firmware and offsets—my first test print dragged the nozzle because my Z-offset was way off. After a few rounds of paper tests and tweaking the probe mount so it didn’t wobble, the difference was obvious: the mesh compensated for my slightly warped bed and I stopped babysitting the first layer. It didn’t magically fix everything, but once I dialed it in, I could start prints with a lot more confidence and fewer failed corners.
What BLTouch Is and Why It Became a Standard Upgrade
BLTouch is a bed-leveling probe designed for FDM/FFF 3D printers that automates the process of measuring the build surface and compensating for small height variations. Instead of relying on manual knobs and repeated paper tests, BLTouch uses a retractable pin and an internal sensor to detect when the nozzle is at a known distance from the bed. The printer firmware then creates a “mesh” or a set of reference points that it uses to adjust Z height while printing the first layers. When the mechanics are sound and the firmware is configured correctly, BLTouch can turn a frustrating first-layer routine into a predictable, repeatable start. That reliability is a big reason the BLTouch name appears so frequently in upgrade lists for popular machines like the Ender series, Prusa-style kits, and many custom builds.
Although automatic bed leveling is often described as a single feature, it’s really a combination of hardware, firmware logic, and machine rigidity. BLTouch sits at the center of that system: it’s the device that provides the bed contact measurements, but it can only be as accurate as its mount, wiring, and the printer’s motion system allow. When a printer frame is loose, wheels are eccentric, or the X gantry sags, any probe—BLTouch included—will report inconsistent results because the geometry is physically changing. When those fundamentals are addressed, BLTouch becomes a powerful tool not only for convenience but also for print quality. The first layer becomes more uniform, corners are less prone to lifting, and you can run tighter tolerances with less “squish” variability across the bed.
How BLTouch Works: Pin Deployment, Triggering, and Repeatability
The core mechanism of BLTouch is straightforward: a small pin deploys downward, the printer lowers the toolhead until the pin touches the bed, and the probe signals a trigger event. The pin then retracts, and the next point is measured. What makes BLTouch distinct from some inductive or capacitive sensors is that it performs a physical touch-off rather than relying on electromagnetic properties of the surface. That means BLTouch can work on glass, PEI, textured sheets, and most build surfaces without needing a metal target. It also means BLTouch is less sensitive to temperature drift and surface coatings compared to some non-contact sensors, though it still benefits from probing at a consistent bed temperature if you want the mesh to match real printing conditions.
Repeatability is the metric that matters most for any probe. BLTouch is generally valued because it can be consistent when installed properly, but it’s not magic: the pin must move freely, the mount must not flex, and the wiring must be clean to avoid signal noise. A sticky pin can cause random high or low triggers, and a loose bracket can introduce angle changes that look like bed warp. If you’re chasing inconsistent Z offset, it’s often worth watching the BLTouch pin during self-test cycles and probing routines. Smooth, identical movements indicate the mechanism is healthy; hesitation, partial deployment, or irregular retraction suggests cleaning, inspection, or replacement is needed. In practice, BLTouch’s reliability comes from treating it as a precision component: keep it aligned, keep it clean, and keep the electrical connections solid.
BLTouch Benefits for First Layer Quality and Long Prints
First layer quality is where BLTouch earns its reputation. A build plate that looks flat to the eye can still be off by tenths of a millimeter across its surface, and that’s enough to cause poor adhesion in one corner and nozzle drag in another. With BLTouch, the printer can compensate by subtly raising or lowering Z as it moves, keeping the nozzle-to-bed distance closer to the ideal value. That consistency improves line width, reduces gaps between extrusions, and helps the first layer “lock in” to the surface. Even if you still do a basic manual leveling to get the bed roughly trammed, BLTouch reduces the amount of fine-tuning required and helps maintain results as springs settle or temperature changes over time.
Long prints benefit from BLTouch indirectly. When the first layer is solid and uniform, the entire print is less likely to fail hours later due to a small adhesion issue that started at minute one. A reliable mesh also enables you to run slightly more aggressive first-layer settings—like faster first-layer speeds or lower extrusion temperature—without risking random corners peeling up. Another advantage is confidence when swapping build surfaces. If you alternate between glass and flexible plates, BLTouch can help adapt to minor thickness differences, though you still need to confirm Z offset after major changes. The end result is a workflow that feels less fragile. Instead of “hoping” the first layer sticks, you can run a consistent start routine and spend your attention on model setup, filament choice, and dimensional accuracy.
BLTouch Compatibility: Printers, Boards, and Firmware Considerations
BLTouch can be installed on a wide range of printers, but compatibility depends on three things: mounting space near the hotend, available inputs on the control board, and firmware support. Many modern 32-bit boards include a dedicated probe port that simplifies wiring. Older 8-bit boards can still run BLTouch, but you may need to repurpose endstop pins or use adapter boards, and you’ll often be tighter on firmware memory. Firmware matters because BLTouch requires logic for servo-style control (for deploying and retracting the pin) and a Z-probe input to read the trigger state. Marlin supports BLTouch extensively, and Klipper supports it as well, but the configuration approach differs. On Marlin you’ll enable features at compile time; on Klipper you’ll define settings in the config file and tune behavior through commands.
Mechanical compatibility is just as important as electrical compatibility. The BLTouch body needs to be mounted so the pin can reach the bed before the nozzle does, but not so low that it risks hitting prints or clips. The offset between the nozzle and the BLTouch pin must be measured accurately because the firmware uses that offset to translate probe measurements into nozzle height corrections. If the offset is wrong, your mesh can be mathematically correct but physically misplaced, leading to nozzle crashes or high first layers. Some hotend shrouds and fan ducts also interfere with the BLTouch pin path, especially on compact toolheads. When planning an installation, it helps to choose a mount designed for your specific hotend and carriage, and to verify that the probe can reach all corners of the printable area without colliding with frame parts or bed clips.
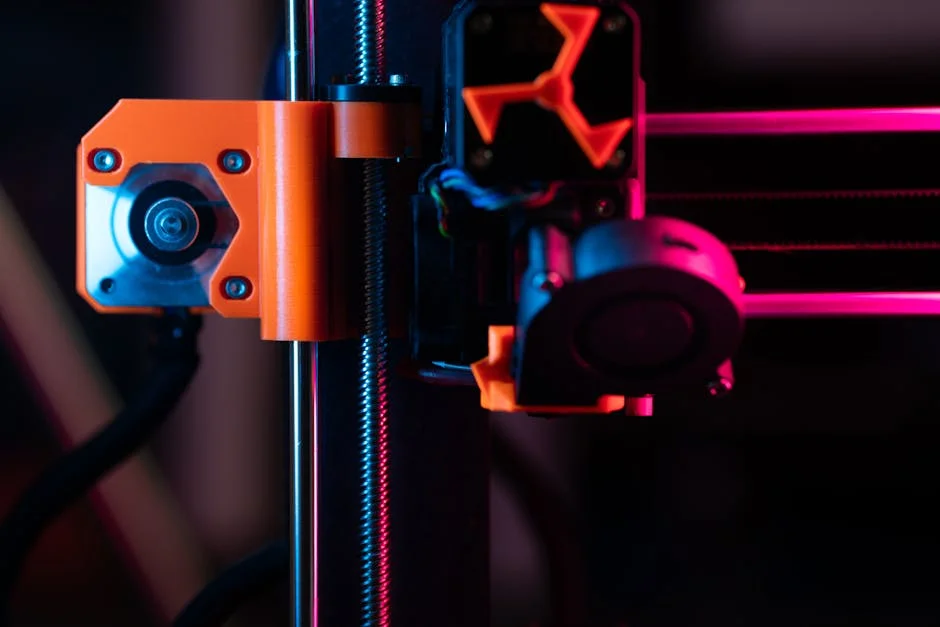
Installing BLTouch: Mounting Position, Offsets, and Physical Alignment
A clean BLTouch installation starts with a rigid mount. Flex is the enemy: if the bracket bends even slightly during probing, the readings will vary and the mesh will be less useful. Metal mounts can be excellent, but a well-designed printed mount in a stiff material can work too, especially if it’s thick, supported, and bolted tightly. The probe should sit parallel to the Z axis so the pin moves straight up and down without rubbing the housing. If the pin rubs, it can stick, and that can cause false triggers. The BLTouch pin must also be positioned so it’s not directly in the path of part cooling airflow that might carry filament strings or dust into the mechanism. While that might sound minor, debris is one of the common reasons probes become inconsistent over time.
Offsets are where many setups go wrong. You’ll need the X and Y offset (how far the BLTouch pin is from the nozzle) and a Z offset (the difference between the trigger point and the nozzle touching the bed). The X/Y offsets should be measured carefully, ideally with calipers, and then verified by making sure the probe points you expect match the printer’s movements. The Z offset is tuned through a controlled procedure: heat the bed and nozzle to typical printing temperatures, home the printer, then use small Z moves to bring the nozzle to a known “paper drag” point. The difference between that point and the probe’s trigger height is the Z offset. The exact steps differ by firmware, but the principle is the same. Once the BLTouch is mounted securely and the offsets are correct, the probe becomes a dependable reference tool rather than an additional variable.
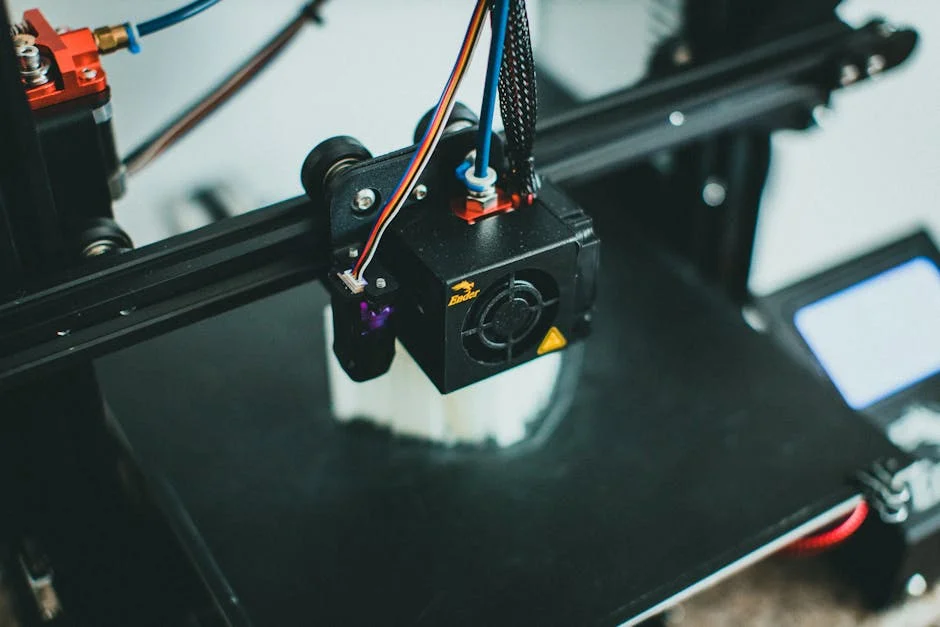
Wiring BLTouch Safely: Signal Integrity, Grounding, and Cable Management
BLTouch wiring typically includes power, ground, a control line for deploying the pin, and a signal line for the trigger state. Getting these connections correct is critical because miswiring can cause erratic behavior or damage. Many boards provide a labeled probe connector, but it’s still important to confirm the pinout against your board documentation. BLTouch versions and clones can have different wire color conventions, so relying on colors alone is risky. A careful approach is to identify each wire by function and verify continuity and voltage expectations before powering the printer. Once the wiring is correct, cable management matters more than people expect. A dangling cable can snag during travel and yank on the BLTouch connector, and intermittent connections can look like random probe failures that are difficult to diagnose.
Signal integrity becomes important when the printer environment is electrically noisy. Stepper motors, heaters, and switching power supplies can induce noise into long, unshielded wires. If the trigger signal line picks up noise, the printer may think BLTouch triggered early, creating a bad mesh or causing homing failures. Good practices include routing the BLTouch cable away from stepper motor wires when possible, securing it along the cable chain or harness, and ensuring ground connections are solid. Some setups benefit from ferrite beads or braided shielding, but often the simplest improvement is just better routing and strain relief. Also keep connectors tight: a partially seated plug can behave normally during idle but fail during motion. When BLTouch is treated like a sensor rather than “just another accessory,” the wiring becomes part of the precision system that supports consistent probing.
Firmware Setup for BLTouch: Marlin and Klipper Configuration Principles
Configuring BLTouch in firmware is about telling the printer how to control the probe and how to interpret its trigger signal. In Marlin, that typically means enabling BLTouch support, choosing a probing method (like bilinear mesh), setting safe homing behaviors, and defining the probe offsets. You also need to decide how probing interacts with homing: many users configure Z homing to use the BLTouch probe rather than a mechanical endstop. Safe Z homing ensures the probe homes near the center of the bed so it doesn’t miss the bed surface due to offsets. Once these features are enabled, you’ll calibrate Z offset and confirm that the probe deploys and retracts correctly during startup and probing commands.
In Klipper, BLTouch configuration is handled through a printer configuration file, and tuning can be done with commands and macros. You define the sensor pin, control pin, offsets, and probing speed. Klipper’s approach makes it easier to adjust and iterate without recompiling firmware, but it also means your configuration must be meticulous. A small mistake in pin mapping can lead to confusing behavior. Regardless of firmware, the same principles apply: confirm that BLTouch self-test runs correctly, verify that the probe triggers when pressed gently by hand, and ensure the printer stops descending immediately when the trigger occurs. Only after those safety checks should you proceed to automated routines like mesh generation. Firmware is where BLTouch becomes integrated into your workflow, so it’s worth taking the time to get the configuration clean and readable for future maintenance.
Calibrating Z Offset with BLTouch: Methods That Produce Consistent Results
Z offset calibration is the point where BLTouch measurements turn into a usable first layer. The probe can accurately detect the bed, but the nozzle must still be positioned at the right printing height. If the Z offset is too high, the first layer won’t adhere and lines will look rounded with gaps. If it’s too low, the nozzle will scrape, extruder pressure will spike, and you can damage the surface. A consistent method is to calibrate with the bed and nozzle heated to your normal printing temperatures because thermal expansion changes the geometry slightly. After homing, move the nozzle to a reference point, often near the center, and lower Z in small increments until a sheet of paper or a feeler gauge has the desired drag. Record that position through your firmware’s Z offset setting procedure. Save the setting and re-home to confirm repeatability.
Expert Insight
Mount the BLTouch rigidly and square to the bed, then measure and set an accurate Z-offset: home the printer, move to the center, lower Z in small steps until a sheet of paper just drags, and save the offset to EEPROM. Recheck the offset any time you change the nozzle, hotend, or probe mount.
Run a fresh bed mesh at printing temperature and keep the probe pin clean: heat the bed/nozzle to your normal values, perform mesh leveling, and store the mesh for consistent first layers. If probing becomes inconsistent, gently wipe the pin and verify the wiring and connector strain relief to prevent intermittent triggers. If you’re looking for bltouch, this is your best choice.
Consistency also comes from controlling variables. Use the same paper type or gauge each time, keep the nozzle clean (a blob of plastic changes the effective height), and avoid pressing down on the bed while adjusting. After setting Z offset, validate it with a first-layer test pattern across the bed. This is where BLTouch shines: if the mesh is good and the Z offset is right, the pattern should look uniform from corner to corner. If the center is perfect but corners are off, the mesh may not be loading, the offsets may be wrong, or the bed tramming may be too far out for the mesh to compensate. Some users chase Z offset repeatedly when the real issue is that the bed is mechanically tilted or the X gantry is not level. Treat BLTouch as part of a system: calibrate Z offset after you’ve ensured the gantry is square, the bed is reasonably trammed, and the probe mount is rigid.
Creating and Using a Bed Mesh with BLTouch: Practical Workflow
A bed mesh is a map of the bed’s surface height variations. BLTouch probes multiple points in a grid pattern, and the firmware interpolates between them to estimate the height at any location. The mesh density you choose is a balance between speed and detail. A coarse grid probes quickly but might miss small dips or bumps; a dense grid captures more detail but takes longer. Many users start with something like a 3×3 or 5×5 grid and adjust based on results. The probing speed also matters: moving too fast can cause mechanical bounce or missed triggers, while moving too slowly can waste time without improving accuracy. With BLTouch, a moderate probing speed usually provides stable results, especially when the probe mount is solid.
| Option | What it is | Key advantages | Key drawbacks | Best for |
|---|---|---|---|---|
| BLTouch | Contact-based auto bed leveling probe with a deployable pin | Works on most bed surfaces, reliable Z probing, widely supported in Marlin/Klipper | More wiring and mounting complexity, moving parts can clog/fail, needs careful offsets | General-purpose ABL on mixed build surfaces and upgraded hobby printers |
| Inductive probe | Non-contact sensor that detects metal (typically the heated bed plate) | No moving parts, fast probing, simple and durable | Only consistent with metal targets; readings can vary with temperature and bed material/thickness | Printers with a metal bed plate and stable thermal conditions |
| Manual mesh leveling | Firmware-assisted leveling using the nozzle and user adjustments (no probe) | Lowest cost, no extra hardware, avoids probe-related failures | Time-consuming, less repeatable, requires periodic re-tuning | Budget builds or users who prefer minimal hardware changes |
Once a mesh is created, the printer needs to use it. Depending on firmware, you may store the mesh in EEPROM and load it at the start of prints, or you may generate a fresh mesh each time. A stored mesh is faster and often sufficient if your bed and environment are stable. A fresh mesh can be helpful if you frequently remove the build plate, change surfaces, or notice that the bed shifts slightly between sessions. The key is to ensure your start G-code actually activates mesh compensation. Many first-layer problems blamed on BLTouch come from forgetting to load the mesh, so the printer probes once but then prints as if the bed were perfectly flat. A reliable workflow includes homing, optionally probing or loading the mesh, and then moving to the start position. When BLTouch is integrated correctly, the start routine becomes predictable rather than a sequence of manual interventions.
Common BLTouch Problems and How to Diagnose Them Without Guesswork
BLTouch issues often look mysterious because they show up as “random” first-layer failures, but most problems fall into a few categories: mechanical sticking, wiring noise, incorrect offsets, or firmware misconfiguration. A classic symptom is inconsistent probing where the first mesh point looks normal but later points are off. That can happen if the pin is dirty, if the mount flexes more in certain positions, or if the cable tugs as the toolhead moves. Another symptom is the nozzle driving into the bed during homing, which is often caused by the trigger signal not being read correctly. In that case, you should stop immediately and test the BLTouch trigger state through firmware commands, ensuring the signal changes when you press the pin gently. If the signal never changes, the wiring or pin mapping is wrong, or the probe is faulty.
False triggers are another frequent complaint. If BLTouch reports a trigger before the pin touches the bed, the mesh will be too high and the first layer will be too far from the surface. False triggers can be caused by electrical noise or by a loose connector. They can also happen if the pin catches on a string of filament or a piece of debris and retracts unexpectedly. The fastest way to reduce guesswork is to isolate variables: run the BLTouch self-test, run repeated single-point probes in the same location, and observe whether the reported height varies. If it varies a lot, focus on mechanical and electrical stability before changing firmware settings. If it’s stable in one spot but the mesh looks wrong, focus on offsets and bed tramming. BLTouch is deterministic when the system around it is stable, so systematic testing usually reveals the culprit quickly.
BLTouch vs Inductive and Capacitive Probes: Choosing the Right Sensor
BLTouch is not the only way to automate bed leveling, and understanding alternatives helps you decide whether it’s the right choice for your printer. Inductive probes detect metal, which makes them excellent for spring steel sheets on magnetic beds, but less useful for glass or thick non-metal build surfaces unless a metal target is added underneath. Capacitive probes can detect more materials, but they can be sensitive to humidity, temperature, and surface coatings, sometimes requiring frequent recalibration. BLTouch, using a physical pin, is largely material-agnostic, which is a major advantage if you change surfaces or want predictable behavior across different bed setups. The tradeoff is that BLTouch is a mechanical device with moving parts, so it can wear or stick if contaminated.
Another factor is mounting and clearance. Some inductive probes are larger and require more space, while BLTouch is relatively compact and designed for common hotend carriages. Accuracy can be excellent with all sensor types when properly installed, but the error sources differ: inductive sensors can drift with temperature and target distance; capacitive sensors can drift with environmental conditions; BLTouch can vary with mechanical friction or mount flex. Many users choose BLTouch because it works on almost any surface and has broad firmware support, making it a safe default choice for general-purpose printers. If your printer always uses a metal build plate and you prefer a solid-state sensor with no moving pin, an inductive probe might be appealing. The best choice depends on your surface, environment, and tolerance for maintenance. BLTouch remains popular because it solves the most common compatibility problems with a single, widely supported device.
Maintenance and Long-Term Reliability: Keeping BLTouch Accurate Over Time
BLTouch maintenance is mostly about cleanliness and mechanical integrity. Dust, filament hairs, and adhesive residue can accumulate around the pin and affect smooth movement. Periodically inspecting the pin area and gently cleaning it can prevent sticking. It’s also wise to check that the mounting screws remain tight, especially after many hours of printing where vibration can loosen hardware. If your printer uses a printed mount, inspect it for cracks or heat deformation from the hotend environment. A mount that was rigid when new can become flexible over time, and that flexibility can show up as subtle first-layer inconsistency that’s easy to misattribute to firmware or slicer settings. Keeping the toolhead assembly tight and aligned supports BLTouch performance more than most “tuning” tricks.
Long-term reliability also involves revisiting calibration when you change key variables. A new nozzle, a different hotend, a changed fan duct, or a new build surface can alter offsets and first-layer behavior. BLTouch can compensate for surface shape, but it cannot guess a new nozzle length. After hardware changes, re-check Z offset and confirm that probing points still land within the printable area. If you store meshes, consider regenerating them after major changes or after moving the printer to a new table. Even small shifts in how the frame sits can affect bed geometry. With a stable machine, BLTouch can remain accurate for a long time with minimal intervention, but it performs best when treated as part of a calibrated system rather than a one-time install. A quick periodic verification print can catch drift early and keep your first layer dependable.
Integrating BLTouch into Start G-code and Daily Printing Habits
BLTouch delivers the best experience when it’s integrated into a consistent start routine. That routine should include homing, ensuring the probe is ready, and activating mesh compensation. Depending on your firmware, you might choose to load a saved mesh for speed or probe a small grid for each print for maximum consistency. If you often print with the same bed temperature and surface, loading a stored mesh is usually efficient. If you remove the build plate frequently or print materials that require very different temperatures, probing more often can reduce surprises. Another habit that helps is keeping the nozzle clean before probing. A small blob of plastic can change how the nozzle relates to the bed during Z offset checks and can also smear onto the bed during the first line, making it harder to judge adhesion.
Daily habits also include watching the first minute of the print. Even with BLTouch, the first layer is still the foundation. If the skirt or brim shows inconsistent squish, it’s a signal to verify that the mesh is active and the Z offset is still correct. Many users find it helpful to have a simple first-layer calibration file ready, because it provides fast feedback across the bed. Another practical step is to avoid relying on mesh compensation to solve large mechanical issues. If the bed is severely out of tram, the nozzle may still be too close in one area and too far in another, even with compensation, especially on printers with limited Z correction range or flexible beds. BLTouch is strongest when it refines an already reasonable mechanical setup. With that mindset, the probe becomes a dependable part of daily printing rather than a feature you only think about when something goes wrong.
When BLTouch Doesn’t Fix the First Layer: Mechanical Checks That Matter
BLTouch can compensate for bed surface variations, but it cannot correct fundamental mechanical problems. If the X gantry is not level relative to the bed, the probe may create a mesh that changes between sessions because the gantry sags differently depending on where the carriage sits. On some printers, especially those with a single Z lead screw, gantry droop is a real factor. Ensuring the gantry is square, the wheels or linear bearings are adjusted correctly, and the frame is tight often has a bigger impact than changing mesh settings. Bed springs and silicone spacers also influence stability. If the bed shifts slightly when the nozzle moves, the mesh becomes outdated instantly. A stable bed mount and consistent tension on leveling hardware can make BLTouch results far more repeatable.
Another overlooked issue is build surface attachment and thermal behavior. A glass plate that isn’t clipped consistently can lift at edges as it heats. A magnetic sheet that has bubbles or debris under it can create localized high spots that move as the sheet expands. BLTouch will measure what’s there, but if the surface changes during heating or during the print, the mesh is no longer accurate. That’s why probing at temperature is important, and why letting the bed soak for a few minutes can help on thicker surfaces. Also consider nozzle condition: a worn nozzle can extrude inconsistently, making a perfect first-layer height look wrong because the line width varies. If you’ve tuned BLTouch settings repeatedly without improvement, step back and confirm the basics: rigid mount, stable bed, square gantry, clean nozzle, and correct extrusion calibration. BLTouch is a precision sensor, but it depends on a stable platform to deliver precision results.
Final Thoughts on Getting the Most from BLTouch
BLTouch is best viewed as an enabling tool: it reduces the time spent chasing bed imperfections and makes first layers more repeatable, but it doesn’t replace good mechanical setup or careful calibration. A rigid mount, correct wiring, accurate offsets, and a clear firmware configuration are what turn BLTouch from a simple add-on into a reliable part of the printer. When those pieces are in place, mesh compensation becomes something you can trust, and you can focus on dialing in materials, improving cooling, or refining dimensional accuracy rather than constantly adjusting bed knobs. That shift in attention is often the most valuable upgrade: fewer interruptions, fewer failed starts, and more confidence that a print will run the way you expect.
Over time, the most satisfying BLTouch setups tend to be the ones built around consistency: consistent temperatures during probing, consistent start routines, and consistent maintenance checks. If you treat the probe as a precision component and keep the rest of the motion system tight, BLTouch can remain stable for months with only minor Z offset touch-ups after hardware changes. That reliability is why the name BLTouch continues to be recommended for printers that need better first-layer performance across different surfaces and conditions, and why it remains one of the most practical upgrades for everyday 3D printing.
Watch the demonstration video
In this video, you’ll learn what a BLTouch is and how it improves 3D printing by automatically measuring your bed’s surface for better first-layer adhesion. It covers how the sensor works, key setup steps, and common troubleshooting tips so you can get more reliable prints with less manual bed leveling.
Summary
In summary, “bltouch” is a crucial topic that deserves thoughtful consideration. We hope this article has provided you with a comprehensive understanding to help you make better decisions.
Frequently Asked Questions
What is a BLTouch used for on a 3D printer?
A BLTouch is an auto bed leveling probe that measures the bed surface at multiple points to help compensate for tilt/unevenness and improve first-layer consistency.
How does a BLTouch work?
It deploys a small pin to touch the bed and triggers a signal when contact is detected; the printer records the Z height at each probe point to build a mesh or apply leveling corrections. If you’re looking for bltouch, this is your best choice.
Do I still need to manually level the bed with a BLTouch?
Yes—BLTouch compensates for small variations, but you should still roughly level/tram the bed and set the correct Z-offset for best results.
What is Z-offset and why is it important with BLTouch?
Z-offset is the gap between when your **bltouch** probe triggers and where the nozzle tip actually sits. Dialing it in correctly means your nozzle begins the first layer at just the right height—close enough for solid adhesion, but not so close that it scrapes the bed.
Why does my BLTouch flash or fail to deploy/stow?
Common causes include incorrect wiring, wrong firmware settings (probe type/pin), insufficient 5V power, loose connectors, or a pin obstructed by debris or a bent tip.
What firmware features are commonly used with BLTouch?
In most Marlin or Klipper configurations, you’ll set up a probe definition (such as a **bltouch**), enable safe homing, and use bed mesh leveling to map the build surface. The usual workflow is to run **G28** to home the printer, then **G29** to probe and generate the mesh—or trigger the same sequence through the equivalent Klipper macros.
📢 Looking for more info about bltouch? Follow Our Site for updates and tips!

Trusted External Sources
- bltouch: what does it do and how does it work. : r/ender3 – Reddit
Jan 16, 2026 … Basically it probes the bed, usually in a 3×3 grid. It calculates how high each part of the bed is based on the probing and then while printing it will live … If you’re looking for bltouch, this is your best choice.
- BLTouch V2 – antclabs
BLTouch is an auto leveling sensor for 3D Printers that can precisely measure the tilt of Bed surface. It could work with any kinds of bed materials.
- What Even Is The Point Of BLTouch? : r/3Dprinting – Reddit
Jun 5, 2026 … What a BLTouch actually does is probe the bed to build a mesh that the machine will use to make adjustments to the Z axis positions in the gcode …
- Octoprint disconnect – Firmware error – BLTouch
Mar 24, 2026 … Hello everybody Recently I have a problem with Octoprint and BLTouch ( OctoPrint 1.5.3 – Python 2.7.13 – OctoPi 0.16.0) running on a Rpi 3 …
- CR-Touch – same as BLTouch? : r/Creality – Reddit
May 3, 2026 … Just got confirmation from Creality that having a BLTouch enabled firmware (on a 32bit board) is all that’s needed to make the CR-Touch work.