An sla printer is a type of resin-based 3D printing system that forms parts by curing liquid photopolymer resin with light, traditionally a laser in classic stereolithography and sometimes other controlled light sources in closely related technologies. The defining characteristic is the ability to create extremely fine features, smooth surfaces, and accurate geometries compared with many filament-based approaches. That combination makes the sla printer a preferred choice for applications where detail is non-negotiable, such as dental models, jewelry masters, miniature figurines, engineering prototypes, and small functional parts with tight tolerances. Because the process builds objects in thin layers inside a resin vat, the surface finish often looks closer to injection-molded plastic than to “layered” 3D printing, especially when layer heights are tuned for quality. The trade-off is that resin printing introduces more handling steps, including washing, post-curing, and careful management of chemicals. Even so, modern equipment and safer resin formulations have made the workflow far more approachable for studios, labs, and small manufacturers that want production-grade detail without investing in industrial tooling.
Table of Contents
- My Personal Experience
- Understanding What an SLA Printer Is and Why It Matters
- How SLA Printing Works: Core Process and Key Components
- SLA vs. Other Resin and Filament Technologies: Choosing the Right Approach
- Key Specifications That Define SLA Printer Performance
- Materials and Resin Types: From Standard to Engineering and Specialty
- Design and Orientation Strategies for Better Results
- Post-Processing Workflow: Washing, Curing, and Finishing
- Safety, Ventilation, and Responsible Resin Handling
- Expert Insight
- Common Print Failures and How to Troubleshoot Them
- Maintenance and Calibration for Long-Term Reliability
- Applications: Where SLA Printing Delivers Real Business Value
- Cost Considerations: Beyond the Machine Price
- Buying Guide: How to Select the Right SLA Printer for Your Needs
- Getting the Best Results Over Time: Process Control and Continuous Improvement
- Watch the demonstration video
- Frequently Asked Questions
- Trusted External Sources
My Personal Experience
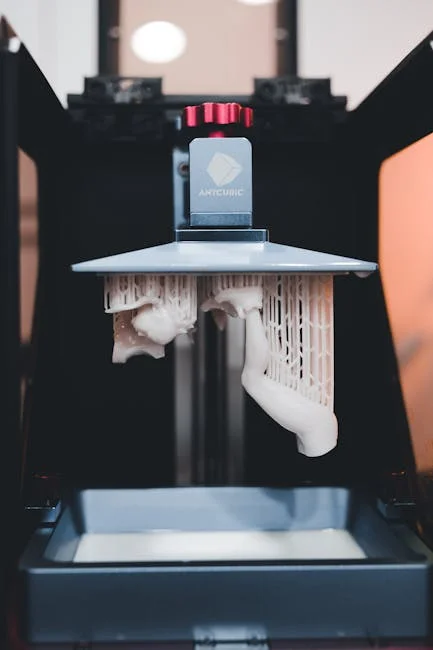
I bought a small SLA printer to make detailed miniatures, thinking it would be as simple as hitting “print,” but the learning curve was real. My first few attempts failed because I didn’t level the build plate properly and I underestimated how much temperature and resin settings matter. Once I dialed in the exposure time and started warming the room a bit, the prints suddenly came out crisp—tiny edges and textures I could never get from my old FDM machine. The messy part surprised me most: gloves, paper towels, and the constant smell of resin until I set up a basic ventilation fan. Now I keep a routine—print, rinse in IPA, cure, and clean the vat—and it’s honestly satisfying seeing a part go from a sticky blob to a solid, detailed piece I can actually use.
Understanding What an SLA Printer Is and Why It Matters
An sla printer is a type of resin-based 3D printing system that forms parts by curing liquid photopolymer resin with light, traditionally a laser in classic stereolithography and sometimes other controlled light sources in closely related technologies. The defining characteristic is the ability to create extremely fine features, smooth surfaces, and accurate geometries compared with many filament-based approaches. That combination makes the sla printer a preferred choice for applications where detail is non-negotiable, such as dental models, jewelry masters, miniature figurines, engineering prototypes, and small functional parts with tight tolerances. Because the process builds objects in thin layers inside a resin vat, the surface finish often looks closer to injection-molded plastic than to “layered” 3D printing, especially when layer heights are tuned for quality. The trade-off is that resin printing introduces more handling steps, including washing, post-curing, and careful management of chemicals. Even so, modern equipment and safer resin formulations have made the workflow far more approachable for studios, labs, and small manufacturers that want production-grade detail without investing in industrial tooling.
To understand why the sla printer has earned a reputation for precision, it helps to look at how the curing happens. A controlled beam or projected pattern selectively solidifies resin at specific coordinates, and each new layer bonds to the previous one. Because light can be focused very precisely, the XY detail can be exceptional, and Z detail can be tuned by selecting a thinner layer height. The result is a printing method that excels at crisp edges, embossed text, smooth curves, and complex organic shapes. However, the same physics that creates high fidelity also introduces design considerations: supports are usually required for overhangs, hollow parts must be properly vented and drained, and orientation strongly affects surface quality and success rates. Material properties vary widely, too; some resins are brittle, others are engineered for toughness, flexibility, heat resistance, or biocompatibility. Choosing an sla printer is therefore not only about the machine, but also about matching resin performance, workflow discipline, and post-processing capabilities to the end use. When those variables are aligned, resin printing becomes a powerful bridge between concept and finished product.
How SLA Printing Works: Core Process and Key Components
The workflow of an sla printer can be broken into a few repeating steps: prepare the build, expose resin to light to form a layer, separate the cured layer from the vat interface, and repeat until the part is complete. The machine’s main components typically include a resin vat, a build platform, an optical system (laser and galvanometers in classic SLA, or other controlled exposure optics in similar resin systems), motion stages, and firmware that coordinates exposure timing with movement. During printing, the platform moves in small increments, and each layer is exposed based on sliced data from a 3D model. The exposure creates a solid cross-section that adheres to the previous layer. After each layer cures, the printer performs a peel or separation motion to release the layer from the vat’s window or film, then the platform repositions for the next exposure. This peel step is critical: it influences print reliability, surface finish, and the forces that can cause failures like delamination or support breakage. Many modern resin machines optimize peel mechanics to reduce suction forces, which is especially important for large cross-sectional areas.
Beyond the core mechanics, the success of an sla printer depends on calibration, environment, and material handling. Resin viscosity changes with temperature, so a cold room can lead to slower flow and inconsistent layer formation, while a warmer controlled environment generally improves repeatability. Exposure settings must match the resin: too little exposure causes soft layers and weak supports, while too much exposure can blur fine features and reduce dimensional accuracy. The optical path must remain clean, and the vat window or film must be free of clouding and scratches to maintain consistent curing. Even the build platform’s flatness and leveling matter because the first layers determine adhesion and dimensional stability. In professional workflows, operators track resin batches, filter resin after prints, and maintain a consistent post-cure process to achieve predictable mechanical properties. When viewed as a system, an sla printer is less “press print and walk away” than some other 3D methods, yet the payoff is high-end surface quality and small-feature reproduction that is difficult to match by extrusion-based printing.
SLA vs. Other Resin and Filament Technologies: Choosing the Right Approach
Comparing an sla printer with other 3D printing technologies is easiest when you focus on what you need: surface finish, accuracy, speed, part strength, and total cost of ownership. Filament-based FDM/FFF printers are often cheaper to run and easier to handle, with materials like PLA, PETG, and nylon offering a wide range of mechanical properties. They also excel at larger parts and functional brackets where surface aesthetics are secondary. However, FDM typically shows layer lines, struggles with tiny embossed details, and can require significant sanding or filler work for smooth cosmetic surfaces. Resin printing, by contrast, can deliver near-production aesthetics out of the printer, especially for organic shapes, jewelry patterns, dental models, and miniatures. That’s where an sla printer shines: it produces crisp, clean geometry with consistent fine details and smooth curves.
Within resin printing itself, there are distinctions between classic SLA and other light-based systems that cure resin in layers. Some machines use a scanning laser; others cure whole layers using projected patterns. The user experience can be similar—resin vat, supports, washing, and post-curing—but the performance profile changes. A scanning laser approach can provide excellent accuracy and smooth results, while layer-projection approaches can be faster on certain geometries because each layer exposure is not dependent on tracing every contour. When deciding between an sla printer and alternative resin systems, look beyond marketing terms and evaluate practical outcomes: achievable XY resolution, consistency across the build area, reliability of peel mechanics, availability of validated resin profiles, and ecosystem support for wash and cure equipment. Also consider what happens after printing: if you need high heat deflection, impact resistance, or long-term UV stability, resin choice matters as much as machine choice. The right decision often comes down to the intended application and the discipline you can bring to post-processing and safety.
Key Specifications That Define SLA Printer Performance
Evaluating an sla printer requires more than checking build volume and advertised resolution. The most meaningful specifications include XY accuracy and repeatability, Z step precision, optical spot size or effective pixel size (depending on the exposure system), and the uniformity of exposure across the build area. A printer may claim extremely fine layer heights, but the practical quality depends on how well the machine controls peel forces, maintains resin temperature, and keeps the optical path stable. Build volume matters, yet it’s often better to choose a machine that delivers consistent results within a slightly smaller envelope than a larger machine that is harder to keep calibrated. If you regularly print tall, thin structures, Z-axis stability and lead screw quality become important; if you print large flat surfaces, peel mechanics and suction management become critical. Another overlooked factor is the availability of replacement consumables such as vat films, resin tanks, and optical protective layers, along with their cost and lead times.
Software and ecosystem support also define real-world performance. Slicing tools determine how supports are generated, how hollowing and drain holes are handled, and how exposure parameters are applied. A strong resin library with tested profiles can save a tremendous amount of trial and error, especially for engineering-grade resins that have narrow processing windows. Monitoring features, print logs, and remote management can also matter if the sla printer will be used in a lab or small production environment. Finally, consider dimensional accuracy as a system outcome, not a single spec: resin shrinkage, post-cure conditions, and wash time all influence final dimensions. If you need precise fits, you’ll likely develop compensation values and a standardized post-processing routine. When you treat the sla printer like a controlled manufacturing tool—rather than a hobby device—you can achieve repeatable, high-quality parts that meet demanding aesthetic and functional requirements.
Materials and Resin Types: From Standard to Engineering and Specialty
The resin you choose can transform what an sla printer can produce, because the photopolymer chemistry determines stiffness, toughness, flexibility, heat resistance, and even color stability. Standard resins are often optimized for detail and surface finish, making them ideal for prototypes, presentation models, and decorative objects. These materials can be relatively brittle, especially in thin sections, but they deliver sharp edges and smooth surfaces with minimal effort. Tough or ABS-like resins aim to improve impact resistance and reduce brittleness, making them better for snap fits, enclosures, and functional testing. Flexible and elastic resins can produce parts like gaskets, grips, and wearable components, though they may require careful support strategies and tuned exposure because soft materials can deform during peeling. High-temperature resins target applications such as molds for low-temperature casting, fixtures exposed to heat, or prototypes that must survive elevated temperatures without warping.
Specialty resins expand the sla printer into professional domains. Dental resins can be formulated for models, surgical guides, splints, and temporary restorations, often requiring validated workflows and specific post-curing to meet standards. Castable resins are popular in jewelry and investment casting, where clean burnout and minimal ash content are essential for crisp metal results. Biocompatible resins may be used for skin-contact applications under controlled conditions, but they require strict adherence to manufacturer guidelines, certified post-processing, and careful documentation. There are also resins engineered for high stiffness, low creep, and improved long-term stability, which are useful for jigs, fixtures, and small end-use parts. No matter the type, resin handling discipline matters: store bottles away from light, mix thoroughly without introducing excessive bubbles, filter resin to remove cured debris, and keep exposure profiles consistent. The combination of the right resin and a well-tuned sla printer setup is what turns impressive-looking prints into reliable, application-ready parts.
Design and Orientation Strategies for Better Results
Designing for an sla printer involves thinking about supports, drainage, and how each layer will separate from the vat. Orientation is one of the most powerful levers for print quality and success. Angling a part can reduce the cross-sectional area per layer, which lowers peel forces and can dramatically reduce failures. It can also move support contact points away from critical cosmetic surfaces. However, angling can introduce subtle layer stepping on shallow slopes, so the best orientation is usually a balance between minimizing supports on visible faces and maintaining smooth curvature where it matters. Thin walls and delicate features can print beautifully in resin, but they may require additional supports to prevent wobble and distortion during peel. For parts with precise holes or mating surfaces, consider printing those features in orientations that minimize distortion and support scarring, and plan for light finishing like reaming or sanding if a press fit is required.
Hollowing is common in resin printing to reduce material use and shorten cure times, but it must be done thoughtfully. A hollow model needs drainage holes placed so uncured resin can escape during washing and so trapped resin does not cause cracking over time. Internal cavities should allow wash solvent to circulate, and walls should be thick enough to resist deformation during printing and post-cure. For large hollow parts, adding internal lattice structures or ribs can improve stiffness without excessive resin usage. Support strategy also matters: too few supports can cause sagging and layer shifts, while too many supports create unnecessary cleanup and surface blemishes. Good support design uses heavier supports for load-bearing sections and lighter supports for fine details, with contact points tuned to remove cleanly. A mature workflow with an sla printer often includes creating a few “house rules” for wall thickness, hole sizes, embossing depth, and drain hole placement, so prints remain consistent across projects and operators.
Post-Processing Workflow: Washing, Curing, and Finishing
Post-processing is where an sla printer workflow differs most from filament printing, and it is also where many quality gains are won or lost. After a print completes, the part is coated in uncured resin that must be removed, typically using a solvent wash. Common washing solutions include isopropyl alcohol (IPA) or specialized resin cleaners, and the goal is to dissolve and remove surface resin without over-washing. Over-washing can lead to surface whitening, micro-cracking, or swollen features depending on resin chemistry and solvent strength. Many operators use a two-stage wash: a “dirty” bath to remove most resin, followed by a “clean” bath to finish. Agitation helps, whether through a wash station, magnetic stirring, or gentle manual movement. Once washed, parts should be dried thoroughly so solvent does not interfere with curing and so surfaces remain consistent.
Post-curing completes the polymerization and stabilizes mechanical properties. A controlled cure environment with the correct wavelength and temperature is important, especially for engineering and dental materials where strength and dimensional stability are tied to cure completeness. Under-curing can leave parts tacky or weak, while over-curing can increase brittleness and cause warping in thin sections. Support removal is usually easier after a short cure that firms the surface, but some resins benefit from removing supports before full cure to reduce scarring. Finishing steps can include sanding, filing support marks, priming, painting, clear coating, or vapor smoothing alternatives depending on resin type and intended look. For transparent resins, progressive sanding and polishing can produce glass-like clarity, though it requires careful technique. When post-processing is standardized—wash times, solvent freshness, cure duration, and finishing steps—the sla printer becomes a predictable production tool rather than an experimental device.
Safety, Ventilation, and Responsible Resin Handling
Working with an sla printer requires a realistic approach to safety because photopolymer resins and solvents are chemicals that can irritate skin, eyes, and respiratory systems. Personal protective equipment is not optional in a professional workflow: nitrile gloves are commonly used, and safety glasses reduce risk from splashes during washing. Resin should not contact skin, and contaminated gloves should not touch door handles, keyboards, or tools that will be handled bare-handed later. Proper ventilation matters, particularly when printing in small rooms, because resin odors and solvent vapors can accumulate. While odor is not a perfect indicator of hazard, it often correlates with volatile compounds that you do not want concentrated in your breathing zone. A dedicated printing area with good airflow, enclosed machines, and sealed solvent containers helps keep exposure low and the workspace cleaner.
| Aspect | SLA Printer (Stereolithography) | FDM Printer (Filament) | DLP/MSLA Printer (Resin) |
|---|---|---|---|
| Print quality & detail | Very high detail and smooth surfaces; excellent for miniatures, dental, jewelry, prototypes | Moderate detail; visible layer lines; best for functional parts and larger prints | High detail and smooth surfaces; often comparable to SLA for many applications |
| Speed & throughput | Typically slower; point-by-point laser curing per layer | Moderate; depends on nozzle size, layer height, and infill | Often faster per layer; cures an entire layer at once (projector/LCD) |
| Cost, materials & post-processing | Higher resin cost; requires washing/curing and careful handling; supports usually needed | Lower material cost; minimal post-processing; wide range of filaments | Resin cost and post-processing similar to SLA; LCD screens can be consumables |
Expert Insight
Dial in exposure with a simple calibration print before starting a new resin or changing room temperature. Adjust exposure in small steps and confirm details like sharp edges and clean holes; this prevents brittle parts from overexposure and failed layers from underexposure. If you’re looking for sla printer, this is your best choice.
Improve reliability and surface finish by controlling resin handling: warm resin to a consistent temperature, stir gently to re-suspend pigments, and keep the vat and build plate spotless. After printing, rinse thoroughly, remove supports while the part is slightly flexible, then post-cure evenly to avoid warping. If you’re looking for sla printer, this is your best choice.
Spill control and waste management are equally important. Resin spills should be absorbed with disposable towels and cured under UV light before disposal, following local regulations. Used solvent becomes contaminated with resin and should be handled as chemical waste or processed using appropriate methods, such as allowing resin to settle and curing residues before disposal, again depending on local rules. Tools like funnels, filters, and silicone mats make handling safer and reduce mess. Keeping resin bottles labeled, dated, and stored away from sunlight prevents accidental curing and maintains material performance. A well-managed sla printer setup also protects the machine itself: cured resin debris in the vat can puncture vat films and damage optical windows, leading to expensive repairs. When safety and cleanliness are built into the daily routine, resin printing becomes far more enjoyable and reliable, and the workspace remains professional and compliant with sensible handling practices.
Common Print Failures and How to Troubleshoot Them
Even a well-maintained sla printer can experience failures, and understanding the root causes saves time and resin. One common issue is poor bed adhesion, where prints detach from the build platform early. This can stem from inadequate initial exposure, a build platform that is not properly leveled, resin that is too cold or poorly mixed, or a platform surface that is contaminated. Increasing bottom exposure and bottom layer count can help, but it should be done carefully to avoid excessive “elephant foot” at the base. Another frequent failure is support detachment or breakage, often caused by insufficient support density, undersized contact points, or peel forces that are too high for the chosen orientation. Adjusting orientation to reduce cross-sectional area, adding stronger supports in high-stress regions, and ensuring exposure settings match the resin can improve success rates. Layer delamination can occur when exposure is too low, when resin is old or contaminated, or when mechanical issues cause inconsistent Z movement.
Surface defects can also appear in resin printing. “Z-banding” or repeated horizontal lines may indicate Z-axis wobble, debris on the lead screw, inconsistent peel, or temperature fluctuations affecting resin viscosity. Random bumps or pockmarks can come from trapped bubbles, floating cured bits in the vat, or dust contamination. Cloudy or hazy surfaces may be linked to over-washing, solvent contamination, or incomplete drying before cure. Dimensional inaccuracies can be caused by resin shrinkage during cure, overexposure that swells features, or inconsistent post-curing conditions. A troubleshooting mindset treats the sla printer as a controlled process: change one variable at a time, keep notes on resin batch, temperature, exposure, and orientation, and inspect the vat and platform between runs. With a disciplined approach, most issues become predictable and preventable, turning failures into a short learning loop instead of a recurring frustration.
Maintenance and Calibration for Long-Term Reliability
Regular maintenance keeps an sla printer producing consistent parts and prevents small issues from becoming costly repairs. The resin vat is a consumable component in many systems, especially the transparent film or window that sits between the resin and the optical source. Over time, that surface can become cloudy, scratched, or punctured by cured debris, which reduces exposure consistency and increases failure rates. Filtering resin after prints and inspecting the vat for cured fragments helps extend its life. The build platform should be cleaned and checked for flatness, as residue buildup can reduce adhesion and create uneven first layers. Optical surfaces and protective windows should be kept clean according to manufacturer guidance; using improper cleaners can damage coatings and cause hazing. Mechanical components like the Z-axis lead screw and rails may need periodic lubrication and dust removal to prevent binding and banding artifacts.
Calibration is not a one-time event. Resin printing is sensitive to changes in ambient temperature, resin age, and even slight mechanical shifts. Many operators run exposure calibration prints when switching resin types or when a new bottle behaves differently than the previous one. Keeping a consistent environment helps, but production-grade reliability often comes from documenting settings and validating changes. If the sla printer is used for dimension-critical parts, it is wise to establish a repeatable post-processing routine and measure final dimensions after cure, then apply compensation in the slicer when needed. Firmware and software updates should be approached thoughtfully: they can improve print quality and features, but they can also change exposure behavior or motion profiles. A stable workflow often includes testing updates on non-critical jobs before deploying them broadly. With consistent maintenance, a resin printer can remain accurate and dependable for years, supporting both rapid prototyping and small-batch manufacturing needs.
Applications: Where SLA Printing Delivers Real Business Value
The strongest argument for an sla printer is not novelty; it is the ability to deliver high-detail parts quickly enough to influence real decisions and real products. In product design, resin prototypes help teams evaluate ergonomics, aesthetics, and assembly fit before committing to expensive tooling. Smooth surfaces and fine features allow prototypes to look like finished goods, which improves stakeholder feedback and reduces miscommunication. In dental and orthodontic workflows, resin printing supports accurate models, aligner molds, and surgical planning components, often with predictable turnaround times that fit clinical schedules. Jewelry and luxury goods benefit from castable resins that produce intricate masters for investment casting, enabling complex geometries that would be difficult or time-consuming to carve by hand. Miniatures, collectibles, and figurines are another obvious fit: resin printing captures textures, facial details, and sharp edges that define premium quality in that market segment.
Engineering applications are expanding as resin chemistries improve. Tough and heat-resistant resins can produce jigs, fixtures, and custom tooling for assembly lines, especially when the parts are small and require precise geometry. Transparent resins can be used for light pipes, fluidic prototypes, or visual inspection components, though optical clarity may require careful finishing. Small-batch production is feasible for certain product categories, particularly where customization is valued and volumes do not justify injection molding. The key is understanding the limits: some resin parts can be sensitive to UV exposure over long periods, and certain formulations remain more brittle than thermoplastics. Still, when used appropriately, an sla printer can reduce lead times from weeks to hours, compress design cycles, and enable localized manufacturing. That speed-to-detail ratio is why resin printing continues to move from hobby spaces into professional labs, workshops, and small factories.
Cost Considerations: Beyond the Machine Price
Budgeting for an sla printer should include more than the upfront cost of the printer. Consumables and workflow equipment often shape the true cost per part. Resin is typically more expensive per kilogram than filament, and failed prints can be costlier because they consume resin, time, and solvent. A wash and cure setup can be essential for consistent results, and it should be considered part of the core system rather than an optional accessory. Replacement vats, films, build plates, and filters add ongoing costs, as do gloves, wipes, and cleaning supplies. Solvent costs can be significant in high-throughput environments, and safe storage containers and ventilation improvements may be required depending on local standards and the scale of operations. If you plan to print engineering resins, expect to spend more on material and to invest more time in dialing in exposure and post-cure routines.
Labor is another major component. Resin printing includes steps that are easy to underestimate: preparing files, orienting parts, building supports, loading resin, removing prints, washing, drying, curing, support removal, and finishing. In a business setting, reducing hands-on time can be as valuable as reducing resin usage. Consistent profiles, standardized supports, and batch processing can reduce labor per part. The cost picture also depends on the value of the output: if a resin prototype prevents a tooling mistake or accelerates a product launch, the return can dwarf material costs. Likewise, for dental labs and jewelry studios, the ability to produce precise parts on demand can replace outsourced services and shorten delivery times. A realistic cost model treats the sla printer as part of a production cell, with materials, consumables, labor, and quality control all included in the calculation.
Buying Guide: How to Select the Right SLA Printer for Your Needs
Choosing an sla printer starts with defining the jobs you actually need to run: small highly detailed parts, dimension-critical prototypes, cosmetic models, or functional components. Build volume should match your typical part size, but reliability and repeatability often matter more than maximum capacity. If your workflow demands consistent accuracy across the platform, look for strong mechanical design, stable Z-axis construction, and an optical system known for uniform exposure. Consider the availability of validated resin profiles, especially if you need specialty materials like castable, dental, or high-temperature formulations. The software experience matters too: efficient support tools, good hollowing and drainage features, and reliable slicing reduce trial and error. For production use, features like resin level monitoring, failure detection, and easy vat swaps can reduce downtime and improve throughput.
Support and ecosystem can be decisive. A printer backed by responsive technical support, readily available spare parts, and an active user community can reduce risk, particularly when resin printing becomes part of a business operation. Evaluate the full workflow: wash and cure equipment, ventilation, storage, and waste handling. Also consider where the printer will live; resin printing is cleaner when it has a dedicated space with controlled temperature and surfaces that are easy to wipe down. Finally, think about the learning curve and standardization. A good sla printer is not only capable of high detail, but also predictable when multiple people operate it. When the machine, resins, slicer profiles, and post-processing steps are aligned, you gain a repeatable process that produces professional results with fewer surprises, making the investment worthwhile for both creative and industrial use cases.
Getting the Best Results Over Time: Process Control and Continuous Improvement
Long-term success with an sla printer comes from process control rather than constant experimentation. Consistency begins with environmental stability: maintaining a repeatable temperature range, keeping resin bottles sealed and stored properly, and using the same wash and cure routine for a given resin. Documentation helps more than many people expect. Recording resin brand and batch, exposure settings, layer height, orientation notes, and post-cure time makes it easier to reproduce a great result and to diagnose a bad one. When a change is necessary—new resin, new vat film, updated slicer—testing with calibration pieces and a small set of known models reduces risk. Over time, you can build a library of validated settings that turn resin printing into a predictable manufacturing step. That predictability is what allows teams to schedule prints, estimate costs, and trust dimensions.
Quality improvements also come from refining design rules and finishing standards. If support marks are a recurring issue, adjusting orientation and contact sizes can reduce cleanup. If dimensional drift appears, standardizing cure time and temperature can tighten tolerances. If surface haze occurs, controlling wash solvent freshness and drying time can improve clarity and paint adhesion. Many users find that a few small upgrades—better filtration, dedicated tools for resin handling, improved ventilation, and a disciplined cleaning routine—make the sla printer easier to operate and more reliable. When the workflow is stable, you can focus on higher-value work: improving part design, experimenting with advanced resins, and delivering consistent output to clients or internal stakeholders. The final measure of maturity is simple: the sla printer produces the expected result repeatedly, with minimal rework, and the last print of the month looks as clean and accurate as the first.
Watch the demonstration video
In this video, you’ll learn the basics of SLA (stereolithography) 3D printing—how resin printers work, what parts and settings matter most, and how to get clean, accurate prints. It also covers essential safety, common print failures, and the key post-processing steps like washing and curing to achieve strong, detailed results. If you’re looking for sla printer, this is your best choice.
Summary
In summary, “sla printer” is a crucial topic that deserves thoughtful consideration. We hope this article has provided you with a comprehensive understanding to help you make better decisions.
Frequently Asked Questions
What is an SLA printer?
An **sla printer** is a resin-based 3D printer that uses UV light—either from a laser or an LCD screen—to cure liquid photopolymer resin layer by layer, gradually forming it into a solid, detailed part.
What are the main advantages of SLA printing?
An **sla printer** is known for producing exceptionally detailed prints with a smooth surface finish, capturing fine features and maintaining tight tolerances—often outperforming many filament (FDM) printers in precision and overall print quality.
What are the downsides of SLA printing?
Resin can be messy and requires careful handling, prints usually need washing and UV curing, parts can be more brittle depending on resin, and consumables (resin, gloves, filters) add cost. If you’re looking for sla printer, this is your best choice.
What post-processing is required for SLA prints?
After printing with an **sla printer**, you’ll usually drain off excess resin, rinse the part in IPA (or a resin-specific cleaner), remove the supports, and then post-cure it under UV light. If you want an even smoother, ready-to-paint finish, you can also sand and prime the surface.
How do I choose the right resin for an SLA printer?
Choose your resin by balancing mechanical requirements (standard, tough, flexible, or high‑temp), the look you want (clear or colored), and your specific application (dental, castable, or engineering). Then double-check that it’s compatible with your **sla printer**, especially the light wavelength it uses—most commonly 405 nm.
What safety precautions should I take with SLA resin printing?
Use nitrile gloves and eye protection, ensure good ventilation, avoid skin contact, keep resin off food surfaces, cure and dispose of waste properly, and store resin away from light and heat. If you’re looking for sla printer, this is your best choice.
📢 Looking for more info about sla printer? Follow Our Site for updates and tips!

Trusted External Sources
- Formlabs: High Resolution SLA and SLS 3D Printers for Professionals
Formlabs is the largest supplier of professional stereolithography (SLA) and selective laser sintering (SLS) 3D printers in the world.
- When will we see a new SLA printer? : r/prusa3d – Reddit
Dec 20, 2026 … Now that Prusa has officially announced the SLX, it’s got a lot of us wondering: when will we see the next update to their consumer **sla printer** lineup?
- Neo® Stereolithography 3D Printers – Stratasys
Neo® open-resin stereolithography additive manufacturing systems deliver high-quality parts with exceptional surface finish, precision, and fine detail—making each **sla printer** a reliable choice for producing accurate, professional-grade components.
- Stereolithography – Wikipedia
Stereolithography is a 3D printing process that builds models, prototypes, patterns, and end-use parts one ultra-thin layer at a time by curing liquid resin with light. With an **sla printer**, you can achieve exceptionally smooth surfaces, crisp details, and reliable accuracy—making it a popular choice for everything from product design and engineering tests to dental, jewelry, and small-batch manufacturing.
- DLP Resin in an SLA printer? : r/resinprinting – Reddit
On Jul 27, 2026, we noted that DLP resins can capture finer resolution and sharper details than standard resins—making them an excellent match for 6K–8K+ machines. If you’re aiming for crisp, high-definition prints, pairing these resins with a high-resolution **sla printer** is an ideal setup.