Tesla home charger installation is one of those upgrades that quickly changes how an electric vehicle fits into everyday life. Instead of planning errands around public charging availability, home charging turns your driveway or garage into a dependable fueling point that works while you sleep, work, or relax. The biggest advantage is consistency: you wake up with the range you intended to have, rather than whatever you happened to find at a nearby station. That reliability matters even more in areas where public chargers are busy, broken, or simply too far away to be convenient. A well-planned setup also protects the vehicle’s charging equipment and your home’s electrical system, because proper wire sizing, breaker protection, and safe cable routing prevent heat buildup and nuisance trips that can occur with improvised solutions. Many drivers start with a basic outlet and later decide they want faster charging, better cable management, and more predictable performance; thoughtful preparation helps avoid paying twice for the same work.
Table of Contents
- My Personal Experience
- Planning a Tesla Home Charger Installation for Daily Convenience
- Choosing the Right Tesla Charging Equipment for Your Space
- Evaluating Your Electrical Panel and Service Capacity
- Understanding Charging Speed, Amperage, and Real-World Range Added
- Permits, Inspections, and Code Compliance for Safe Charging
- Professional Electrician vs. DIY: Practical and Safety Considerations
- Step-by-Step Overview of a Typical Installation Process
- Expert Insight
- Placement, Cable Routing, and Weather Protection for Indoor or Outdoor Setups
- Costs, Quotes, and What Drives the Price Up or Down
- Utility Rates, Smart Charging, and Managing Electricity Use
- Common Mistakes to Avoid and How to Ensure Long-Term Reliability
- Final Checks, First Charge, and Getting the Most from Your Setup
- Watch the demonstration video
- Frequently Asked Questions
- Trusted External Sources
My Personal Experience
When I bought my Model 3, I figured I could get by on a regular outlet for a while, but it got old fast—especially after a couple of late-night charging sessions that barely added any range. I ended up scheduling a Tesla Wall Connector installation and had an electrician come out to check my panel and the run to the garage. The biggest surprise was that my main panel was close to full, so we had to add a couple of tandem breakers to make room for a new 60-amp circuit. The install itself was straightforward: they mounted the charger next to the garage door, ran conduit cleanly along the wall, and set the breaker and amperage so it matched the wiring. Once it was up, the difference was immediate—plugging in takes two seconds, it charges overnight without me thinking about it, and I stopped planning my week around public chargers. If you’re looking for tesla home charger installation, this is your best choice.
Planning a Tesla Home Charger Installation for Daily Convenience
Tesla home charger installation is one of those upgrades that quickly changes how an electric vehicle fits into everyday life. Instead of planning errands around public charging availability, home charging turns your driveway or garage into a dependable fueling point that works while you sleep, work, or relax. The biggest advantage is consistency: you wake up with the range you intended to have, rather than whatever you happened to find at a nearby station. That reliability matters even more in areas where public chargers are busy, broken, or simply too far away to be convenient. A well-planned setup also protects the vehicle’s charging equipment and your home’s electrical system, because proper wire sizing, breaker protection, and safe cable routing prevent heat buildup and nuisance trips that can occur with improvised solutions. Many drivers start with a basic outlet and later decide they want faster charging, better cable management, and more predictable performance; thoughtful preparation helps avoid paying twice for the same work.
Before any tools come out, it helps to map your charging habits and the physical layout of your property. Consider where the car usually parks, how often you drive, and whether you want the cable to reach a second parking spot. For a garage, wall space near the front fender area is often ideal, but outdoor installs can be just as effective when weather-rated equipment and correct conduit practices are used. Also consider future needs: a second EV, a longer commute, or time-of-use electric rates that reward faster overnight charging. Tesla home charger installation choices often come down to balancing speed, cost, and complexity. A higher-amperage circuit can deliver more miles per hour of charging, but may require panel upgrades or load management. Planning also means understanding local permitting, HOA requirements, and the best path for wiring from the electrical panel to the charger. When these factors are decided early, the installation is cleaner, safer, and less disruptive to your home.
Choosing the Right Tesla Charging Equipment for Your Space
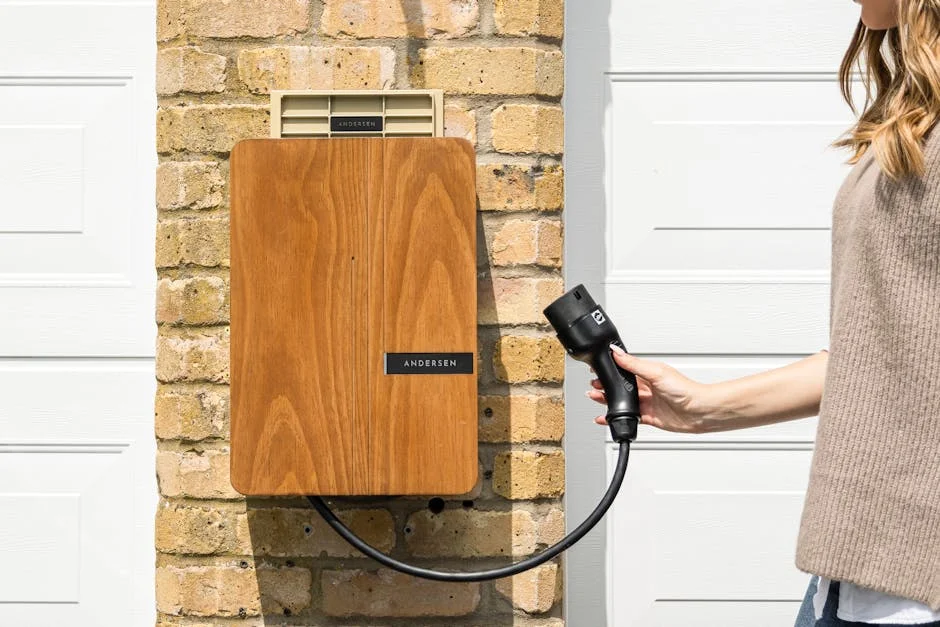
One of the first decisions in a Tesla home charger installation is selecting the hardware that matches your driving pattern and the electrical capacity of your home. Many owners choose the Tesla Wall Connector for its integrated cable management, durable build, and ability to support higher charging rates when paired with the right circuit. Others prefer a NEMA 14-50 or similar outlet with a portable charging cable, especially when flexibility matters or when a simpler setup fits a modest daily mileage. The right choice depends on more than just peak charging speed. A hardwired wall unit can be more robust for long-term use and can reduce the number of plug/unplug cycles that wear outlets over time. It also tends to look tidier and can be positioned for optimal cable reach, which reduces trip hazards and avoids accidentally pinching the cable under a garage door.
It’s also worth considering compatibility and future-proofing. Tesla’s charging ecosystem can work alongside other EVs when adapters or universal connectors are involved, and some households prefer a setup that can serve more than one brand. Power sharing features, where supported, can be valuable if two EVs will charge in the same location, because it may allow you to avoid a costly service upgrade by intelligently distributing available amperage. For outdoor placements, weather resistance, mounting height, and protection from impact become important, especially in tight driveways. A Tesla home charger installation should account for cable length, because a cable that is too short forces awkward parking or repeated strain on the connector, while an excessively long cable can create clutter and wear points if it’s constantly dragged across the ground. Choosing equipment that suits the environment and usage pattern sets the stage for a smoother electrical design and a better day-to-day experience.
Evaluating Your Electrical Panel and Service Capacity
The electrical panel is the heart of any Tesla home charger installation, because it determines how much additional load your home can safely support. Many houses have enough spare capacity to add a dedicated circuit for EV charging, but the answer depends on the service size (often 100A, 150A, or 200A), the number of existing high-demand appliances, and how the panel is configured. Electric ranges, dryers, HVAC systems, pool equipment, and hot tubs can all reduce the available headroom. A qualified electrician typically performs a load calculation to determine whether the panel can accommodate a new continuous load without exceeding safe limits. EV charging is considered a continuous load because it can run for hours, which means the circuit and breaker must be sized with that in mind. This is one reason a professional assessment matters: it ensures the charger operates reliably without overheating conductors or causing frequent breaker trips.
If the panel is crowded or the service is undersized, there are still multiple paths forward. Sometimes a simple panel reorganization or a subpanel can create space for a new breaker. In other cases, a service upgrade may be recommended, especially if you want high-amperage charging and also plan to electrify other appliances over time. A growing number of homes use load management devices that monitor total household consumption and reduce EV charging power when the home load spikes. This can allow a Tesla home charger installation to proceed even when service capacity is tight, while still keeping everything within safe limits. The best solution depends on local code, utility rules, and your tolerance for complexity. Taking the time to evaluate the panel early prevents surprises such as a failed inspection, an unexpectedly expensive upgrade, or a charger that can’t be configured to the speed you expected. A careful evaluation also helps determine the most efficient wiring route, which can significantly affect labor cost and how invasive the work will be.
Understanding Charging Speed, Amperage, and Real-World Range Added
Charging speed is often the headline feature people focus on, but the practical goal of a Tesla home charger installation is matching overnight charging capability to real driving needs. Charging rate is influenced by the circuit amperage, the charger’s settings, the vehicle’s onboard charging limits, and the supply voltage. In many homes, a 240V circuit provides a meaningful jump from a standard 120V outlet, which can be too slow for drivers with longer commutes. The difference can feel dramatic: instead of adding a small amount of range over many hours, a properly sized 240V setup can replenish daily usage comfortably within an overnight window. However, the highest possible amperage is not always necessary. Many drivers find that a moderate circuit provides plenty of range, especially if the vehicle is plugged in most nights. Selecting a charging rate that fits your schedule can reduce installation costs by avoiding panel upgrades or long conduit runs for heavier gauge wiring.
Another factor is efficiency and heat management. Higher current means more heat in conductors and connections, which is why correct wire size, torque specifications, and quality terminations matter. A Tesla home charger installation done to code ensures the electrical system handles continuous current without hot spots that can degrade components over time. It’s also important to understand that charging speed can be limited by the vehicle configuration; some trims or older models may have different onboard charger capabilities. Additionally, real-world miles added per hour depends on driving conditions and consumption, not just the energy delivered. Cold weather, high speeds, and aggressive acceleration increase consumption, meaning the same charging rate may translate to fewer miles of effective range. A smart approach is to calculate your typical daily energy use, then choose a circuit and charger configuration that replaces that energy with a buffer. This keeps the system cost-effective while still delivering the convenience that makes home charging so valuable.
Permits, Inspections, and Code Compliance for Safe Charging
Permits and inspections can feel like paperwork, but they are a key part of a safe Tesla home charger installation. Electrical work involves risks that aren’t always visible, such as undersized conductors, improper grounding, or loose connections that can overheat under continuous load. Local building departments typically require a permit for a new 240V circuit or a hardwired charger, and an inspection ensures the work meets adopted electrical codes. Compliance matters for safety, for insurance considerations, and for future resale, because unpermitted electrical modifications can create complications during a home sale. Permits also help ensure that the correct type of breaker is used, that conduit and cable are appropriate for the environment, and that the installation includes required disconnects or labeling where applicable. Even if a homeowner is capable of doing some electrical work, code requirements for EV charging can be specific and vary by jurisdiction, making professional guidance valuable.
Inspection requirements often include verifying the breaker size, wire gauge, conductor type, grounding and bonding, and the method of cable protection. For outdoor or exposed runs, inspectors look for weather-rated fittings, correct burial depth if trenching is involved, and protection against physical damage. A Tesla home charger installation may also require GFCI protection depending on the circuit type and local amendments, and the rules can differ between hardwired equipment and receptacle-based setups. Some jurisdictions also have rules about where chargers can be mounted, clearances around panels, and working space requirements. While permits can add time, they also add accountability and can prevent costly rework. Coordinating permitting early helps avoid delays, especially if your utility or municipality has additional steps for service upgrades. Treating code compliance as part of the project, rather than an afterthought, leads to a safer, cleaner, and more durable charging solution.
Professional Electrician vs. DIY: Practical and Safety Considerations
Deciding who should perform a Tesla home charger installation often comes down to risk tolerance, local regulations, and the complexity of the electrical work. In many areas, homeowners are allowed to perform certain electrical tasks on their own property, but EV charging circuits are not a simple weekend project for most people. The work can involve panel modifications, routing new cable through finished walls, drilling through studs, installing conduit, and ensuring correct terminations under torque specifications. Mistakes can be dangerous, ranging from nuisance breaker trips to overheating that can damage wiring and, in extreme cases, lead to fire. A licensed electrician brings experience with load calculations, code requirements, and best practices for continuous loads. They also typically provide documentation, which can be helpful for permits, inspections, and warranty or insurance questions later.
DIY may appear to save money, but it can introduce hidden costs if an error leads to failed inspection, damaged equipment, or the need to redo wiring. A Tesla home charger installation must be treated as a system: the breaker, conductors, receptacle or hardwired connections, and mounting hardware all work together. Even details such as using the correct receptacle grade, choosing copper versus aluminum conductors, and properly securing cable can affect long-term reliability. If you’re considering doing any portion yourself, a safer compromise is to handle non-electrical prep work, such as clearing mounting space, planning cable routing, or patching drywall afterward, while leaving electrical connections and panel work to a professional. For many homeowners, the best value is hiring an electrician who has installed EV chargers before, because that experience often translates into a faster, cleaner job and fewer surprises during inspection.
Step-by-Step Overview of a Typical Installation Process
A typical Tesla home charger installation follows a sequence that keeps the work organized and minimizes disruption. It usually begins with a site visit or consultation to confirm panel capacity, determine the best mounting location, and plan the wiring route. The electrician then selects the appropriate breaker type and size, chooses wire gauge based on circuit rating and distance, and decides whether the run will be through walls, attic spaces, crawlspaces, or surface-mounted conduit. If the installation is hardwired, the plan includes a junction box or direct connection method as allowed by the equipment instructions and local code. If the setup uses a receptacle, the plan includes selecting a properly rated outlet and ensuring it is installed in a suitable enclosure if outdoors. After permits are obtained, the physical work begins: mounting the charger or receptacle box, running conductors, and making terminations in the panel and at the charging point.
| Option | Best for | Typical install needs |
|---|---|---|
| Tesla Wall Connector (hardwired) | Fastest, cleanest permanent home charging | Dedicated 240V circuit, correct breaker sizing, hardwire connection, permitting/inspection as required |
| NEMA 14-50 outlet + Mobile Connector (plug-in) | Flexible setup or renters who may move | 240V receptacle install, GFCI/breaker requirements, outlet placement, cord management, permitting/inspection as required |
| Standard 120V outlet (Level 1) | Low daily mileage or temporary charging | Existing grounded outlet, dedicated circuit recommended, weather-safe location if outdoors |
Expert Insight
Before scheduling installation, confirm your electrical service capacity (typically 100A vs. 200A) and choose the charger amperage that fits your panel and daily driving needs. Ask the electrician to perform a load calculation and, if needed, install a dedicated circuit with the correct breaker size and wire gauge to support your target charging rate safely. If you’re looking for tesla home charger installation, this is your best choice.
Plan the location for convenience and long-term reliability: mount the unit close to where the charge port will park, keep the cable run as short as practical, and use a weather-rated setup if installing outdoors. Request permits and inspection, and have the installer label the breaker and demonstrate how to adjust charging current in the car or charger settings to match your circuit. If you’re looking for tesla home charger installation, this is your best choice.
Once the wiring is complete, configuration and testing are critical. A Tesla home charger installation often involves setting the charger’s maximum current to match the circuit rating, which prevents overloading and ensures compliance with continuous load rules. The electrician may test voltage under load, verify grounding integrity, and check for excessive heat at connections after a brief charging session. Cable management is also addressed, because a neatly stored cable reduces wear and keeps the area safer. After the inspection passes, you can begin regular use with confidence that the system is built to handle nightly charging. Even after commissioning, it’s wise to periodically check that the charger remains securely mounted, that the cable is not damaged, and that the breaker isn’t showing signs of overheating. A well-executed process results in a clean, professional look and years of dependable charging without the need for constant attention.
Placement, Cable Routing, and Weather Protection for Indoor or Outdoor Setups
Where you mount the charger has a major impact on daily usability, and it can also affect the overall cost of a Tesla home charger installation. Shorter wiring runs are usually less expensive, but the cheapest location is not always the most convenient. Ideally, the charger is placed where the cable naturally reaches the charge port without stretching, kinking, or crossing a walkway. In a garage, mounting near the front third of the parking space often works well, but the best spot depends on your vehicle orientation and whether you back in or pull in. Consider door swing, storage shelves, and the path you walk when carrying groceries. Good placement also keeps the charging handle clean and protected, reducing the chance it gets dropped or driven over. If the charger is near the garage door, make sure the cable won’t be pinched by the door or dragged across the threshold repeatedly.
Outdoor installations require added attention to weather and physical protection. A Tesla home charger installation outdoors should use equipment rated for exterior use, with conduit and fittings designed to keep moisture out. Mounting height matters: too low and the connector may sit in puddles or snow; too high and the cable can hang awkwardly and strain the connector. Cable routing should avoid sharp bends and areas where lawn equipment, vehicles, or gates could hit it. In regions with intense sun exposure, consider a location that reduces direct UV on the cable and unit, which can extend the life of plastics over time. If the run from the panel to the charger crosses finished living areas, routing through attic or crawlspace can reduce drywall repair, but each home is different. A careful routing plan keeps the installation tidy and durable, while also making the charger feel like a natural part of the home rather than an afterthought bolted to the wall.
Costs, Quotes, and What Drives the Price Up or Down
The cost of a Tesla home charger installation can vary widely, and understanding the main price drivers helps you evaluate quotes realistically. The biggest factors are electrical distance and complexity: a charger mounted near the panel with an easy path for wiring tends to be far less expensive than one that requires a long conduit run, trenching, or routing through multiple finished walls. Panel capacity is another major factor. If your panel has available breaker space and sufficient load capacity, the project may be straightforward. If a service upgrade, panel replacement, or load management device is needed, costs rise accordingly. Material choices also matter. Copper wire prices can be significant for longer runs, and heavier gauge conductors for higher amperage circuits cost more. Outdoor installations may require weather-rated enclosures, additional conduit, and more labor to secure and seal everything properly.
When comparing quotes for Tesla home charger installation, it helps to look for details rather than a single number. A solid quote should specify the circuit amperage, breaker type, wire gauge, approximate route, whether drywall repair is included, and whether permitting and inspection coordination are part of the service. It should also clarify whether the charger hardware is included or homeowner-supplied. Beware of quotes that seem unusually low without explaining how code compliance will be met, especially for receptacle installations where the quality of the outlet and terminations can affect long-term reliability. If you’re on a budget, you can sometimes reduce costs by choosing a mounting location closer to the panel, accepting a moderate charging rate rather than maximizing amperage, or preparing the space to make the electrician’s work faster. The goal is value, not just the lowest price, because a properly installed charging circuit is something you’ll rely on for years.
Utility Rates, Smart Charging, and Managing Electricity Use
A Tesla home charger installation is also an opportunity to take control of energy costs, especially if your utility offers time-of-use rates or EV-specific plans. Many utilities charge less per kWh during off-peak hours, often overnight, which aligns perfectly with home charging. By scheduling charging to start after peak hours, you can reduce monthly costs without changing how you drive. Tesla vehicles and many wall chargers offer scheduling features that make this easy, allowing the car to begin charging automatically at a set time. Some households also benefit from setting a charge limit appropriate for daily use, which can reduce energy consumption and align with battery care preferences. The key is consistency: when the charging system is predictable, it becomes easier to estimate monthly costs and avoid surprise bills.
For homes with limited electrical capacity, smart load management can be the difference between a simple Tesla home charger installation and an expensive service upgrade. Load management systems can monitor total household draw and adjust EV charging power dynamically, ensuring the home stays within safe limits even when large appliances cycle on. This can be particularly helpful in older homes with 100A service, where adding a high-amperage EV circuit might otherwise be difficult. If you have solar panels, charging strategy becomes even more interesting. Some owners charge during the day to use solar production directly, while others still prefer off-peak nighttime charging depending on net metering rules and battery storage availability. Coordinating your charger settings with your utility plan, solar output, and driving schedule can make home charging not just convenient, but also financially efficient over the long run.
Common Mistakes to Avoid and How to Ensure Long-Term Reliability
Many problems attributed to the vehicle or charger are actually caused by avoidable installation issues. One common mistake in a Tesla home charger installation is using an outlet or receptacle that isn’t designed for frequent high-current use. Not all receptacles are built the same, and lower-quality devices can loosen over time, creating heat and intermittent charging. Another frequent issue is improper torque on terminals, either too loose (leading to arcing and heat) or too tight (damaging the conductor or lug). Cable routing mistakes also cause trouble: tight bends, unsupported runs, or exposure to physical damage can lead to insulation wear and eventual faults. Even the mounting location can create long-term annoyance if the cable constantly crosses a walkway or gets trapped by a garage door. These issues are preventable with careful planning and professional workmanship.
Reliability also depends on setting the correct current limits and matching them to the circuit. A Tesla home charger installation should include configuring the charger so it never draws more than the circuit is designed to handle as a continuous load. Skipping this step can cause nuisance trips or, worse, overheating at the breaker or terminations. Environmental factors matter too. In dusty garages or outdoor locations with wind-driven debris, keeping the connector clean and storing the handle properly reduces wear. Periodic visual checks are simple but valuable: look for discoloration at the receptacle faceplate, unusual warmth during charging, or cracks in the cable jacket. If anything seems off, it’s best to stop charging and have an electrician inspect the system. A high-quality install paired with basic ongoing awareness typically results in years of trouble-free charging, which is the whole point of making home charging your default routine.
Final Checks, First Charge, and Getting the Most from Your Setup
After the hardware is mounted and the circuit is energized, the final stage of a Tesla home charger installation is confirming that everything operates smoothly under real conditions. That means verifying the charger’s settings, ensuring the vehicle recognizes the equipment, and observing the first charging session long enough to confirm stable current delivery. It’s normal to hear minor clicks from contactors or see charging power adjust slightly as the system manages temperature and battery conditions, but the process should be consistent and free of error messages. If the installation uses a receptacle, it’s wise to confirm the plug fits firmly and that the outlet remains cool during charging. If the unit is hardwired, ensure the cover is secured, cable strain relief is correct, and the mounting surface feels solid. These checks aren’t about paranoia; they’re about validating that the system is ready for years of nightly use.
To get the most value from your Tesla home charger installation, align charging behavior with your lifestyle and utility rates. Use scheduled charging to take advantage of lower-cost hours, set a charge limit that fits your daily driving, and keep the cable stored neatly to reduce wear. If you anticipate adding another EV, consider whether power sharing, a second circuit, or load management would make future expansion easier. Also keep the installation documentation, permit records, and any electrician notes in a safe place, since they can be useful for troubleshooting, warranty questions, or home resale. With the right planning and a code-compliant setup, home charging becomes a background task you rarely think about, and that is exactly what makes it so satisfying: you plug in, walk away, and your Tesla is ready when you are, thanks to a well-executed tesla home charger installation.
Watch the demonstration video
In this video, you’ll learn the essentials of installing a Tesla home charger, from choosing the right location and electrical requirements to understanding permits, wiring, and breaker sizing. It also covers what to expect from an electrician, typical installation steps, safety considerations, and how to test and set up your Wall Connector for reliable daily charging. If you’re looking for tesla home charger installation, this is your best choice.
Summary
In summary, “tesla home charger installation” is a crucial topic that deserves thoughtful consideration. We hope this article has provided you with a comprehensive understanding to help you make better decisions.
Frequently Asked Questions
Do I need a permit to install a Tesla home charger?
In most areas, yes. A licensed electrician typically pulls the permit and schedules the inspection required by local code.
Should I install a Tesla Wall Connector or use a NEMA 14-50 outlet?
A Wall Connector is typically the faster, cleaner-looking option and can be hardwired for a more permanent setup, while a NEMA 14-50 outlet is often more affordable and flexible—but it may charge more slowly depending on your electrical capacity and vehicle. When planning your **tesla home charger installation**, the best choice comes down to your budget, how quickly you want to charge, and whether you prefer a dedicated hardwired solution or a versatile plug-in outlet.
What electrical service do I need for home charging?
Most **tesla home charger installation** projects use a 240V circuit. Your electrician will choose the right breaker and wire size—often in the 40A–60A range—based on your electrical panel’s capacity, the distance to the charger, and how fast you want to charge.
How long does Tesla home charger installation take?
Most jobs wrap up in about 2–6 hours, but a **tesla home charger installation** can take longer if you need a longer wiring run, an electrical panel upgrade, or extra time to coordinate permits and inspections—sometimes stretching the process from a single day to several days or even a few weeks.
How much does it cost to install a Tesla home charger?
Costs can vary a lot with a **tesla home charger installation**. A straightforward setup might only run a few hundred dollars, but if your electrician needs to add a long wiring run, upgrade your electrical panel, or handle other complexities, the total can quickly climb into the thousands.
Can I install a Tesla Wall Connector outdoors?
Yes—it’s built for both indoor and outdoor use, as long as your **tesla home charger installation** is completed with the correct weather-rated conduit and fittings and meets all local electrical code requirements.
📢 Looking for more info about tesla home charger installation? Follow Our Site for updates and tips!

Trusted External Sources
- How much did you pay for home charger installation? : r/TeslaModelY
Nov 27, 2026 … $100/hr plus materials to hardwire the wall charger. All in it was under $200. Of course it depends where the panel is in relation to the charge … If you’re looking for tesla home charger installation, this is your best choice.
- Find a Tesla Certified Installer
Tesla works with trusted local professionals to handle Wall Connector, Powerwall, and Solar Roof projects. Connect with a Tesla Certified Installer to get a clear estimate, a realistic timeline, and expert guidance for your **tesla home charger installation** and other Tesla energy upgrades.
- How much did you pay for wall charger installation? (No … – Reddit
Aug 19, 2026 … I found our past electrician will do it for a flat fee of $650 (hardwired Tesla with a 10ft run). Seems about average for non-Tesla recommend … If you’re looking for tesla home charger installation, this is your best choice.
- Installing a Wall Connector | Tesla Support
Open the Tesla One app and tap ‘Begin’ on the install page, then scan the QR code from the QuickStart guide or the back of the Wall Connector. In ‘Installation … If you’re looking for tesla home charger installation, this is your best choice.
- What is the cost of installing a Tesla wall charger in Australia?
tesla home charger installation: Apr 9, 2026 … Got quoted $2400 for the supply and install of a wall charger. Simple install, with RCD, 10m of calling and charger. Does this seem a fair price?