A dlp printer is a type of resin-based 3D printer that uses Digital Light Processing to cure liquid photopolymer into solid layers. Instead of tracing each layer with a laser spot, it projects an entire layer pattern at once using a digital micromirror device (DMD) or similar projection system. That “whole-layer exposure” is what gives DLP-based printing its reputation for speed and consistency, especially on small-to-medium parts where each layer can be flashed in a single exposure. When people compare resin technologies, the conversation often places DLP alongside SLA (laser-based stereolithography) and LCD/MSLA (masked stereolithography using an LCD panel). Each can deliver highly detailed parts, but the optical path, light source, and pixel geometry differ in ways that affect accuracy, throughput, surface finish, and maintenance.
Table of Contents
- My Personal Experience
- Understanding What a DLP Printer Is and Why It Matters
- How Digital Light Processing Cures Resin: The Optical and Chemical Workflow
- DLP vs SLA vs LCD: Practical Differences That Affect Print Quality
- Key Components of a DLP Printer: Projector, Vat, Build Plate, and Motion System
- Resolution, Pixel Size, and Accuracy: What the Numbers Really Mean
- Materials for DLP Printing: Standard, Tough, Flexible, Castable, and High-Temp Resins
- Applications: Where DLP Printing Excels in Real Production Environments
- Workflow and Best Practices: Slicing, Orientation, Supports, and Build Plate Strategy
- Expert Insight
- Post-Processing: Washing, Drying, Curing, and Surface Finishing for Professional Results
- Maintenance and Troubleshooting: Keeping a DLP System Stable Over Time
- Choosing the Right DLP Printer: Criteria for Hobby, Studio, Dental, and Industrial Use
- Safety, Ventilation, and Handling: Practical Resin Printing Hygiene
- Cost of Ownership and Scaling Up: From Single Prints to Repeatable Output
- Final Thoughts: Getting the Best Results from a DLP Printer
- Watch the demonstration video
- Frequently Asked Questions
- Trusted External Sources
My Personal Experience
I started using a DLP printer at home to make small resin parts for a drone project, and the first thing I noticed was how crisp the details looked compared to my old FDM machine. The learning curve was mostly about the resin workflow—leveling the build plate, dialing in exposure times, and figuring out why my first few prints kept sticking to the vat film instead of the plate. Once I slowed down and ran a couple of calibration tests, the failures dropped off fast, but the cleanup still surprised me: gloves, IPA rinses, and curing under UV became part of the routine. The printer itself is quick and consistent, but I’ve learned to budget time for post-processing and to keep the room ventilated, because the smell and mess are real. Now that it’s tuned, I can knock out a batch of tiny brackets overnight and they come out looking almost injection-molded.
Understanding What a DLP Printer Is and Why It Matters
A dlp printer is a type of resin-based 3D printer that uses Digital Light Processing to cure liquid photopolymer into solid layers. Instead of tracing each layer with a laser spot, it projects an entire layer pattern at once using a digital micromirror device (DMD) or similar projection system. That “whole-layer exposure” is what gives DLP-based printing its reputation for speed and consistency, especially on small-to-medium parts where each layer can be flashed in a single exposure. When people compare resin technologies, the conversation often places DLP alongside SLA (laser-based stereolithography) and LCD/MSLA (masked stereolithography using an LCD panel). Each can deliver highly detailed parts, but the optical path, light source, and pixel geometry differ in ways that affect accuracy, throughput, surface finish, and maintenance.
To appreciate why the technology matters, consider how the image is formed. A DLP projector creates a rectangular “voxel grid” determined by the projector’s native resolution and the size of the projected area. That grid defines the XY detail, while the Z detail comes from layer height and resin curing behavior. Because the projected pixels are optically defined, a DLP system can produce crisp features with stable edges when the optics are properly aligned and the resin profile is tuned. At the same time, DLP has its own characteristic artifacts: pixel edges can produce a subtle “stair-step” or “pixelation” on gently curved surfaces, and the intensity distribution across the field can vary if the optical engine is not calibrated. For many users, the appeal is the balance: fast layer exposure, high repeatability, and a robust light engine that can maintain output over long runs. That combination makes DLP printing attractive for dental models, jewelry masters, miniatures, engineering prototypes, and small-batch production where dimensional control and fine detail are priorities. If you’re looking for dlp printer, this is your best choice.
How Digital Light Processing Cures Resin: The Optical and Chemical Workflow
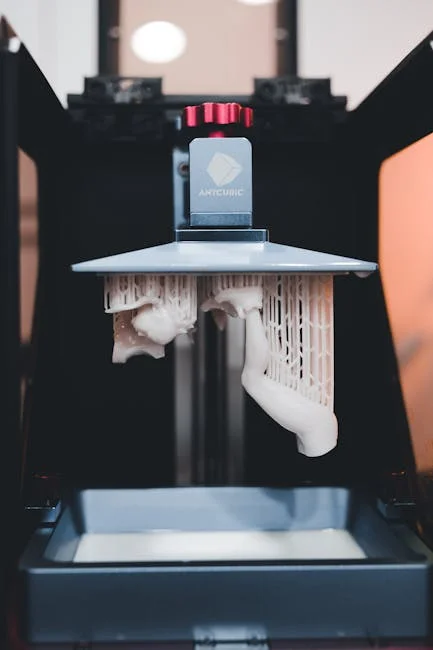
At the heart of a DLP system is the relationship between light energy and photopolymer chemistry. The projector emits light—often 405 nm violet—through lenses that focus the image onto the resin vat’s transparent window. The resin contains photoinitiators that react to the projected light, creating polymer chains that solidify into a crosslinked network. Exposure time, intensity, and the resin’s absorption characteristics determine how deeply the light penetrates, which in turn affects layer bonding and feature sharpness. A well-tuned exposure forms a reliable “cure depth” that slightly overlaps the previous layer for strong adhesion without overcuring into adjacent voids or fine cavities. In practice, this tuning is what separates a crisp gear tooth from a softened one, or a clean internal channel from a partially blocked passage. If you’re looking for dlp printer, this is your best choice.
Mechanically, the process is straightforward but sensitive to parameters. A build platform moves in Z, typically lifting after each layer to peel the cured layer from the vat film and allow fresh resin to flow underneath. The peel forces depend on resin viscosity, layer area, lift speed, and the properties of the release film (often FEP or similar). Because a DLP printer exposes the whole layer, large cross-sectional areas can create strong suction forces; smart orientation, hollowing, and support strategies reduce stress and improve success rates. Meanwhile, the optical engine must stay consistent: dust on the lens, degradation of a protective window, or a misaligned projector can introduce uneven curing across the build plate. On the chemistry side, resin temperature and age matter. Warmer resin flows more easily and can cure slightly differently; older resin may have partially settled pigments or altered reactivity. Users who treat exposure calibration as a repeatable process—test prints, resin-specific profiles, and consistent environmental control—tend to get the best results from DLP printing, especially when switching between engineering resins, castable blends, and flexible formulations.
DLP vs SLA vs LCD: Practical Differences That Affect Print Quality
Choosing between DLP, SLA, and LCD often comes down to the tradeoffs between speed, detail, uniformity, and long-term operating costs. A DLP projector has a fixed pixel count; when you enlarge the projected area, each pixel covers a larger physical size, reducing XY resolution. This means a DLP printer can be optimized for either high detail on a smaller build area or moderate detail on a larger one, depending on optical design. SLA systems, which use a laser to scan, can maintain fine spot sizes across larger areas but may take longer for each layer because the laser must trace the geometry. LCD/MSLA systems mask UV light through an LCD panel, offering high pixel counts and large build areas at relatively low entry cost, but the LCD panel is a consumable component that can dim or fail over time.
From a surface finish standpoint, all three can produce excellent results, but the “signature” differs. DLP’s projected pixels can yield consistent edges, while LCD systems can show grid-like artifacts depending on pixel geometry and anti-aliasing. SLA can deliver smooth curves because the laser spot is not inherently pixelated, though scanning artifacts can appear if the galvanometers are not tuned. In real workflows, post-processing often matters more than the raw print engine: washing, curing, sanding, and priming can make any of these technologies look exceptional. Still, the day-to-day experience is influenced by maintenance and reliability. DLP projectors can be durable and stable, though optics must be kept clean and aligned. LCD printers can be easy to operate but may require periodic screen replacement. Laser SLA can be precise and repeatable but may command higher upfront costs. When evaluating a resin platform for professional use, it helps to think in terms of total system behavior: exposure stability, resin availability, calibration tools, ecosystem support, and how predictable the machine is across months of production. If you’re looking for dlp printer, this is your best choice.
Key Components of a DLP Printer: Projector, Vat, Build Plate, and Motion System
A DLP printer is an integration of optics, mechanics, and materials handling. The optical engine includes a light source (LED or lamp), a DMD chip or similar micromirror array, and lenses that focus the projected image onto the resin. The optical path often includes filters and protective glass to manage heat and prevent resin fumes or dust from reaching sensitive components. A well-designed system maintains uniform brightness across the build area so that parts at the corners cure similarly to parts in the center. Some professional machines incorporate calibration routines or field-uniformity compensation to correct for slight intensity falloff, which is especially useful when printing tight-tolerance components or dense build plates with many repeated parts.
The resin vat is more than a container; it is a precision element that influences peel force, clarity, and print consistency. The vat window and release film must be optically clear and free from scratches, clouding, or embedded debris. Even small imperfections can scatter light, producing bloom around features or localized undercure. The build plate must be flat and rigid, with a surface finish that promotes adhesion without making removal overly difficult. Motion systems vary: some machines use single linear rails with lead screws; others use dual rails and ball screws for rigidity. Z wobble, backlash, or vibration can show up as banding on vertical surfaces. On many resin machines, the Z axis is the most critical mechanical subsystem because every layer depends on accurate positioning and repeatable peel mechanics. Finally, firmware and slicing software connect the dots, translating a 3D model into layer images and motion commands. Even with excellent hardware, poor slicing settings—lift distance, lift speed, exposure, and rest times—can cause failures. A balanced configuration treats optics, mechanics, and resin as one system rather than isolated parts. If you’re looking for dlp printer, this is your best choice.
Resolution, Pixel Size, and Accuracy: What the Numbers Really Mean
Marketing specs can make DLP printing sound simple: a certain resolution, a certain layer height, and therefore a certain accuracy. In practice, the relationship is more nuanced. XY resolution is largely determined by projected pixel size, which is a function of projector resolution divided by the projected build area. If a projector is 1920×1080 and the build area is wide, each pixel may represent 50–80 microns or more; if the build area is smaller, pixel size can drop significantly. However, “can resolve” is not the same as “will measure.” Resin cures beyond the exact pixel boundary due to light scattering, resin diffusion, and exposure overlap. That’s why calibration prints and compensation settings (like XY size compensation or “elephant foot” correction) exist: they help align nominal geometry with real-world results. If you’re looking for dlp printer, this is your best choice.
Z resolution is controlled by layer height and the printer’s ability to position the platform accurately. Many users assume that smaller layer heights automatically produce better quality, but extremely thin layers can amplify problems: higher total layer count, more peel cycles, and more opportunities for minor errors to accumulate. Additionally, resin chemistry often has an optimal range where layers bond reliably; too thin can lead to undercure or weak interlayer adhesion if exposure is not adjusted. Accuracy is also influenced by support strategy and post-curing. Resin parts can shrink slightly during curing, and they can warp if cured unevenly or if internal stresses are locked in during printing. A DLP printer can be highly repeatable, which is often more valuable than absolute accuracy for production workflows. Repeatability allows predictable scaling factors, validated exposure profiles, and consistent fit across batches. For applications like dental aligner models or casting patterns, controlling dimensional drift through validated settings, stable resin temperature, and consistent post-processing can matter more than chasing the smallest nominal pixel size.
Materials for DLP Printing: Standard, Tough, Flexible, Castable, and High-Temp Resins
Resin choice determines not only the mechanical properties of the final part but also the day-to-day experience of printing. Standard resins are typically used for visual prototypes, figurines, and general modeling. They can produce sharp details and smooth surfaces but may be brittle. Tough or ABS-like resins aim to improve impact resistance and elongation, making them better for functional prototypes, snap fits, and housings—though they may require longer exposure or more careful post-curing to reach full properties. Flexible and elastic resins open up possibilities for gaskets, grips, and compliant mechanisms, but they can be more challenging to print because peel forces and support removal behave differently. A DLP printer can handle many resin families, but each resin needs its own exposure profile and sometimes different lift settings to prevent delamination or tearing.
Castable resins are a major reason many jewelers and dental labs invest in DLP technology. These resins are formulated to burn out cleanly in investment casting without leaving ash that ruins the mold. The printing requirements can be strict: too much overcure can make burnout worse, while insufficient cure can cause fragile patterns that break during handling. Dental resins—model, surgical guide, temporary crown and bridge—often require validated workflows and specific post-curing conditions to meet biocompatibility or mechanical standards. High-temperature resins are used for tooling inserts, fixtures, and parts exposed to heat, but they can be more viscous and may need warmed vats or slower lift speeds. Pigmentation matters too: opaque resins can reduce light penetration, improving edge definition but requiring more energy; translucent resins can cure deeper and may need tighter exposure control to avoid loss of detail. Selecting materials for a DLP workflow is less about finding a single “best” resin and more about building a small library of reliable, well-profiled options aligned with the parts you actually produce. If you’re looking for dlp printer, this is your best choice.
Applications: Where DLP Printing Excels in Real Production Environments
DLP technology is often chosen when detail, surface finish, and repeatability are essential. Dental labs use DLP systems for high-throughput model production because layer exposure is fast and consistent across a plate of many arches. Surgical guides and splints benefit from fine feature control and smooth surfaces that reduce finishing labor. In jewelry, a DLP printer is frequently used to produce master patterns for casting, where fine filigree, prongs, and crisp edges matter. Miniatures and collectibles also benefit because the process captures surface texture and small features that are difficult to achieve with filament printing. Engineering teams use DLP for enclosures, fluidic prototypes, and small mechanisms where dimensional predictability and good aesthetics help communicate design intent.
Small-batch manufacturing is another strong fit. When a design is stable and demand is moderate, DLP printing can produce dozens or hundreds of parts without the tooling cost of injection molding. This is particularly attractive for custom products, medical devices with patient-specific geometry, and niche industrial components. However, success in production depends on controlling the entire workflow: resin handling, exposure calibration, build plate loading, and consistent post-processing. Many professional shops standardize on a few validated part orientations and support presets to minimize variation between operators. They also monitor resin life, filter resin regularly, and track projector hours or light output to prevent drift. When used this way, DLP becomes less of a “maker tool” and more of a predictable manufacturing cell. The technology’s ability to deliver fine detail repeatedly, with short layer times, often translates into lower labor per part—especially when the build plate is densely packed and the post-processing steps are optimized for batching. If you’re looking for dlp printer, this is your best choice.
Workflow and Best Practices: Slicing, Orientation, Supports, and Build Plate Strategy
Reliable results with a DLP printer depend heavily on pre-print decisions. Orientation influences surface quality, support marks, peel forces, and dimensional accuracy. Angling parts can reduce the cross-sectional area per layer, lowering suction and improving success rates, but it also introduces more supports and may require more finishing on visible faces. For cosmetic parts, it’s common to place support contact points on hidden surfaces or edges that will be sanded. For functional parts, it can be better to orient critical dimensions in a way that minimizes distortion from peel forces and post-cure shrinkage. Hollowing can reduce resin use and peel stress, but it requires drain holes and careful curing to prevent trapped uncured resin from causing cracks or swelling over time.
| Aspect | DLP Printer | FDM (Filament) Printer | SLA (Laser Resin) Printer |
|---|---|---|---|
| How it works | Projects an entire layer at once using a digital light projector onto liquid resin. | Extrudes melted thermoplastic through a nozzle, building parts line-by-line. | Traces each layer with a laser to cure liquid resin point-by-point. |
| Speed & throughput | Fast per layer (full-layer exposure), often strong for batch printing. | Typically slower for fine detail; speed depends on nozzle size and infill. | Can be slower than DLP for large cross-sections due to laser scanning. |
| Detail & surface finish | High detail and smooth surfaces; XY detail tied to projector pixel size. | Visible layer lines; best for functional prototypes rather than ultra-fine detail. | Very high detail and smooth finish; excellent for intricate features. |
Expert Insight
Lock down your DLP printer’s exposure settings before chasing mechanical fixes: run a quick calibration print, then fine-tune exposure time and lift speed in small increments until details are crisp without over-curing. Keep a simple log of resin type, room temperature, and settings so you can reliably reproduce successful prints.
Prevent print failures by treating resin handling as part of maintenance: filter resin back into the bottle after each session, wipe the vat rim, and inspect the FEP film for clouding or scratches that can scatter light. Replace the film at the first signs of hazing and keep the build plate perfectly level to reduce suction and layer separation. If you’re looking for dlp printer, this is your best choice.
Support design is both an art and a repeatable engineering practice. Light supports reduce scarring but can fail on heavy sections; heavy supports hold well but leave larger marks. A practical approach is to use strong anchors where the part first forms and lighter supports along edges and islands. Anti-aliasing and grayscale exposure can smooth pixel edges and reduce stepping, but too much smoothing can soften sharp features. Build plate strategy matters for throughput: packing many parts increases efficiency, but it can also amplify peel forces and increase the risk that a single failure contaminates the vat. Many operators prefer to group parts by height and resin type to keep exposure profiles consistent. Rest times after lift can improve layer uniformity with viscous resins by allowing resin to settle, which can reduce voids and improve surface finish. The most efficient workflows are the ones that treat slicing settings as a controlled recipe: documented, versioned, and adjusted only with test prints rather than guesswork. If you’re looking for dlp printer, this is your best choice.
Post-Processing: Washing, Drying, Curing, and Surface Finishing for Professional Results
Post-processing is where DLP-printed parts become truly usable and visually refined. Washing removes uncured resin from surfaces and cavities, typically using isopropyl alcohol or specialized cleaning solutions. Over-washing can soften some resins or cause swelling, while under-washing leaves residue that becomes sticky or chalky after curing. Agitation and fresh solvent improve results; many shops use a two-stage wash—dirty wash first, clean wash second—to extend solvent life and maintain consistent cleanliness. After washing, thorough drying is important because trapped solvent can interfere with post-curing and surface quality. Compressed air can help clear holes and fine features, but it should be used carefully to avoid aerosolizing resin-contaminated solvent in poorly ventilated spaces. If you’re looking for dlp printer, this is your best choice.
Post-curing completes polymerization and brings parts closer to their intended mechanical properties. Cure time and light intensity should match the resin manufacturer’s recommendations, and part orientation inside the curing chamber affects uniformity. Over-curing can make parts brittle or cause discoloration, while under-curing can leave parts soft or dimensionally unstable. For critical parts, it’s worth standardizing cure settings and using consistent equipment. Support removal is easiest when parts are slightly warm or when resins are formulated for clean snapping, but aggressive removal can tear surfaces. Sanding and priming can turn resin prints into paint-ready models; wet sanding helps control dust and heat. For transparent resins, progressive sanding and polishing followed by a clear coat can significantly improve clarity. The key is consistency: a DLP printer can produce highly repeatable raw parts, but inconsistent washing and curing can erase that advantage. Treating post-processing as part of the manufacturing process—timed steps, controlled solvents, and documented cure cycles—yields better strength, appearance, and dimensional stability.
Maintenance and Troubleshooting: Keeping a DLP System Stable Over Time
Long-term performance depends on routine care of optics, vat components, and mechanical alignment. Resin contamination is one of the most common causes of failures. Small cured fragments can float in the vat and block light, causing missing features or layer separation. Filtering resin through a fine mesh after failures, and periodically even during normal use, helps prevent recurring defects. The vat film should be inspected for clouding, scratches, and tension changes; a worn film can scatter light and increase peel force, leading to delamination or surface artifacts. Build plate leveling should be checked whenever adhesion issues appear, after moving the machine, or after changing plates. Even slight tilt can cause one side of the plate to under-adhere while the other side over-compresses early layers. If you’re looking for dlp printer, this is your best choice.
Optical cleanliness is equally important. Dust on the projector lens or protective glass can show up as repeated defects in the same XY location across multiple prints. If a part consistently fails in one corner, it may indicate uneven illumination, a smudged window, or a mechanical constraint in Z travel. Calibration routines, if available, should be used to verify uniformity and scale. Temperature control can solve problems that look mysterious: cold resin is thicker, flows slowly, and can produce incomplete layers or suction-related failures. Warming the room or using a controlled enclosure often improves reliability. When troubleshooting, it helps to separate variables: test with a known-good resin profile, print a small validation piece, and inspect the failure mode. Is it adhesion to the plate, separation mid-print, distorted dimensions, or surface pitting? Each symptom points to different causes—exposure, lift settings, supports, resin condition, or mechanical play. A well-maintained DLP printer becomes more predictable with time because the operator learns how each resin behaves and how the machine responds to small adjustments.
Choosing the Right DLP Printer: Criteria for Hobby, Studio, Dental, and Industrial Use
Selecting a DLP system should start with intended parts, not just specs. Build volume, projected pixel size, and resin ecosystem determine what you can produce efficiently. If you need very fine jewelry details, a smaller build area with tighter pixel size may outperform a larger machine with coarser pixels. If you need production throughput for many small parts, the ability to pack the plate and maintain uniform exposure matters more than peak resolution. Connectivity, software reliability, and availability of validated resin profiles can save enormous time. A machine with consistent firmware updates, good slicing support, and a robust user community often delivers a smoother ownership experience than one that looks impressive on paper but lacks tooling and documentation. If you’re looking for dlp printer, this is your best choice.
Operational considerations are equally important. Consider the cost and availability of consumables: vat films, resin vats, and any optical protective windows. Evaluate how easy it is to clean spills, swap resin, and store materials safely. If parts must meet regulatory or customer requirements, look for resins with certificates, traceability, and recommended cure protocols. For dental and medical workflows, validated combinations of printer, resin, and curing unit can reduce risk and rework. For studios and makerspaces, safety features—enclosures, ventilation options, and spill containment—can be as important as resolution. Also consider serviceability: access to replacement parts, warranty terms, and whether the projector or light engine is field-replaceable. A DLP printer is often a long-term tool; choosing one that fits your workflow, material needs, and tolerance requirements tends to yield better results than chasing the highest advertised resolution or the largest build plate alone.
Safety, Ventilation, and Handling: Practical Resin Printing Hygiene
Resin printing requires careful handling because uncured photopolymer can irritate skin and may cause sensitization over time. Gloves, eye protection, and good habits—like avoiding touching door handles with contaminated gloves—reduce exposure. Ventilation matters because resin odors and volatile compounds can accumulate, especially in small rooms. A dedicated workspace with exhaust ventilation or a filtered enclosure can improve comfort and reduce lingering smells. Spills should be cleaned promptly with appropriate absorbent materials, and contaminated waste should be cured before disposal according to local regulations. Keeping tools organized—scrapers, tweezers, funnels, filters—helps prevent cross-contamination and reduces mistakes when switching resins or cleaning vats. If you’re looking for dlp printer, this is your best choice.
Fire safety and chemical handling deserve attention as well. Isopropyl alcohol is flammable, and wash stations should be used away from ignition sources with containers sealed when not in use. Used solvent becomes contaminated with resin; allowing resin to settle, filtering, and curing sludge before disposal can extend solvent life and reduce waste. Food and drink should be kept out of the printing area, and parts should be fully washed and cured before being handled extensively or used in consumer-facing contexts. If a DLP printer is used in a shared environment, clear labeling and standard operating procedures prevent accidental exposure—especially when multiple people handle uncured parts. Safety practices are not just bureaucracy; they directly support consistent print quality by keeping resin clean, preventing accidental mixing, and ensuring that post-processing steps are completed correctly every time.
Cost of Ownership and Scaling Up: From Single Prints to Repeatable Output
The purchase price of a DLP machine is only one part of the cost picture. Resin, consumables, cleaning solvents, gloves, filters, and replacement films add up over time. Electricity use is usually modest, but labor is a significant factor: the time spent orienting parts, adding supports, washing, curing, and finishing often exceeds the time the machine spends printing. For that reason, many users who scale up focus on process efficiency. They standardize part layouts, use quick-swap build plates, maintain multiple vats for different resins, and batch post-processing. When production increases, small improvements—like consistent labeling of resin bottles, scheduled filtering, and measured wash times—can significantly reduce failures and reprints. If you’re looking for dlp printer, this is your best choice.
Scaling also requires thinking about repeatability and documentation. If you deliver parts to customers, you may need consistent dimensions and surface quality across weeks or months. That consistency comes from stable exposure profiles, controlled resin storage, and consistent post-curing. Some operations track resin batch numbers, projector hours, and maintenance events to correlate changes in quality with machine state. When demand grows beyond one machine, matching outputs across multiple DLP units becomes important; identical models can still differ slightly due to optical tolerances, so calibration and standardized validation prints help align them. Ultimately, the value of DLP printing is not only that it can make beautiful parts, but that it can make the same part repeatedly with predictable effort. When the workflow is tuned, a DLP printer can function as a reliable production tool rather than a temperamental prototype device.
Final Thoughts: Getting the Best Results from a DLP Printer
Strong results come from respecting the balance between optics, resin chemistry, mechanics, and post-processing. The most successful users treat exposure settings as material-specific recipes, keep resin clean and well-mixed, and maintain the vat film and optical path as carefully as any precision tool. They also design parts with resin printing in mind—adding drainage for hollow parts, avoiding unnecessary large cross-sections, and placing supports where marks are acceptable. When problems appear, they troubleshoot methodically by changing one variable at a time, using small validation prints to confirm improvements. This approach turns resin printing from a trial-and-error hobby into a controlled workflow that produces predictable quality. If you’re looking for dlp printer, this is your best choice.
A dlp printer can be an exceptional choice for detailed prototypes, dental and jewelry workflows, and small-batch production when the process is dialed in. The combination of whole-layer exposure, stable projection, and fine feature capability gives DLP a distinct advantage in repeatability and throughput for many part types. With the right resin profiles, disciplined post-curing, and consistent maintenance, the technology rewards you with crisp details, smooth surfaces, and dependable results that hold up across repeated runs. For anyone prioritizing precision and professional finish in resin manufacturing, DLP printing remains one of the most practical and proven paths to high-quality output.
Watch the demonstration video
In this video, you’ll learn how a DLP (Digital Light Processing) 3D printer works, including how projected light cures resin layer by layer to create highly detailed parts. It explains key components, basic setup and calibration, and what affects print quality—such as exposure settings, resin choice, and post-processing steps like washing and curing. If you’re looking for dlp printer, this is your best choice.
Summary
In summary, “dlp printer” is a crucial topic that deserves thoughtful consideration. We hope this article has provided you with a comprehensive understanding to help you make better decisions.
Frequently Asked Questions
What is a DLP printer?
A **dlp printer** is a type of resin 3D printer that uses Digital Light Processing technology to project an image onto liquid photopolymer resin, curing and solidifying a whole layer in a single flash for fast, precise prints.
How does a DLP printer differ from SLA and LCD/MSLA?
DLP uses a projector to expose each layer; SLA uses a laser to draw the layer; LCD/MSLA uses an LCD screen as a mask with a UV backlight. DLP often has sharp optics and consistent pixels, while LCD can offer higher resolution at lower cost. If you’re looking for dlp printer, this is your best choice.
What materials can a DLP printer use?
It works with UV-curable resins—standard, tough, flexible, high-temperature, castable, and dental—so long as they match the **dlp printer**’s curing wavelength (typically 385 nm or 405 nm).
What are common applications for DLP 3D printing?
High-detail parts like miniatures, jewelry patterns, dental models, hearing-aid shells, prototypes, and small functional components requiring fine surface finish.
What post-processing is required after printing?
After printing, take the part off the build plate, rinse it thoroughly in IPA or a resin cleaner, then remove any supports. Next, UV-cure the model to achieve its final strength and durability. If you want an even smoother, more polished result from your **dlp printer**, finish up with a bit of sanding and primer before painting or sealing.
What are the main drawbacks and safety considerations?
Resin can be messy and irritating; use gloves, eye protection, and good ventilation. Prints may be more brittle than FDM, build volumes are often smaller, and consumables like resin and FEP/film can add ongoing costs. If you’re looking for dlp printer, this is your best choice.
📢 Looking for more info about dlp printer? Follow Our Site for updates and tips!

Trusted External Sources
- Guide to Resin 3D Printers: SLA vs. DLP vs. MSLA vs. LCD – Formlabs
Dive into the key differences between SLA, DLP, MSLA, and LCD resin 3D printers—including how a **dlp printer** stacks up on resolution, speed, accuracy, print quality, workflow, and overall performance—so you can choose the right technology for your needs.
- Are there any DLP 3d printers out there which are decent enough for …
Jan 20, 2026 … I have the Mars 4 dlp and I can say that it’s pretty simple to use. I’m a total noob and I just printed a 1/6 scale figure without a single fail … If you’re looking for dlp printer, this is your best choice.
- DLP 3D Printing Explained: A Complete Guide for Professionals
As of Feb 24, 2026, DLP 3D printing continues to stand out for producing highly accurate parts with exceptionally smooth surface finishes. Using a **dlp printer**, makers and manufacturers can work with high-performance materials that enhance durability and add functional properties—making the technology ideal for everything from detailed prototypes to end-use components.
- Where’s the large DLP’s : r/resinprinting – Reddit
Jul 30, 2026 … Resolution cannot be properly compared between DLP printers and MSLA printer. … DLP resin printers, we are not gonna see a huge DLP.
- Origin® Two: DLP 3D Printer – Stratasys
Origin Two takes industrial 3D printing to the next level, delivering exceptional accuracy, proven repeatability, and ultra-tight tolerances—all with beautifully smooth surface finishes. As a high-performance **dlp printer**, it’s built to produce consistent, production-ready parts you can rely on, run after run.