An elegoo resin printer sits in a sweet spot where cost, detail, and accessibility meet, which is why it continues to show up on workbenches ranging from miniature painting desks to small product prototyping studios. Resin printing, especially in the MSLA category that Elegoo is known for, is built around curing photopolymer resin layer by layer using a UV light source and an LCD masking screen. That combination makes it possible to produce sharp edges, crisp surface textures, and fine features like engraved lettering or tiny mechanical details that can be difficult to reproduce with filament-based printers. When someone is choosing a machine for tabletop miniatures, dental-like models, jewelry masters, or figurines, the priorities often include surface finish and dimensional fidelity; the resin approach tends to deliver on those priorities with less visible layer stepping. A key reason the Elegoo ecosystem is attractive is that the brand typically pairs solid mechanical design with a user-friendly interface and widely available spare parts, which reduces downtime when something wears out or a consumable needs replacement. The appeal is also practical: the learning curve is manageable, and the online community around these machines offers abundant profiles, troubleshooting tips, and workflow examples.
Table of Contents
- My Personal Experience
- Why an Elegoo Resin Printer Appeals to Hobbyists and Small Workshops
- Understanding MSLA Resin Printing and How Elegoo Implements It
- Choosing the Right Elegoo Resin Printer: Size, Resolution, and Use Case Fit
- Workspace Setup: Ventilation, Temperature Control, and Practical Layout
- Resins for Elegoo Machines: Standard, Tough, Flexible, and Specialty Options
- Calibration and First-Time Success: Leveling, Exposure Tests, and Profiles
- Supports, Orientation, and Avoiding Common Failure Modes
- Expert Insight
- Washing and Curing: Getting Clean, Strong Prints Without Excess Mess
- Maintenance and Longevity: Vat Films, Screens, and Keeping Performance Stable
- Print Quality Tuning: Layer Height, Anti-Aliasing, and Detail Preservation
- Applications: Miniatures, Prototyping, Dental-Style Models, and Small-Batch Parts
- Cost of Ownership: Consumables, Time, and Planning for Realistic Operating Expenses
- Making the Most of an Elegoo Resin Printer Over the Long Term
- Watch the demonstration video
- Frequently Asked Questions
- Trusted External Sources
My Personal Experience
I picked up an Elegoo resin printer to make small tabletop minis, and the first week was a mix of excitement and a lot of learning. My initial prints looked great on the build plate, but I ruined a couple by rushing the wash and cure—anything with tiny supports would snap if I handled it too soon. Once I dialed in the exposure settings for my room temperature and started warming the resin bottle in a bowl of lukewarm water, failures dropped off fast. The biggest surprise was how much the “unsexy” stuff mattered: leveling the plate carefully, keeping the FEP clean, and filtering resin back into the bottle after a messy print. Now I can reliably knock out crisp parts overnight, but I still keep a box of gloves and paper towels next to the machine because resin printing is never as hands-off as the videos make it look.
Why an Elegoo Resin Printer Appeals to Hobbyists and Small Workshops
An elegoo resin printer sits in a sweet spot where cost, detail, and accessibility meet, which is why it continues to show up on workbenches ranging from miniature painting desks to small product prototyping studios. Resin printing, especially in the MSLA category that Elegoo is known for, is built around curing photopolymer resin layer by layer using a UV light source and an LCD masking screen. That combination makes it possible to produce sharp edges, crisp surface textures, and fine features like engraved lettering or tiny mechanical details that can be difficult to reproduce with filament-based printers. When someone is choosing a machine for tabletop miniatures, dental-like models, jewelry masters, or figurines, the priorities often include surface finish and dimensional fidelity; the resin approach tends to deliver on those priorities with less visible layer stepping. A key reason the Elegoo ecosystem is attractive is that the brand typically pairs solid mechanical design with a user-friendly interface and widely available spare parts, which reduces downtime when something wears out or a consumable needs replacement. The appeal is also practical: the learning curve is manageable, and the online community around these machines offers abundant profiles, troubleshooting tips, and workflow examples.
At the same time, the appeal of an elegoo resin printer is not only about beautiful prints; it’s about repeatability and the ability to dial in a process that produces consistent results. Many users find that once exposure settings and supports are tuned for a resin and a model type, they can reproduce parts with minimal variation across batches. That matters if you’re printing multiple miniatures for a game night, producing a run of small enclosures for electronics, or iterating quickly on a prototype. Another reason it resonates is the modular nature of the workflow: you can change resins for different properties (toughness, flexibility, castability, heat resistance), adjust layer heights for speed versus detail, and choose post-processing steps that match the final purpose. It’s also easier than ever to fit a resin printer into constrained spaces, provided that ventilation and safety are taken seriously. With a thoughtful setup, the machine can become a reliable tool rather than an occasional experiment, and it can grow with your skills as you move from basic figurines to functional parts and more demanding geometries.
Understanding MSLA Resin Printing and How Elegoo Implements It
Most models marketed as an elegoo resin printer rely on masked stereolithography (MSLA), where an LCD panel acts as a dynamic mask that blocks or allows UV light to cure resin for each layer. Compared with older laser-based SLA systems, MSLA often provides a compelling value because an entire layer is exposed at once, so print time depends more on height than on the number of parts on the build plate. This “whole-layer exposure” behavior is one of the reasons resin printing feels productive for batches: adding more miniatures often doesn’t add much time, as long as they fit within the build area. The key technical factors include the LCD resolution, the optics that shape and distribute UV light, and the mechanical stability of the Z-axis. Elegoo machines typically focus on balanced performance: adequate rigidity, straightforward leveling mechanisms, and firmware that supports common slicer outputs. While marketing materials may highlight “4K/8K/12K” screens, the practical difference shows up when you’re printing fine textures, small text, or micro-details like chain links or skin pores on a sculpt. Still, resolution is only one part of the final outcome; resin choice, exposure tuning, and post-processing quality can matter just as much.
When evaluating an elegoo resin printer from an MSLA perspective, it helps to think in terms of a complete system: screen, light engine, vat, build plate, and software pipeline. The LCD panel has a finite life because it is repeatedly exposed to UV and heat; a healthy ecosystem is one where replacement screens are obtainable and installation is not a nightmare. The light source must be consistent across the build area; uneven illumination can lead to varying cure depth and subtle dimensional differences between parts printed on different regions of the plate. The vat’s FEP/PFA film influences peel forces and release reliability; choosing a quality film and keeping it clean can reduce failed prints and preserve detail. The Z-axis design and lead screw alignment influence layer stacking accuracy; wobble and flex can translate into artifacts. Finally, the slicer’s anti-aliasing, support generation, and resin profile management are what turn a 3D model into a dependable print job. The machines are often compatible with common slicers, which is important because slicer features evolve quickly, and a printer that works well with modern tools stays useful longer.
Choosing the Right Elegoo Resin Printer: Size, Resolution, and Use Case Fit
Selecting an elegoo resin printer becomes easier when you map your projects to three practical constraints: build volume, pixel size (effective XY resolution), and workflow capacity. Build volume is the first gatekeeper: if you’re printing tabletop miniatures, small busts, or jewelry patterns, a compact machine may be perfect and may even be easier to manage because smaller vats and plates are simpler to clean. If you want to print larger cosplay components, bigger figurines, or multiple parts at once, a larger build area reduces the need to split models and manage seam lines. Resolution matters most when you print small objects with fine surface detail; a smaller pixel size generally yields smoother edges and more legible micro-text, but it can also reveal sculpting flaws and makes support placement more critical. Another often overlooked factor is the Z-axis maximum height and stability; tall, thin prints can be sensitive to vibration, peel forces, and suction, so a robust frame and well-tuned lift speeds can matter more than headline resolution figures.
Use case fit also includes how often you plan to print and how tolerant you are of post-processing time. An elegoo resin printer can produce outstanding results, but resin printing is a process with steps: preparing the build plate, filtering resin when needed, washing, curing, and managing waste. If your goal is rapid prototyping with frequent iterations, you may value a printer that has a reliable leveling system and predictable exposure behavior so you can focus on design changes rather than constant troubleshooting. If your goal is producing display-quality miniatures, you may prioritize resolution, resin selection, and compatibility with your preferred slicer features like hollowing, drainage holes, and support editing. Consider your environment too: resin printing benefits from a controlled temperature range and good ventilation. If you have a dedicated hobby room with airflow and a stable surface, you can comfortably run longer jobs and keep supplies organized. If you’re working in a shared living space, you may prioritize odor management, containment, and a workflow that minimizes spills. Matching the machine to your space and habits is often the difference between a printer that gets used weekly and one that sits idle.
Workspace Setup: Ventilation, Temperature Control, and Practical Layout
Setting up an elegoo resin printer responsibly starts with acknowledging that photopolymer resin is a chemical product that requires careful handling. A good workspace is not just a table; it’s a small production line with zones for clean tasks and messy tasks. Ventilation should be treated as a requirement, not an optional upgrade. Many users place the printer near a window with an exhaust fan or use an enclosure with ducting to route air outside. The goal is to reduce lingering fumes, especially during printing and when the lid is opened. Temperature control matters because resin viscosity and curing behavior change with ambient temperature; too cold and the resin thickens, leading to poor flow, weaker layer bonding, and increased failure rates. Too hot and you can see faster reactions and potential overcuring or dimensional drift depending on resin chemistry. A stable, moderate temperature improves predictability and reduces the amount of re-tuning you have to do when seasons change.
Layout is a productivity factor that also improves safety. Place the elegoo resin printer on a sturdy, level surface that won’t wobble when the Z-axis moves. Keep paper towels, nitrile gloves, a silicone mat, and a dedicated tool set within reach so you don’t walk around with resin-contaminated gloves. It helps to designate containers for “clean tools” and “resin tools,” because cross-contamination can make washing less effective and can introduce cured debris into the vat. Add a wash and cure station or at least a sealed wash container and a UV curing solution, and plan where wet parts will drip-dry without making a mess. Lighting is underrated: bright, even light helps you spot uncured resin, support marks, and small defects before you paint or assemble. Finally, think about waste: you will generate resin-saturated wipes, gloves, and occasional failed prints. A lidded bin, UV exposure for curing waste before disposal, and a clear routine for filtering resin help keep the workspace tidy and reduce the chance of accidental contact. The more deliberate the setup, the more enjoyable the printing process becomes.
Resins for Elegoo Machines: Standard, Tough, Flexible, and Specialty Options
Choosing resin for an elegoo resin printer is like choosing material for any manufacturing process: it defines not only the look of the part but also its strength, brittleness, and long-term behavior. Standard resins are popular because they’re relatively affordable, cure reliably, and deliver excellent surface detail. They are often ideal for miniatures, decorative pieces, and prototypes that won’t be stressed mechanically. However, standard resin can be brittle, which becomes obvious when you print thin features like sword blades, antennae, or snap-fit clips. Tough resins or ABS-like blends improve impact resistance and reduce chipping, making them better for parts that will be handled frequently or lightly loaded. Flexible or elastomer-like resins are useful for gaskets, protective covers, or parts that need a bit of give, though they can be trickier to print because they may require different supports and post-cure strategies. Specialty resins—such as castable, high-temperature, or water-washable—expand what you can do, but each comes with tradeoffs in cost, odor, durability, and required process control.
Resin selection also affects how you tune an elegoo resin printer. Different formulations respond differently to exposure time, lift speed, and layer height. A pigmented resin with heavy fillers may need longer exposure to achieve consistent cure depth, while a translucent resin can cure more readily but may be prone to light bleed that softens sharp corners. Water-washable resins can simplify cleanup, but they still require responsible waste handling; resin-contaminated water is not safe to pour down the drain and should be cured and disposed of properly. Another practical dimension is color: lighter colors can show surface imperfections and support marks more clearly, which can be helpful for quality control. Darker colors can hide minor defects but may also require longer exposure, depending on opacity. If you plan to paint your prints, consider how the resin sands and how it accepts primer; some resins produce dust that is more irritating, and some benefit from a slightly longer post-cure to reduce tackiness. Many users keep two or three “go-to” resins: a high-detail standard resin for display pieces, a tougher blend for functional parts, and a specialty resin for occasional needs. That approach keeps your workflow consistent while still offering versatility.
Calibration and First-Time Success: Leveling, Exposure Tests, and Profiles
Dialing in an elegoo resin printer is less about secret tricks and more about establishing a repeatable baseline. Leveling the build plate is usually the first step, and it pays to do it methodically: ensure the vat is removed if the manufacturer recommends leveling to the screen, use the correct thickness of leveling paper, and tighten bolts in a consistent pattern. A poorly leveled plate can cause partial adhesion, warped first layers, or prints that peel off mid-job. After leveling, exposure calibration is the next lever. Resin printing is sensitive to exposure time: too little and layers may not fully bond, supports may fail, and details can look soft or incomplete; too much and details can “bloom,” holes can close up, and dimensional accuracy can drift. Exposure test prints—small calibration models designed to show detail thresholds—are a practical way to find a working range. Once you have a good base exposure for a resin at a specific layer height, you can save it as a slicer profile and avoid reinventing the wheel every time.
Profiles are where an elegoo resin printer becomes predictable. A solid profile includes bottom layer count and bottom exposure (for strong adhesion), normal exposure, lift distance, lift speed, and retract speed. Bottom settings are often higher because the first layers must grip the plate against peel forces; however, excessive bottom exposure can cause “elephant’s foot,” where the base flares outward. Lift and retract settings influence peel reliability: lifting too fast can increase suction and cause failures, while lifting too slowly can extend print times significantly. The right balance depends on your vat film condition, resin viscosity, and model geometry. It also helps to run prints at consistent room temperature because exposure behavior changes with resin temperature. If you change one variable—new resin, different layer height, a new vat film—expect to revalidate the profile with a small test. Keeping notes is surprisingly valuable: record resin brand, color, ambient temperature, and settings for successful jobs. Over time, you build a library of known-good configurations that make the printer feel like a dependable tool rather than a finicky gadget.
Supports, Orientation, and Avoiding Common Failure Modes
Support strategy is often the biggest determinant of success on an elegoo resin printer, especially for highly detailed models and parts with large flat areas. Orientation matters because resin printing involves peel forces as each layer separates from the vat film. Large cross-sectional areas create higher peel forces, which can lead to layer separation, suction-cup effects, and failures that leave cured resin stuck to the film. Angling a model can reduce the cross-sectional area per layer and distribute forces more evenly. It can also improve surface quality by moving critical details away from heavy supports. Supports themselves need to be strong enough to hold the part during repeated lifting, but not so aggressive that they scar visible surfaces. Light supports can preserve detail but may fail on heavier models; medium and heavy supports can be necessary for large masses, but careful placement and tuning of contact points reduce cleanup work. Many users find that manual support editing—adding a few strategic reinforcements—outperforms fully automatic supports for challenging prints.
Expert Insight
Dial in exposure with a quick calibration print before starting a big job: run a small test (like a validation matrix), then adjust normal exposure in small steps (0.2–0.5s) until details are crisp without swollen edges. Keep resin temperature consistent (around 20–25°C) to avoid sudden changes in cure behavior between prints. If you’re looking for elegoo resin printer, this is your best choice.
Improve reliability by treating the build plate and vat as a routine checklist: re-level after any failed print, lightly scuff the plate if adhesion slips, and inspect the FEP for clouding or dents that can cause sticking. Filter resin back into the bottle after failures, and keep the vat covered to prevent dust and stray UV from contaminating the next run. If you’re looking for elegoo resin printer, this is your best choice.
Common failure modes tend to repeat, and learning to diagnose them saves time and resin. If prints detach from the build plate early, the cause may be insufficient bottom exposure, inadequate bottom layer count, a dirty plate, or leveling issues. If supports print but the model is missing sections, normal exposure may be too low, or supports may be too light for the geometry. If you see “pancakes” of cured resin on the vat film, something failed mid-print and continued exposing without a part attached; this is a signal to stop, clean the vat carefully, and inspect the film for damage. Layer lines or shifts can indicate mechanical issues, debris in the Z-axis rails, or a loose build plate mount. Hollow models introduce another category of problems: trapped resin and pressure differentials can cause cracking over time unless proper drainage holes are included and the interior is thoroughly washed and cured. With an elegoo resin printer, a consistent routine helps: stir or gently mix resin, check the vat for debris, confirm the plate is clean, and preview the sliced file for islands (unsupported regions). These habits reduce surprises and make even complex models more achievable.
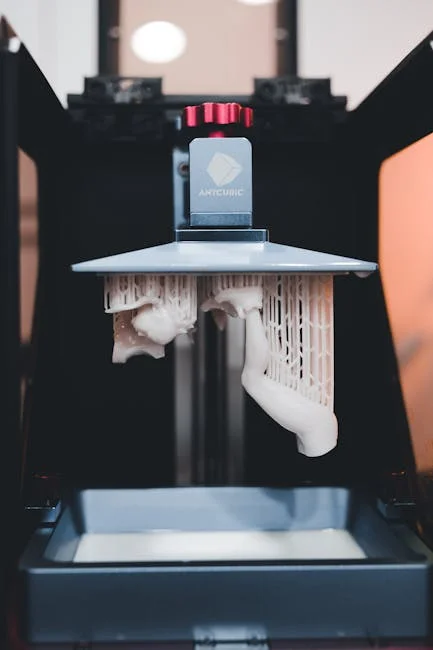
Washing and Curing: Getting Clean, Strong Prints Without Excess Mess
Post-processing is where an elegoo resin printer workflow either feels smooth or becomes frustrating, and the difference is usually the system you set up for washing and curing. Washing removes uncured resin from the surface, which improves detail, reduces tackiness, and prevents glossy patches after curing. Many people use isopropyl alcohol (IPA) because it dissolves resin effectively, though alternatives exist depending on resin type and local availability. A two-stage wash is often more efficient than a single bath: the first container removes the bulk of resin, and the second “clean” bath finishes the job. This approach extends the life of your cleaning solvent and reduces residue. Agitation helps—whether through a wash station, a magnetic stirrer, or manual swirling—because stagnant solvent can leave resin in crevices. After washing, allow parts to dry fully before curing; trapped solvent can cause whitening, brittle surfaces, or uneven cure.
| Model | Best for | Key advantages |
|---|---|---|
| ELEGOO Mars 4 | Entry-level resin printing and small, detailed miniatures | High-detail mono LCD, compact footprint, strong value for beginners |
| ELEGOO Saturn 3 | Larger prints with fine detail (props, busts, batch mini printing) | Bigger build volume, high-resolution screen, faster curing with mono tech |
| ELEGOO Jupiter SE | Large-format resin printing and production-style batching | Very large build volume, designed for higher throughput, good for big models |
Curing completes polymerization and brings the part closer to its intended mechanical properties. Under-curing can leave prints soft, smelly, or prone to deformation; over-curing can make some resins more brittle, so timing matters. A controlled UV curing station is convenient because it provides consistent exposure and often includes a turntable for even curing. Sunlight can work, but it’s less predictable and can warp thin parts due to heat and uneven exposure. For hollow parts, curing the exterior is not enough; interior surfaces should be washed thoroughly, drained, and cured as well, or you risk long-term cracking and resin seepage. Support removal can happen before or after curing depending on resin behavior; many resins allow easier support removal after a short wash and before full cure, because the material is slightly more pliable. However, removing supports too early can deform delicate features. The best approach is consistent experimentation: print a known model, try different wash times and cure durations, and note what yields clean surfaces and strong details. With a dialed-in routine, post-processing becomes predictable and the overall output quality of the printer improves dramatically. If you’re looking for elegoo resin printer, this is your best choice.
Maintenance and Longevity: Vat Films, Screens, and Keeping Performance Stable
Regular maintenance keeps an elegoo resin printer producing consistent results and reduces the risk of sudden failures that waste resin and time. The vat film (often FEP or PFA) is a wear item: it can become cloudy, scratched, or dented from repeated peel cycles and occasional contact with tools. A cloudy film diffuses light and can soften details, while dents can increase adhesion and cause failures. Inspect the film regularly under good lighting, and replace it when you see persistent haze, deep scratches, or recurring release problems. Cleaning the vat should be gentle: avoid scraping aggressively with metal tools, and instead use plastic scrapers and proper filtering. Resin can be poured through a fine filter to remove cured debris that might puncture the film or create artifacts. The build plate should be kept clean and lightly scuffed if necessary to maintain adhesion, but avoid over-sanding that creates unevenness. Keeping the Z-axis rails clean and lightly lubricated according to manufacturer guidance helps prevent binding and reduces visible artifacts.
The LCD screen is another critical component in an elegoo resin printer, and understanding its role helps you protect it. Resin spills are a common hazard; a small leak can seep around the vat and cure on the screen, which is difficult to remove without damage. Using a screen protector can add a sacrificial layer that is easier to replace than the screen itself. It’s also wise to check the vat for pinholes or resin residue on the underside before each long print. If you notice inconsistent curing, dead pixels, or strange bands on prints, running an exposure test pattern can help diagnose whether the screen is failing or whether the issue is optical or resin-related. Firmware and slicer updates are part of maintenance too: updated slicers can improve supports, anti-aliasing, and file handling, while printer firmware updates may improve stability. The goal is not to chase every update but to keep a stable toolchain that you trust. With sensible care—cleaning, periodic film replacement, and attention to spills—these machines can remain reliable for years of hobby and light production use.
Print Quality Tuning: Layer Height, Anti-Aliasing, and Detail Preservation
Print quality on an elegoo resin printer is shaped by a mix of physical settings and digital choices in the slicer. Layer height is one of the most visible controls: thinner layers can reduce stepping on curved surfaces and improve the appearance of gentle slopes, but they increase print time. For miniatures and display models, many people choose finer layers to preserve sculpted detail, while for functional prototypes or internal parts, thicker layers can be a practical compromise. Anti-aliasing and grayscale exposure can smooth edges by softening pixel transitions, but heavy anti-aliasing can sometimes blur tiny engraved details or create a slightly waxy look. It’s worth testing anti-aliasing levels on a calibration model that includes both sharp edges and fine text so you can see the tradeoff. Another factor is light bleed and cure depth: overexposure can fill in small holes, soften corners, and reduce dimensional accuracy, while underexposure can lead to fragile supports and incomplete features. Fine-tuning exposure in small increments is often more effective than making large changes.
Detail preservation also depends on how you design and prepare models for an elegoo resin printer. Thin walls and tiny protrusions may print beautifully, but they can also be fragile until fully cured. If a part needs strength, consider adding subtle thickness where it won’t affect appearance, or use a tougher resin blend. For hollow models, wall thickness and drain hole placement influence both quality and reliability. A well-hollowed model reduces resin use and peel forces, but poor drainage can trap resin and cause defects. Support contact points can mar surfaces; placing supports on less visible areas and using smaller tips where possible reduces cleanup. After printing, gentle sanding, careful priming, and paint technique can make the layer structure nearly invisible. If you plan to paint miniatures, a good primer that levels slightly without obscuring fine details is a major ally. With consistent calibration, thoughtful orientation, and a realistic approach to post-processing, you can achieve results that look professionally produced, even from a desktop machine.
Applications: Miniatures, Prototyping, Dental-Style Models, and Small-Batch Parts
The most celebrated application for an elegoo resin printer is miniatures, and the reason is straightforward: resin captures fine textures that bring sculpts to life. Chainmail links, facial expressions, cloth folds, and tiny accessories can print with crispness that reduces the amount of manual cleanup before painting. For tabletop gamers and collectors, the ability to print squads of figures, terrain accessories, and custom bits without visible filament lines is transformative. Beyond miniatures, resin printing is also excellent for figurines, busts, and display pieces where surface finish matters. Artists can iterate on sculptures quickly, test poses, and validate proportions in physical form. Cosplay makers can use resin prints for detailed greebles, emblems, and master patterns for molding, though larger wearable parts often require splitting or moving to other fabrication methods due to build volume and resin brittleness.
Prototyping is another strong match for an elegoo resin printer, especially for small components where fit and detail are critical. Enclosures for electronics, ergonomic shapes, button caps, and light-duty mechanical parts can be printed quickly to validate design intent. For product designers, the ability to produce near-injection-mold-like surfaces makes it easier to evaluate aesthetics and user experience. Dental-style models, aligner forms, and high-detail anatomical prints are also common resin use cases in general, though anyone pursuing regulated medical workflows should ensure they follow appropriate standards and material requirements. Small-batch production is possible too: jigs, fixtures, and custom adapters can be printed when quantities are low and design changes are frequent. The key is to choose the right resin for the job and to validate the part under real conditions, because resin properties vary widely. When used with a disciplined workflow, the printer becomes a versatile manufacturing tool rather than merely a hobby device.
Cost of Ownership: Consumables, Time, and Planning for Realistic Operating Expenses
The upfront price of an elegoo resin printer is only part of the financial picture, and understanding ongoing costs helps you avoid surprises. Consumables include resin itself, vat films, cleaning solvent, gloves, paper towels, filters, and occasionally replacement parts like LCD screens or UV LEDs depending on the model and usage. Resin cost varies by type; standard resin is usually the baseline, while tough, flexible, and specialty formulations can cost significantly more per liter. Vat films are a predictable periodic expense, especially if you print frequently or if you occasionally have failures that require cleaning cured resin off the film. Cleaning solvent needs replacement or recycling; many users let resin settle out of dirty IPA, cure the sludge, and reuse the clarified solvent, which reduces recurring cost. Electricity usage is generally modest, but curing stations and heaters can add a bit depending on your environment.
Time is another ownership cost that matters. Resin printing involves hands-on steps: setup, part removal, washing, curing, and cleanup. If you plan to print often, investing in tools that streamline the routine can be more valuable than saving a small amount on the initial printer purchase. A dedicated wash and cure station, extra vats, a silicone work mat, and good storage containers for resin can speed up the process and reduce mess. There is also a learning investment: you may spend time dialing in profiles for each resin and model type. However, once you build a stable workflow, that time investment pays dividends through fewer failures and less rework. Planning for realistic operating expenses means budgeting not only for resin but also for the supporting ecosystem that keeps printing safe and repeatable. When you treat the printer as a small workshop system rather than a standalone gadget, the long-term experience is smoother and the total cost becomes easier to predict. If you’re looking for elegoo resin printer, this is your best choice.
Making the Most of an Elegoo Resin Printer Over the Long Term
To get lasting value from an elegoo resin printer, consistency beats constant experimentation. A stable routine—controlled temperature, reliable leveling, validated exposure settings, and a clear wash/cure process—turns printing into a dependable habit rather than a periodic gamble. Keeping a simple log of settings and outcomes can dramatically reduce troubleshooting time, especially when you switch resins or attempt a new kind of geometry. It also helps to standardize your support approach for the types of models you print most often. Miniature printers often develop a preferred orientation style and support density that balances surface cleanliness with reliability. Functional-part users often develop guidelines for wall thickness, fillets, and drainage that reduce cracking and improve strength. Over time, you’ll identify which variables matter most for your environment, and you can focus on those instead of chasing every minor tweak.
Equally important is building good habits around safety, cleanliness, and maintenance so the printer remains a pleasure to use. Keep spare gloves, filters, and a backup vat film on hand, and set aside time for periodic inspection of the vat, build plate, and Z-axis. If prints start to fail unexpectedly, resist the urge to change everything at once; adjust one variable, test, and confirm. That approach preserves your baseline and makes root causes easier to find. When you do want to expand capabilities, do it deliberately: test a new resin with calibration prints, validate mechanical properties with small samples, and only then commit to long runs. With that mindset, an elegoo resin printer becomes more than a device that makes cool objects—it becomes a reliable production tool for miniatures, prototypes, and custom parts, and it remains rewarding to use long after the initial excitement fades.
Watch the demonstration video
In this video, you’ll learn the essentials of using an Elegoo resin printer—from setup and calibration to choosing resin settings for clean, detailed prints. It covers practical tips for improving print quality, avoiding common failures, and handling post-processing steps like washing and curing, so you can get reliable results safely and efficiently.
Summary
In summary, “elegoo resin printer” is a crucial topic that deserves thoughtful consideration. We hope this article has provided you with a comprehensive understanding to help you make better decisions.
Frequently Asked Questions
Which Elegoo resin printer should I choose (Mars vs Saturn vs Jupiter)?
Choose Mars for small prints and low cost, Saturn for larger build volume with strong value, and Jupiter for very large prints and higher throughput. Compare build volume, XY resolution, and your typical model size before buying. If you’re looking for elegoo resin printer, this is your best choice.
What resin works best with Elegoo resin printers?
Most 405nm UV resins work, including Elegoo Standard, ABS-like, Water-Washable, and Tough resins. For best results, match resin type to your needs (detail vs durability) and use the manufacturer’s exposure recommendations as a starting point. If you’re looking for elegoo resin printer, this is your best choice.
How do I dial in exposure settings on an Elegoo resin printer?
Run a calibration print (e.g., exposure test) for your specific resin, layer height, and temperature. Adjust normal exposure in small steps, keep bottom layers strong enough for adhesion, and re-test after any resin or environmental change. If you’re looking for elegoo resin printer, this is your best choice.
Why are my prints not sticking to the build plate?
Common causes are insufficient bottom exposure, an un-leveled plate, a dirty/oily plate, or a worn/loose FEP film. Re-level, clean the plate, increase bottom exposure/layers slightly, and check the vat/FEP tension and resin temperature. If you’re looking for elegoo resin printer, this is your best choice.
What’s the correct cleaning and curing workflow for Elegoo resin prints?
Rinse prints in IPA (or water for water-washable resin), remove supports after a brief rinse if desired, then fully wash, dry, and UV cure evenly. Avoid over-curing thin parts and always cure after the surface is completely dry. If you’re looking for elegoo resin printer, this is your best choice.
How do I maintain an Elegoo resin printer to prevent failures?
Keep the vat and build plate clean, filter resin when pouring back, inspect/replace FEP when scratched or cloudy, keep the Z-axis lubricated, and periodically check LCD condition and screen protector. Store resin sealed and print in stable temperatures. If you’re looking for elegoo resin printer, this is your best choice.
📢 Looking for more info about elegoo resin printer? Follow Our Site for updates and tips!

Trusted External Sources
- ELEGOO: Best Consumer Level 3D Printers, Materials and STEM …
ELEGOO products are highly regarded in the 3D printing industry, maker communities & STEM classrooms around the world.
- How easy are elegoo resin printers to use? – Reddit
Apr 26, 2026 … Very easy to use compared to fdm. Very little tweaking if you of course get a newer version. Post processing is the part that sucks but I love … If you’re looking for elegoo resin printer, this is your best choice.
- 3D Printers & Accessories – elegoo us
ELEGOO is known for creating high-quality, cutting-edge, and budget-friendly 3D printing solutions. From advanced UV resin and SLA technology to reliable everyday performance, an **elegoo resin printer** is designed to deliver crisp detail and smooth results without the premium price tag.
- Are elegoo printers good? : r/3Dprinting – Reddit
Jan 14, 2026 … We have two Elegoo printers (one resin, one fdm) and love them both. They’re running all the time and still working great. Customer service has been awesome. If you’re looking for elegoo resin printer, this is your best choice.
- 3D Printers & Accessories – elegoo au
ELEGOO is dedicated to creating high-quality, innovative, and budget-friendly 3D printing solutions—especially its lineup of UV resin and SLA machines. Whether you’re a hobbyist or a professional, an **elegoo resin printer** delivers modern features and reliable performance without the premium price tag.