A 3d printer for prototyping can compress weeks of iteration into days because it removes the traditional bottlenecks tied to tooling, vendor queues, and minimum order quantities. Instead of waiting for a machine shop slot or committing to an injection mold too early, teams can translate a CAD concept into a physical object quickly enough to learn from it while the design is still fluid. That speed is not only about making something fast; it’s about making the right thing sooner. When a new handle shape feels wrong in the hand, when a snap fit is too stiff, or when a mounting boss interferes with wiring, a printed prototype makes those issues tangible. The most valuable benefit is the feedback loop: design, print, evaluate, revise, and print again. Each loop reduces uncertainty, and uncertainty is the real cost driver in early development. A well-chosen printer also makes experimentation safer. Designers can try alternate geometries, explore thickness changes, or test assembly sequences without worrying that each change triggers a new supplier quote. The result is a development process that is more exploratory and less constrained by sunk costs.
Table of Contents
- My Personal Experience
- Why a 3d printer for prototyping changes the pace of product development
- Choosing the right printing technology for prototypes: FDM, SLA, SLS, and beyond
- Key criteria when buying a 3d printer for prototyping: accuracy, repeatability, and workflow
- Materials that matter: PLA, PETG, ABS, nylon, TPU, and resin options
- Designing for additive: DfAM practices that improve prototype quality
- From concept to functional test: how to structure prototype iterations
- Surface finish, aesthetics, and presentation prototypes without slowing down
- Expert Insight
- Mechanical performance: strength, anisotropy, and realistic stress testing
- Tolerance, fit, and assembly: making prototypes that actually snap together
- Cost, time, and ROI: what “cheap prototypes” really means
- Common pitfalls and how to avoid them: failures, warping, and misleading results
- Building a repeatable prototyping workflow: settings, documentation, and team habits
- Final thoughts on selecting and using a 3d printer for prototyping effectively
- Frequently Asked Questions
My Personal Experience
I bought a small FDM 3D printer to speed up prototyping for a handheld sensor enclosure I was designing, and it immediately changed how I worked. Instead of waiting days for a machine shop quote, I could print a rough fit-check in a couple of hours, mark the tight spots with a Sharpie, tweak the CAD, and run another version overnight. The first few prints were honestly rough—warped corners, sloppy tolerances, and a clogged nozzle right before a deadline—but once I dialed in bed leveling, extrusion temp, and added a few fillets to my model, the parts started coming out consistently. What surprised me most was how useful “ugly” prototypes were: even in cheap PLA, I could test button feel, cable routing, and screw boss placement before committing to a nicer material. It didn’t replace final manufacturing, but it cut my iteration time so much that I stopped being precious about designs and started improving them faster. If you’re looking for 3d printer for prototyping, this is your best choice.
Why a 3d printer for prototyping changes the pace of product development
A 3d printer for prototyping can compress weeks of iteration into days because it removes the traditional bottlenecks tied to tooling, vendor queues, and minimum order quantities. Instead of waiting for a machine shop slot or committing to an injection mold too early, teams can translate a CAD concept into a physical object quickly enough to learn from it while the design is still fluid. That speed is not only about making something fast; it’s about making the right thing sooner. When a new handle shape feels wrong in the hand, when a snap fit is too stiff, or when a mounting boss interferes with wiring, a printed prototype makes those issues tangible. The most valuable benefit is the feedback loop: design, print, evaluate, revise, and print again. Each loop reduces uncertainty, and uncertainty is the real cost driver in early development. A well-chosen printer also makes experimentation safer. Designers can try alternate geometries, explore thickness changes, or test assembly sequences without worrying that each change triggers a new supplier quote. The result is a development process that is more exploratory and less constrained by sunk costs.
Beyond speed, a 3d printer for prototyping improves communication across disciplines. Engineers, industrial designers, marketing stakeholders, and manufacturing specialists often interpret drawings differently. A physical model aligns expectations quickly: it clarifies scale, reveals ergonomic issues, and helps non-technical reviewers participate. In regulated or safety-critical environments, early physical prototypes can also support preliminary risk reviews by exposing pinch points, sharp edges, and misuse scenarios that are hard to spot on a screen. Even when the printed material is not identical to production material, geometry-related insights are still meaningful: clearances, assembly tolerances, cable routing, and service access can all be evaluated with printed parts. Over time, organizations that integrate printing into their routine tend to standardize internal practices—naming conventions, revision control, test notes, and print logs—so that each prototype becomes a documented learning artifact rather than a one-off model. That operational maturity turns additive manufacturing into a predictable, repeatable part of development rather than a novelty.
Choosing the right printing technology for prototypes: FDM, SLA, SLS, and beyond
Selecting a 3d printer for prototyping starts with understanding the major process families and the kind of learning each one enables. FDM (fused deposition modeling) is common because it’s cost-effective, durable for rough handling, and compatible with many thermoplastics. It excels for early form-and-fit models, jigs, fixtures, and test rigs where surface finish is secondary to speed and toughness. SLA (stereolithography) uses photopolymer resin to achieve fine detail and smooth surfaces, making it a strong choice for appearance models, small mechanical features, fluidic channels, and parts that must communicate a “near-final” look. SLS (selective laser sintering) fuses nylon powder and produces strong, isotropic parts without support structures, which is useful for complex assemblies, functional hinges, and geometries that would be painful to support in other processes. Each technology has tradeoffs: FDM can show layer lines and anisotropic strength; SLA can be brittle and requires post-curing; SLS systems are typically more expensive and require powder handling. The “right” selection depends on what question the prototype must answer: Does it need to survive repeated drops? Must it reveal tiny text and crisp edges? Is it meant for snap-fit testing, heat exposure, or chemical resistance?
Many teams end up using more than one 3d printer for prototyping approach across the lifecycle. Early on, FDM may dominate because it’s inexpensive and forgiving. As the design stabilizes and stakeholders want something visually convincing, resin printing might take over for presentation-grade parts. For functional testing that demands better mechanical properties and more uniform strength, SLS nylon can be a bridge toward production. There are also hybrid strategies: printing a rigid core on an FDM machine and adding soft overmold-like features with a flexible filament; printing molds for silicone casting to produce small batches of elastomer parts; or printing sacrificial patterns for investment casting. Thinking in terms of “prototype intent” helps: concept models validate scale and ergonomics; engineering prototypes validate mechanisms and tolerances; pre-production prototypes validate assembly flow and serviceability. A printer choice that matches intent prevents wasted time chasing perfect cosmetics when the real need is to verify a latch, a gasket compression, or a cable strain relief.
Key criteria when buying a 3d printer for prototyping: accuracy, repeatability, and workflow
Accuracy and repeatability matter more than headline resolution when evaluating a 3d printer for prototyping. Resolution specs can be misleading because they describe step size or pixel size, not the end-to-end system behavior including calibration, thermal drift, material shrinkage, and slicing decisions. For prototyping, repeatability—getting the same dimension and fit across multiple prints—often matters most, especially when testing assemblies where multiple parts must mate. Look for robust motion systems, stable frames, consistent extrusion or exposure control, and a mature ecosystem of profiles for common materials. Equally important is how the printer handles real-world geometry: thin walls, small holes, long spans, and complex overhangs. A printer that can produce clean bores and predictable hole diameters reduces the need for drilling or reaming, and that saves time when iterations are frequent. Pay attention to bed leveling (manual vs. automatic), enclosure temperature control for engineering plastics, and the availability of hardened nozzles if abrasive filaments are on the roadmap.
Workflow considerations can make or break the value of a 3d printer for prototyping. A fast printer that is frequently down for maintenance, clogged nozzles, or failed adhesion will slow iteration more than a slightly slower but reliable machine. Consider how prints are started and monitored, whether the machine supports remote management, and how easy it is to swap materials. Post-processing is part of the workflow too: resin printing requires washing and curing; SLS needs depowdering; FDM may need support removal and light sanding. If the team is small, a simpler workflow may be preferable to a higher-end process that demands more handling time and safety controls. Also evaluate software: slicing options, support generation quality, and the ability to save repeatable settings per prototype type. Finally, consider the “human factors” of adoption: clear documentation, active community support, spare parts availability, and vendor responsiveness. Prototyping thrives when the printer is approachable enough that engineers use it daily instead of treating it like specialized equipment that requires a gatekeeper.
Materials that matter: PLA, PETG, ABS, nylon, TPU, and resin options
The most useful 3d printer for prototyping is the one that can print materials aligned with the performance questions you need answered. PLA is popular for quick concept models because it prints easily and holds dimensional detail well, but it softens at relatively low temperatures and can be brittle. PETG offers better toughness and temperature resistance while remaining approachable, making it a practical choice for functional mockups, housings, and brackets. ABS and ASA bring improved heat resistance and durability; ASA adds UV stability for outdoor exposure prototypes. Nylon (PA) and nylon composites can approximate production-like toughness for clips, hinges, and snap fits, though they can be moisture-sensitive and may require drying. TPU and other flexible filaments enable gasket trials, vibration isolators, wearable prototypes, and grip surfaces. Resin materials vary widely: standard resins excel at detail; tough resins mimic ABS-like behavior; flexible resins simulate rubbery parts; high-temp resins support heat-deflection tests; and dental/jewelry resins address specialized needs. Choosing material is less about a single “best” option and more about building a small, well-understood library of materials with known behavior.
Material behavior also affects design rules for a 3d printer for prototyping. Wall thickness, rib design, fillet radii, and snap geometry should reflect the printed material’s strengths and weaknesses. For FDM, layer adhesion can be the limiting factor, so orienting parts to load layers in shear rather than peel can produce more realistic functional tests. For resin printing, avoid thin, unsupported features that can warp during post-cure; design drainage holes for hollow parts; and account for resin shrinkage and support marks. For nylon processes, consider that powder-based printing can yield slightly porous surfaces that may need sealing for fluid tests. When a prototype must simulate a production part, it can be smarter to choose a material that matches the test’s intent rather than chasing an exact material match. For example, if the goal is to validate a latch’s ergonomics and travel, a tough PETG print may be sufficient. If the goal is to validate fatigue life, moving to nylon or a reinforced filament might be more informative. Many teams also combine printing with secondary operations—heat-set inserts, threaded inserts, epoxy coating, vapor smoothing, or painting—to bring prototypes closer to real-world use without losing iteration speed.
Designing for additive: DfAM practices that improve prototype quality
Design for additive manufacturing (DfAM) makes a 3d printer for prototyping far more effective because it reduces failure rates and makes printed parts more representative. One of the biggest DfAM wins is planning for support strategy. Overhang angles, bridging distances, and internal cavities determine whether a print comes off cleanly or requires extensive cleanup. Adding chamfers, splitting a part into multiple pieces, or incorporating self-supporting angles can preserve detail and reduce post-processing time. Another key practice is using consistent wall thicknesses appropriate for the process. Thin walls can print beautifully in resin but may be fragile; thick walls can trap heat in FDM and cause warping. For assemblies, build in clearances that match the printer’s capability rather than nominal CAD clearances. A prototype that’s meant to snap together should account for layer lines, material stiffness, and dimensional variation. Even a small adjustment to a peg diameter or slot width can determine whether a fit test is meaningful or misleading.
DfAM also helps teams get better learning from each 3d printer for prototyping cycle by designing parts to be measurable. Adding datum features, gauge blocks, or simple test coupons on the same build can reveal whether a printer is drifting out of calibration. Including alignment pins, witness marks, or assembly guides can clarify whether a fit issue is due to design geometry or print variability. When testing mechanisms, design in modularity so that only the changing portion is reprinted—swap-in latch arms, alternate spring geometries, or adjustable stops. That modular approach accelerates iteration and reduces material waste. Another useful technique is designing for post-processing: leave stock for sanding on cosmetic surfaces, add flats for drilling, and include pockets for heat-set inserts. If the prototype needs to tolerate repeated assembly, design bosses that can accept threaded inserts rather than relying on self-tapping screws into printed plastic. These practices make additive prototypes more robust, and robustness matters because it allows longer, more realistic tests—drop trials, thermal exposure, repeated actuation—without the prototype failing for reasons unrelated to the design intent.
From concept to functional test: how to structure prototype iterations
A disciplined iteration structure turns a 3d printer for prototyping into a strategic advantage rather than a source of random experiments. Early concept iterations should focus on broad questions: overall size, hand feel, placement of buttons, visibility of indicators, and the general layout of components. At this stage, faster prints and simpler materials are often best. The goal is to learn quickly and discard freely. As the design converges, the prototypes should shift toward engineering questions: wall thickness, screw boss strength, snap engagement force, alignment features, and tolerance stacks. Printing multiple variants in a single build—A/B/C versions of a latch or a set of different rib patterns—can speed learning without adding calendar time. Documenting each variant with clear labels and test notes prevents the common problem of repeating the same experiment later because nobody remembers which geometry was tested and why it failed.
Functional testing with a 3d printer for prototyping becomes more meaningful when the test environment is realistic. If a housing will see elevated temperatures, test it in a warm enclosure; if a part will be exposed to oils or cleaners, check chemical compatibility; if a mechanism will be actuated thousands of times, create a simple test jig to cycle it. Printed prototypes can also be paired with off-the-shelf components—springs, bearings, magnets, fasteners—to create realistic assemblies. It’s often valuable to run “assembly rehearsals” where the team simulates the intended build process using printed parts: this reveals whether tools can access fasteners, whether cables can be routed without pinching, and whether subassemblies can be installed in the correct order. As the design approaches a handoff to manufacturing, prototypes can be used to validate packaging, service procedures, and accessory fit. The printer supports these later-stage needs by enabling small revisions quickly, so late discoveries—like a connector that needs more clearance—don’t derail timelines.
Surface finish, aesthetics, and presentation prototypes without slowing down
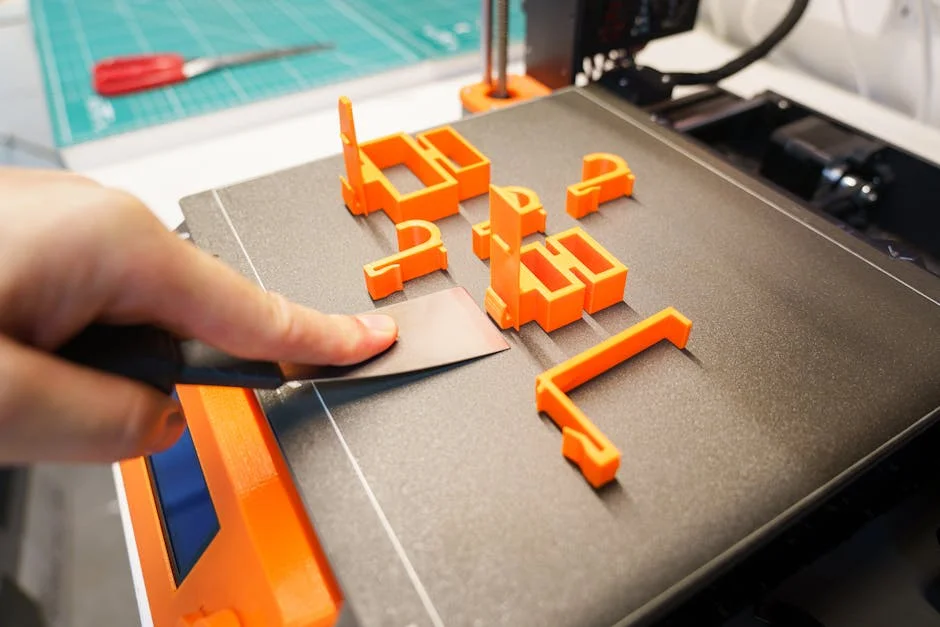
A 3d printer for prototyping can produce presentation-quality models, but it requires smart choices about process and finishing. Resin printing is commonly used when smooth surfaces and crisp details are important, such as consumer product enclosures, medical device housings, or small mechanical features that must look precise. For FDM, improving aesthetics often starts with orientation: placing the most visible surfaces vertically can reduce the appearance of layer stepping, while using smaller layer heights and well-tuned extrusion can reduce artifacts. Support scars are another major factor in appearance; choosing support contact points on hidden surfaces and using support interfaces can minimize cleanup. When a prototype is intended for stakeholder review, the objective is usually “looks right at arm’s length” rather than perfection under a microscope. That means choosing finishing steps that provide the most visual improvement per unit time, such as a quick sand on prominent faces, a filler primer, and a uniform paint coat.
| Model | Best for prototyping | Key strengths | Trade-offs |
|---|---|---|---|
| Prusa MK4 (FDM) | Functional parts, iterative design, jigs/fixtures | Reliable dimensional accuracy, broad material support (PLA/PETG/ASA), strong community + profiles | Visible layer lines; fine details and smooth surfaces require post-processing |
| Bambu Lab X1 Carbon (FDM) | Fast iteration cycles and multi-material concept models | Very high print speed, excellent out-of-box quality, optional AMS for multi-color/material | More closed ecosystem; higher cost for multi-material setup |
| Elegoo Saturn 3 (Resin/MSLA) | High-detail prototypes, small parts, cosmetic/form models | Exceptional surface finish and fine detail, sharp features, great for fit/visual validation | Resin handling/odor, post-curing/cleaning required; parts can be more brittle than FDM |
Expert Insight
Start prototyping with fast, low-risk settings: use a 0.6 mm nozzle (or 0.4 mm with 0.28 mm layers), 10–20% infill, and 2–3 perimeters to validate fit and ergonomics quickly. Print only the critical section (a corner, latch, or interface) before committing to a full build to cut iteration time and material waste. If you’re looking for 3d printer for prototyping, this is your best choice.
Design for repeatable results: add 0.2–0.4 mm clearance on mating parts, orient features to avoid weak layer lines at stress points, and include simple test coupons for holes, snaps, and threads to dial in tolerances. Keep a short log of filament type, temperature, and cooling settings so successful prototypes can be reproduced and refined without guesswork. If you’re looking for 3d printer for prototyping, this is your best choice.
Finishing workflows can be standardized so that a 3d printer for prototyping doesn’t become a time sink. For example, an FDM part can be printed with slightly thicker walls to allow sanding without weakening the structure, then primed and painted in a consistent sequence. For ABS prints, vapor smoothing can deliver a near-molded look, though it requires careful handling and ventilation. Resin parts can be wet-sanded and clear-coated for an injection-mold-like sheen. Another practical approach is “hybrid prototyping”: print the structural core quickly, then apply cosmetic skins, vinyl wraps, or thin covers that deliver the desired surface appearance. Labels, decals, and simulated textures can help stakeholders focus on the design rather than the manufacturing artifacts. If the prototype is used for photography, lighting and paint choices matter as much as print quality. The point is not to turn every print into a showpiece, but to have a repeatable method to produce a convincing model when the situation demands it—without losing the speed that makes rapid iteration valuable.
Mechanical performance: strength, anisotropy, and realistic stress testing
Mechanical realism is a common challenge with a 3d printer for prototyping because printed parts often behave differently than molded or machined parts. FDM parts can be strong along the filament path but weaker between layers, making them anisotropic. Resin parts can be stiff and detailed but may be more brittle, especially in thin sections or after extended UV exposure. Nylon-based prints generally offer better toughness, but surface porosity and dimensional variability can affect certain fits. To run meaningful tests, it’s important to align print orientation with expected loads. If a bracket will see bending, orient the layers so that tensile loads don’t peel layers apart. If a snap feature must flex repeatedly, consider printing in a tougher polymer and orienting it so the flex line isn’t coincident with layer boundaries. These decisions can make the difference between a prototype that fails immediately and one that reveals the true behavior of the design.
Stress testing with a 3d printer for prototyping also benefits from controlled comparisons. Printing standardized test coupons alongside the actual part can help correlate settings to strength outcomes. Changing one variable at a time—wall count, infill pattern, layer height, annealing step—keeps results interpretable. For parts that will be fastened, adding heat-set inserts can prevent thread stripping and better simulate production assemblies where metal threads are common. For enclosures, drop tests can be informative even with printed plastics, as long as the team understands the limitations: a brittle resin might exaggerate cracking risk, while a tough filament might hide weaknesses that would appear in a more brittle production plastic. When the goal is to approximate production behavior, it can be effective to print multiple prototypes in different materials and compare failure modes. If all versions fail at the same geometric feature, the design likely needs reinforcement; if only one material fails, the issue may be material-specific. This approach uses the printer not just as a part maker, but as a controlled experimentation platform.
Tolerance, fit, and assembly: making prototypes that actually snap together
Fit and assembly are where a 3d printer for prototyping proves its value, because many product problems are really tolerance problems in disguise. Printed parts can be dimensionally accurate yet still assemble poorly if clearances are too tight, if holes print undersized, or if warping introduces subtle misalignment. Establishing a baseline “fit standard” for each printer-material combination helps: for example, a common clearance for sliding fits, a different one for snap fits, and a known offset for hole diameters that tend to print small. Once those baselines are documented, designers can apply them consistently and avoid rediscovering the same clearance rules. For multi-part assemblies, printing a small section of the interface first—like a corner with a latch and mating groove—can validate the fit before committing to a full build. That targeted approach accelerates iteration and reduces wasted print time.
Assembly prototypes created with a 3d printer for prototyping become more realistic when they include the same fasteners and hardware planned for production. Boss geometry can be designed for threaded inserts, and prototypes can incorporate alignment pins, dowels, magnets, or clips to mimic real assembly. If the final product uses gaskets, flexible filaments can simulate compression and sealing behavior, at least qualitatively. Cable management can be tested with printed channels and retention features, revealing whether the assembly process is practical. It’s also useful to print fixtures or assembly aids alongside product parts: a simple jig to hold components in place, drill guides for secondary operations, or a clamp to apply consistent force during bonding. These supporting tools are often overlooked, but they can dramatically improve the quality of prototype builds and the reliability of test results. When teams treat assembly as part of the prototype scope, they uncover issues earlier—like screwdriver access, part orientation confusion, or inadequate lead-ins—that might otherwise appear only during pilot production.
Cost, time, and ROI: what “cheap prototypes” really means
A 3d printer for prototyping is often justified as a cost saver, but the strongest ROI usually comes from time saved and mistakes avoided rather than the per-part price alone. Printing a part may cost only a few dollars in material, yet the true value is in identifying design flaws before they become expensive. Catching a clearance issue before ordering machined parts, spotting an ergonomic problem before committing to tooling, or validating an assembly sequence before a pilot run can prevent substantial downstream rework. Still, it’s important to calculate realistic operating costs: consumables, replacement nozzles, build plates, resin vats, IPA for washing, filters, electricity, and the labor time for setup and post-processing. A printer that is inexpensive upfront but requires constant babysitting can quietly become expensive in labor. Conversely, a more reliable machine can pay for itself by keeping iteration moving and reducing failed prints.
To manage costs with a 3d printer for prototyping, teams often adopt a tiered approach. Use fast, low-cost prints for early learning, then reserve premium materials and high-detail processes for later stages when the design is stable enough to justify the extra effort. Batch printing can reduce labor overhead by consolidating setup time, and printing overnight can turn idle hours into productive time. It also helps to standardize print settings for common prototype categories—draft, engineering, cosmetic—so that time estimates are predictable. Another ROI lever is internal access: when engineers can print on demand, they avoid procurement delays and reduce dependency on external vendors for every small change. That autonomy can be especially valuable for startups or small teams where calendar time is a major constraint. Over time, the printer can also support adjacent needs—fixtures, replacement parts, packaging mockups, and test equipment—extending its value beyond product prototypes alone.
Common pitfalls and how to avoid them: failures, warping, and misleading results
Even the best 3d printer for prototyping can produce misleading results if common pitfalls aren’t managed. One of the biggest is treating a printed prototype as if it perfectly represents production. Printed materials may have different stiffness, friction, and heat behavior, so test conclusions should be framed carefully. Another pitfall is ignoring moisture management for hygroscopic filaments like nylon and some TPU, which can cause bubbling, weak parts, and inconsistent dimensions. Warping and shrinkage can distort long flat surfaces, leading to false assumptions about the design when the real issue is print setup. Support removal can also damage small features, making a design look weak when it’s actually the post-processing that caused failure. These issues are solvable, but they require process discipline: drying filaments, controlling enclosure temperature, tuning first-layer adhesion, and using appropriate support strategies.
Another frequent problem with a 3d printer for prototyping is inconsistent settings across team members. If one person prints a part with three perimeters and another uses one perimeter, the prototypes may behave differently and lead to conflicting feedback. Standard profiles and a simple print log can prevent this. Geometry can also be a source of confusion: holes often print undersized, thin walls can become fragile, and sharp corners can concentrate stress. Designing in fillets, adding ribs, and allowing realistic clearances can make prototypes more robust and make tests more representative. Finally, it’s easy to over-polish early prototypes, spending hours sanding and painting when the design is still changing daily. A practical rule is to match finish effort to decision impact: if the goal is to validate a mechanism, keep the prototype functional and quick; if the goal is to secure stakeholder approval on form factor, invest in cosmetics. Avoiding these pitfalls keeps the printer’s output aligned with learning objectives, which is the whole point of rapid iteration.
Building a repeatable prototyping workflow: settings, documentation, and team habits
A 3d printer for prototyping delivers consistent value when the workflow is repeatable. That begins with standardized printer profiles for each material, including temperatures, speeds, cooling, supports, and infill defaults. Profiles should be treated like engineering assets: versioned, tested, and updated with notes about what changed and why. Calibration routines—bed leveling checks, extrusion calibration, resin exposure tests—should be scheduled rather than performed only when prints start failing. A simple maintenance checklist can prevent many issues: clean build surfaces, inspect belts or rails, replace worn nozzles, and keep resin tanks free of cured debris. Material handling is part of workflow too. Filament storage with desiccant, labeled spools with open dates, and a dryer for moisture-sensitive polymers can turn inconsistent printing into dependable output. For resin, safe handling practices, proper ventilation, and consistent wash/cure times improve both safety and part quality.
Documentation habits amplify the benefits of a 3d printer for prototyping. Each prototype should be traceable to a CAD revision and a set of print settings, especially when test results drive design decisions. Labeling parts directly—embossed revision codes, small tags, or marker-friendly flats—prevents mix-ups during reviews. Test notes should record what was evaluated, what failed, and what changed next. When multiple variants are printed, keep a physical or digital “variant map” so feedback stays tied to the correct geometry. Teams that do this well can look back months later and understand the evolution of a design without relying on memory. Another habit that improves throughput is designing with printability in mind from the start: avoiding unnecessary overhangs, splitting parts into printable modules, and using standard insert sizes. When these practices become routine, the printer becomes a dependable extension of the engineering process rather than a separate activity that only a few people understand.
Final thoughts on selecting and using a 3d printer for prototyping effectively
The most effective approach is to treat a 3d printer for prototyping as a learning tool with a clear purpose, not as a single machine expected to solve every problem. Match the printing process and material to the question you need answered, whether that question is about ergonomics, fit, mechanical strength, surface finish, or assembly sequence. Build internal standards for clearances, profiles, and documentation so that prototypes are consistent and test results are trustworthy. Make workflow reliability a priority—material storage, calibration, and maintenance—because iteration speed depends on successful prints, not theoretical print speed. When needed, combine printing with simple secondary operations like inserts, sanding, coating, and hardware integration to get prototypes that behave realistically without sacrificing agility.
With the right expectations and habits, a 3d printer for prototyping becomes a practical advantage that shortens iteration cycles, improves cross-team communication, and reduces risk before expensive commitments are made. The most valuable prototypes are not necessarily the prettiest ones; they are the ones that answer a specific question decisively and guide the next design move. By choosing an appropriate technology, keeping a focused material set, and maintaining a repeatable workflow, teams can produce better prototypes more often and make decisions with greater confidence, ensuring that the final product reflects tested geometry rather than assumptions carried forward under schedule pressure.
Summary
In summary, “3d printer for prototyping” is a crucial topic that deserves thoughtful consideration. We hope this article has provided you with a comprehensive understanding to help you make better decisions.
Frequently Asked Questions
What type of 3D printer is best for prototyping?
If you need a **3d printer for prototyping**, FDM is usually the go-to choice for quick, budget-friendly functional parts. SLA/MSLA shines when you want crisp details and a smooth, polished finish, while SLS/MJF is ideal for rugged, production-like components—though it typically comes with a higher price tag.
Which materials should I use for prototype parts?
For a **3d printer for prototyping**, material choice makes all the difference: use **PLA** for fast form-and-fit checks, step up to **PETG** when you need tougher, more impact-resistant parts, and choose **ABS or ASA** for better heat tolerance and long-term durability. If your design needs bend and stretch, **TPU** is ideal, while **engineering resins or nylon** deliver higher strength and sharper precision for more demanding prototypes.
How accurate are 3D printers for prototyping?
In general, you can expect FDM prints to land around ±0.2–0.5 mm, while SLA/MSLA typically achieves tighter results of about ±0.05–0.2 mm—though the final accuracy will still depend on calibration, part geometry, and material shrinkage when using a **3d printer for prototyping**.
How do I choose build volume and speed for prototyping?
Pick a build volume that fits your largest common part (or plan to split assemblies) and prioritize printers with reliable extrusion, good cooling, and consistent first layers over peak speed specs. If you’re looking for 3d printer for prototyping, this is your best choice.
What settings matter most for strong functional prototypes?
For strong, reliable prints, aim for 3–5 perimeters and about 30–60% infill (increasing it in high-stress areas), choose a sensible FDM layer height around 0.15–0.25 mm, dial in the right nozzle and bed temperatures, and orient your part so loads don’t pull directly across layer lines—especially important when using a **3d printer for prototyping**.
What post-processing is needed for prototype-ready parts?
FDM prints typically need support removal and a bit of light sanding, while SLA parts usually require washing, curing, and careful support cleanup. If you want a smoother surface or added strength from your **3d printer for prototyping**, consider post-processing steps like sanding, priming and painting, or adding inserts and heat-set threads.
📢 Looking for more info about 3d printer for prototyping? Follow Our Site for updates and tips!