Deciding to install electric car charger equipment at home starts with clarity about how you actually drive, not just the vehicle’s brochure range. Many households overestimate daily mileage, which can lead to overspending on power capacity or features that never get used. A sensible first step is to review your weekly driving routine: commuting distance, school runs, weekend trips, and any seasonal changes. If you typically add 20–40 miles per day, a modest Level 2 setup may still refill overnight with room to spare, while occasional longer trips can be handled by public fast charging. Understanding your pattern helps you choose between a plug-in unit, a hardwired wallbox, or an outlet upgrade, and it also guides where the charger should sit for the easiest cable reach. Parking position matters more than people expect; a charger placed too far from the charge port becomes an everyday annoyance, encouraging awkward cable routing that can wear connectors or create tripping hazards. Thinking through these small, repetitive behaviors is part of planning, because convenience is the main value of home charging.
Table of Contents
- My Personal Experience
- Planning to Install Electric Car Charger at Home: Goals, Use Patterns, and Realistic Expectations
- Choosing the Right Charger Type: Level 1, Level 2, and What “Smart” Really Means
- Electrical Capacity and Panel Readiness: Service Size, Breaker Space, and Load Calculations
- Permits, Codes, and Safety Standards: Doing the Work Legally and Correctly
- Where to Mount the Charger: Garage vs. Outdoors, Cable Reach, and Everyday Convenience
- Hardwired vs. Plug-In EV Chargers: Reliability, Flexibility, and Code Considerations
- Installation Process Overview: What an Electrician Typically Does and Why Each Step Matters
- Expert Insight
- Cost Factors and Budgeting: Equipment, Labor, Panel Upgrades, and Hidden Variables
- Smart Charging, Time-of-Use Rates, and Energy Management: Cutting Costs Without Cutting Convenience
- Common Mistakes to Avoid: Undersized Wiring, Cheap Receptacles, Poor Placement, and Misconfigured Amperage
- Maintenance and Long-Term Reliability: Keeping Your Home Charging Setup Safe and Trouble-Free
- Final Checklist Before You Install Electric Car Charger Equipment: Ensuring a Smooth, Compliant Result
- Watch the demonstration video
- Frequently Asked Questions
- Trusted External Sources
My Personal Experience
Last month I finally had a Level 2 electric car charger installed at home, and it was a bigger project than I expected. I started by getting a couple of quotes and learned pretty quickly that the main cost wasn’t the charger itself—it was running a new 240V line from my panel in the basement to the garage. The electrician checked my breaker box, confirmed I had enough capacity, and recommended a hardwired unit instead of a plug-in since I wanted it outdoors on the side wall. The install took about half a day, including drilling through the rim joist and mounting the charger at a comfortable height, and they pulled a permit so the city inspector could sign off. The first night I plugged in and saw the car jump from 20% to nearly full by morning, I realized how much easier charging at home is compared to planning trips around public stations. If you’re looking for install electric car charger, this is your best choice.
Planning to Install Electric Car Charger at Home: Goals, Use Patterns, and Realistic Expectations
Deciding to install electric car charger equipment at home starts with clarity about how you actually drive, not just the vehicle’s brochure range. Many households overestimate daily mileage, which can lead to overspending on power capacity or features that never get used. A sensible first step is to review your weekly driving routine: commuting distance, school runs, weekend trips, and any seasonal changes. If you typically add 20–40 miles per day, a modest Level 2 setup may still refill overnight with room to spare, while occasional longer trips can be handled by public fast charging. Understanding your pattern helps you choose between a plug-in unit, a hardwired wallbox, or an outlet upgrade, and it also guides where the charger should sit for the easiest cable reach. Parking position matters more than people expect; a charger placed too far from the charge port becomes an everyday annoyance, encouraging awkward cable routing that can wear connectors or create tripping hazards. Thinking through these small, repetitive behaviors is part of planning, because convenience is the main value of home charging.
Expectations also need to account for your home’s electrical realities. A common misconception is that every house can instantly support a high-amperage EVSE with no changes. In practice, the service panel capacity, available breaker spaces, and the distance from panel to parking area determine complexity and cost. Another expectation to set early is charging speed: even the best home charger is not the same as a highway DC fast charger, and that’s fine because home charging is about topping up while you sleep. If you aim to install electric car charger equipment for multiple EVs, you’ll also want to think about load sharing, scheduling, and whether you anticipate adding another vehicle within a few years. These choices affect whether it’s smarter to install conduit now for future expansion or select a charger that can be networked later. A final reality check involves local rules and homeowner association policies: some neighborhoods regulate exterior conduit, visible cabling, or wall-mounted equipment. Getting alignment early prevents rework and makes the entire project smoother, safer, and more predictable.
Choosing the Right Charger Type: Level 1, Level 2, and What “Smart” Really Means
When people say they want to install electric car charger hardware, they often mean Level 2 charging, but it’s worth confirming what each level delivers. Level 1 uses a standard household outlet and typically adds only a few miles of range per hour, which can be enough for low-mileage drivers or plug-in hybrids. It’s also the simplest from an electrical standpoint, though you still need a safe, dedicated outlet and a circuit that won’t be overloaded by other appliances. Level 2 charging uses 240V and dramatically improves replenishment speed, commonly adding several times more range per hour than Level 1, depending on amperage and your vehicle’s onboard charger. Many drivers find Level 2 hits the sweet spot: fast enough to recover from errands and commuting overnight, yet still feasible in most homes with a proper circuit and breaker. The key is to size the system to your vehicle and lifestyle rather than chasing maximum amperage; a charger set up correctly at 32A or 40A can be plenty for many households.
“Smart” features deserve careful interpretation. A smart EV charger may offer scheduling, energy monitoring, utility demand-response participation, and remote start/stop controls. Those features can be valuable if your electricity plan has time-of-use pricing, because shifting charging to cheaper nighttime hours can pay back the cost of a smarter unit. However, smart functions can add complexity: Wi‑Fi coverage in garages is sometimes weak, firmware updates may be required, and app ecosystems vary in quality. If you plan to install electric car charger equipment in a location with unreliable internet, a reliable “dumb” charger with simple scheduling handled by the car can be a better experience. Also consider whether the unit supports load management if you have limited panel capacity; some chargers can automatically reduce output when other household loads spike, which can help avoid expensive service upgrades. Ultimately, the “right” charger is the one that matches your vehicle’s acceptance rate, fits your electrical service, and offers features you’ll actually use consistently.
Electrical Capacity and Panel Readiness: Service Size, Breaker Space, and Load Calculations
Before you install electric car charger equipment, the most important technical step is confirming your electrical system can handle the additional continuous load. EV charging is typically treated as a continuous load, meaning it can run for hours at a time, and electrical codes often require circuits to be sized with a safety margin. That margin affects breaker size, wire gauge, and the maximum charging current you can set. A professional will usually start by checking your main service rating (for example, 100A, 150A, or 200A), then looking at your panel’s available spaces and the condition of the bus bars and breakers. Older panels, crowded panels, or panels with known brand issues may need remediation before adding a high-power circuit. Distance also matters: a charger placed far from the panel requires longer cable runs, which increases cost and may require thicker conductors to limit voltage drop. If your garage is detached or your parking area is outside, trenching and conduit can become major parts of the project.
Load calculations are where planning prevents surprises. A home might have plenty of service capacity on paper but still experience peak demand when HVAC, water heaters, ovens, and dryers run simultaneously. If you aim to install electric car charger equipment at 48A or higher, you may trigger the need for a service upgrade, especially in smaller-service homes. The good news is that many households can avoid upgrades by right-sizing charging current or using dynamic load management. For example, a 32A or 40A setup often provides excellent overnight replenishment while staying within panel limits. Some utilities and jurisdictions also allow energy management systems that monitor total household draw and automatically throttle the charger to keep the main breaker from being overloaded. This can be a cost-effective alternative to upgrading service, though it requires compatible equipment and proper configuration. Taking the time to confirm capacity, breaker availability, and code requirements upfront helps you choose a charger and circuit that are safe, legal, and practical for daily use.
Permits, Codes, and Safety Standards: Doing the Work Legally and Correctly
To install electric car charger equipment properly, you must treat it like any other significant electrical addition: subject to permits, inspections, and code-compliant materials. Many jurisdictions require an electrical permit for a new 240V circuit, a hardwired EVSE, or any modification to the service panel. Permitting can feel like a hassle, but it protects you by ensuring the installation follows safety standards for conductor sizing, breaker selection, grounding, and fault protection. It also matters for insurance and resale; unpermitted electrical work can become a liability if there’s a fire, a claim, or a future buyer’s inspection. Code requirements often include GFCI protection in certain locations, appropriate conduit types, weatherproofing for outdoor units, and clear labeling at the panel. Additionally, manufacturers specify installation conditions, torque settings, and mounting clearances; following those instructions is part of a compliant and safe job.
Safety standards go beyond paperwork. EV charging involves high current for long durations, and that combination demands excellent connections and correct wire sizing. Loose terminals can generate heat over time, leading to nuisance trips or, in worst cases, damage. When you install electric car charger hardware outdoors, you must consider UV exposure, water intrusion, and physical impact risks. Proper strain relief, drip loops, and rated enclosures reduce long-term issues. Another important safety element is selecting the right receptacle if you choose a plug-in charger; heavy-duty, EV-rated receptacles are preferable to cheaper options that may not tolerate repeated high-load use. Some electricians recommend hardwiring for maximum reliability because it eliminates a potential weak point at the plug and receptacle. Whether plug-in or hardwired, the goal is the same: a stable, cool-running circuit designed for continuous duty, installed under permit, and verified by inspection.
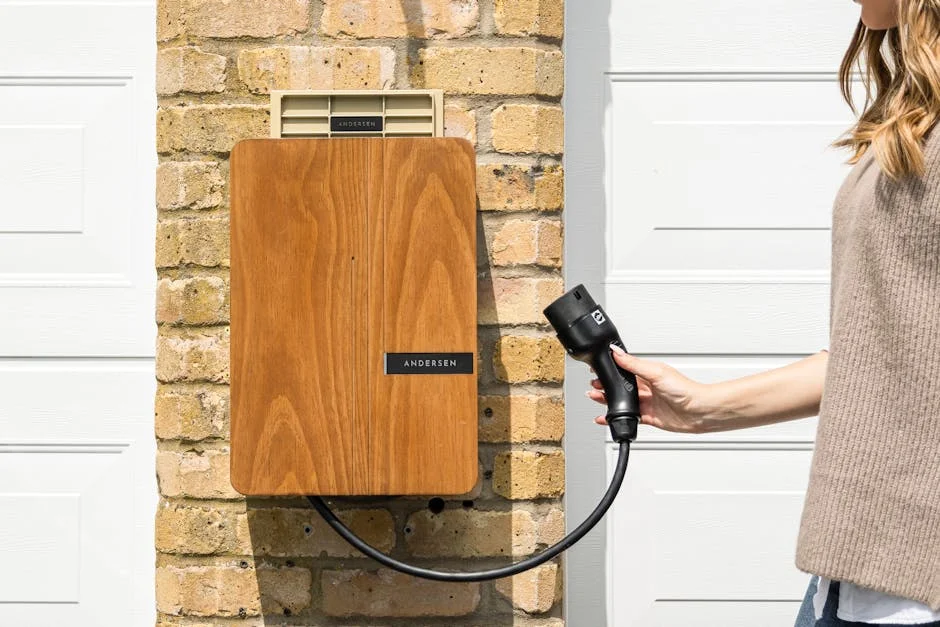
Where to Mount the Charger: Garage vs. Outdoors, Cable Reach, and Everyday Convenience
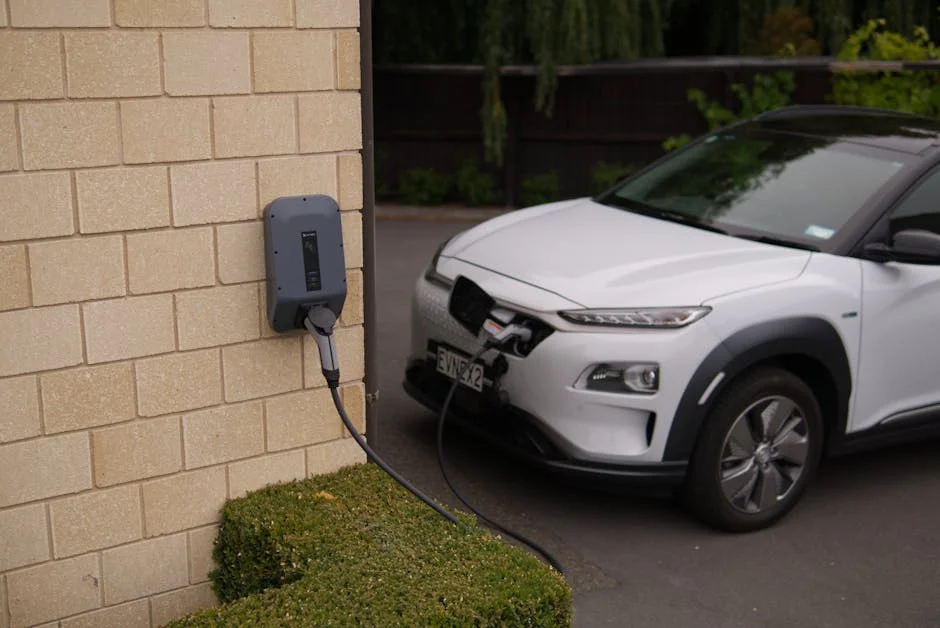
Location is a major factor when you install electric car charger equipment, because it influences cost, usability, and durability. A garage installation typically offers the most protection from weather and temperature extremes, and it can simplify cable management. Still, the “best” garage spot is not always the closest to the panel; it’s the place that makes daily charging effortless without blocking doors, walkways, or storage. Consider the charge port location on your vehicle and how you usually park. A charger mounted near the front-left corner might be perfect for one model and awkward for another. Many households eventually own different EVs, so it can be smart to mount the unit where the cable can reach multiple port locations without stretching. Cable length is not just a convenience feature; excessive tension on connectors can reduce lifespan and cause intermittent charging faults.
Outdoor installs are common for driveway parking and can work very well if you choose properly rated equipment and weatherproof wiring methods. When you install electric car charger equipment outside, think about exposure to rain, snow, sprinklers, and direct sunlight. A shaded, sheltered location helps electronics last longer, but you also need adequate lighting and a safe walking path to handle the connector at night. Another practical consideration is security: some chargers have lockable holsters or settings to prevent unauthorized use, and mounting height can reduce tampering. If the install requires crossing a walkway or placing cable where people walk, a better mounting location or a cable management system can prevent tripping hazards. Finally, plan for future changes: if you might add a second EV, a second parking spot, or a carport, it’s worth discussing conduit routing and panel capacity now so you’re not forced into expensive rework later.
Hardwired vs. Plug-In EV Chargers: Reliability, Flexibility, and Code Considerations
One of the most consequential choices when you install electric car charger hardware is whether to hardwire the unit or use a plug-in model connected to a 240V receptacle. Hardwired installations are often considered the most robust because they reduce connection points and eliminate wear at the plug and outlet. They can also allow higher continuous current in many jurisdictions and simplify compliance with certain local rules. Hardwiring tends to look cleaner, with fewer exposed components, and it can be easier to weatherproof outdoors. For many homeowners, the biggest benefit is peace of mind: fewer parts that can loosen over time, fewer opportunities for heat buildup at a receptacle, and less concern about someone unplugging the unit. If you want maximum long-term reliability and you don’t anticipate moving the charger frequently, hardwiring is a strong option.
Plug-in chargers offer flexibility, but they require the right receptacle and a careful approach. If you install electric car charger equipment as a plug-in unit, you’ll likely use a receptacle such as a NEMA 14-50 or 6-50, depending on the charger and local practices. The receptacle must be high quality and properly installed, because EV charging draws high current for long periods. Cheap outlets can overheat, and repeated plug cycles can wear contacts. Plug-in setups can be convenient if you rent, plan to move, or want the option to take the charger with you. They can also simplify replacement if the charger fails; you can swap the unit without opening an electrical junction box. However, plug-in does not mean “no maintenance”: it’s wise to periodically check for unusual warmth at the plug, ensure the cord is not kinked, and confirm the receptacle faceplate remains secure. Either approach can be safe and code-compliant when done correctly; the best fit depends on your priorities and the specifics of your electrical layout.
Installation Process Overview: What an Electrician Typically Does and Why Each Step Matters
When you hire a professional to install electric car charger equipment, the process usually begins with a site assessment and a plan for routing power from the panel to the charger location. The electrician will confirm panel capacity, select breaker size, determine conductor type and gauge, and decide whether the run will be in conduit, cable, or a combination depending on walls, attic access, and local code. They’ll also plan mounting height, stud location, and clearance around the charger for ventilation and cable storage. If the installation is outdoors or in a damp location, they’ll use appropriate weather-rated fittings and enclosures. A well-planned route keeps the installation neat and reduces the chance of future damage from impacts or storage activities in the garage. This planning also affects cost: a straight shot through unfinished space is simpler than fishing wire behind finished walls or drilling through masonry.
| Option | Best for | Key considerations |
|---|---|---|
| Level 1 (120V) Charger | Low daily mileage, overnight top-ups, renters or temporary setups | Slowest charging; uses a standard outlet; minimal installation (verify outlet condition and dedicated circuit). |
| Level 2 (240V) Home Charger | Most homeowners wanting faster, convenient daily charging | Requires 240V circuit and typically a permit/inspection; panel capacity and wiring distance affect cost; choose hardwired vs. plug-in. |
| Professional Installation vs. DIY | Anyone prioritizing safety, code compliance, and warranty protection | Pros handle permits, load calculations, and code requirements; DIY can be risky/illegal in some areas and may void warranties or insurance. |
Expert Insight
Before you install an electric car charger, confirm your home’s electrical capacity and panel space, then choose a charger that matches your vehicle and desired charging speed (often a 240V Level 2 unit). Get a licensed electrician to size the circuit correctly, add a dedicated breaker, and ensure the installation meets local code and permit requirements. If you’re looking for install electric car charger, this is your best choice.
Place the charger where the cable easily reaches the charge port without creating a trip hazard, and consider weather-rated equipment if it’s outdoors. Ask for a load calculation and, if needed, install load management or schedule charging during off-peak hours to reduce strain on your system and lower energy costs. If you’re looking for install electric car charger, this is your best choice.
After planning, the electrician will shut off power as needed, install the breaker, run the wiring, and make terminations using correct torque specifications. Torque matters because under-tightened connections can heat up, while over-tightened connections can damage conductors or lugs. When you install electric car charger hardware, proper grounding and bonding are essential, as is correct GFCI protection where required. The charger is then mounted securely, configured for the circuit’s maximum allowable current, and tested. Configuration is not just an app step; many chargers have internal dip switches or software settings that must match the breaker and wire capacity. Setting the charger higher than the circuit supports is unsafe and can violate code. The final steps typically include labeling the breaker, demonstrating operation, and arranging inspection if a permit was pulled. A reputable installer will also walk you through daily use, cable care, and how to respond to common issues like nuisance trips or connectivity problems.
Cost Factors and Budgeting: Equipment, Labor, Panel Upgrades, and Hidden Variables
The total price to install electric car charger equipment can vary widely, and understanding what drives cost helps you budget without frustration. The charger itself ranges from basic, durable units to feature-rich models with advanced monitoring and load management. Labor is often the bigger variable: the time required to run wiring, open and repair drywall, install conduit, or trench to a detached garage can quickly change the quote. Distance from the panel to the parking location is one of the most reliable predictors of cost because longer runs require more conductor, more conduit, and more labor. Another cost factor is the condition and capacity of your panel. If the panel is full, you might need a subpanel or tandem breakers (if permitted), and if service capacity is insufficient, a service upgrade can become the largest expense. Even smaller upgrades, like replacing a problematic breaker or installing a surge protective device, add to the total but can improve safety and equipment longevity.
Hidden variables are worth anticipating. When you install electric car charger equipment in older homes, electricians may uncover brittle wiring, undersized feeders, or grounding issues that must be corrected to meet current standards. Outdoor installations may require more robust weatherproofing, bollards for physical protection, or special conduit routing to comply with setback rules. If you live in a multi-unit building, there may be additional costs for metering, permissions, or running power from a common electrical room. On the savings side, incentives can reduce net cost: utilities sometimes offer rebates for certain charger models, off-peak enrollment, or managed charging programs. Some regions also provide tax credits or local grants, though eligibility and documentation requirements vary. The best budgeting approach is to get multiple itemized quotes that specify charger model (or allowance), amperage, wiring method, permit handling, and any assumptions about wall repair. Clear scope prevents surprise add-ons and makes it easier to compare bids fairly.
Smart Charging, Time-of-Use Rates, and Energy Management: Cutting Costs Without Cutting Convenience
Once you install electric car charger equipment, operating cost becomes the next opportunity for optimization. If your utility offers time-of-use pricing, charging overnight or during designated off-peak windows can significantly reduce your per-mile cost. Many EVs can schedule charging directly from the vehicle’s interface, which is useful if you prefer a simple charger. Smart chargers add another layer: they can schedule by utility rate, track kWh usage, and generate reports that help you understand monthly charging cost. Some can even pause charging during high household load periods or respond to utility demand-response events. These features can be especially valuable in homes with limited service capacity, where energy management may allow a Level 2 circuit without a costly panel upgrade. The real benefit is not just saving money but making charging more predictable and avoiding nuisance breaker trips during peak household activity.
Energy management also matters when you have more than one EV. If you install electric car charger equipment for a two-EV household, you can either install two separate circuits or use a system that shares a single circuit intelligently. Load-sharing chargers can allocate power between vehicles or alternate charging sessions, ensuring both cars are ready by morning without exceeding circuit limits. This can reduce installation complexity and cost, especially when panel space is tight. Another consideration is integration with solar. If you have rooftop solar, some chargers can prioritize solar surplus, increasing self-consumption and reducing grid imports. Even without specialized solar features, you can time charging to coincide with midday production if your car is home. The best setup depends on your lifestyle: commuters who leave the car at home during the day may benefit from solar-aligned charging, while overnight-focused households benefit most from off-peak scheduling. Either way, thoughtful configuration after installation can yield long-term savings that rival the upfront rebate amounts.
Common Mistakes to Avoid: Undersized Wiring, Cheap Receptacles, Poor Placement, and Misconfigured Amperage
Many problems attributed to the charger itself are actually installation or planning mistakes made when trying to install electric car charger equipment quickly or cheaply. One of the most serious is undersized wiring or improper breaker selection. EV charging is a sustained load, and corners cannot be cut on conductor gauge, insulation rating, or termination quality. Another frequent issue is the use of low-quality receptacles for plug-in installations. Some outlets are not designed for continuous high-current draw and can overheat, leading to melted plugs or intermittent charging. Poor placement is a quieter but equally frustrating mistake: mounting the charger where the cable barely reaches, where the connector drags on the floor, or where the car must be parked in an awkward position can turn a convenience upgrade into a daily irritation. A thoughtful mount location, a sturdy holster, and good cable management solve most of these quality-of-life issues.
Misconfigured amperage is another common pitfall. When you install electric car charger equipment, the charger must be set to a maximum current that matches the circuit rating and code rules for continuous loads. Some chargers ship with high default settings, and if they are not adjusted, the system may overload the circuit or repeatedly trip the breaker. That can also cause heat buildup at connections over time. Connectivity problems can also be self-inflicted: placing a Wi‑Fi-dependent charger in a garage with weak signal leads to unreliable app control and delayed firmware updates. If smart features matter to you, plan for a mesh node or access point near the install location. Finally, skipping permits is a mistake that can come back years later during a home sale or an insurance claim. A permitted, inspected installation might cost a bit more upfront, but it reduces risk and helps ensure the charger performs reliably for the long term.
Maintenance and Long-Term Reliability: Keeping Your Home Charging Setup Safe and Trouble-Free
After you install electric car charger equipment, maintenance is usually minimal, but a few habits can preserve reliability and safety. Start with cable care: avoid tight bends, kinks, or pinching the cord under garage doors. Use the holster every time so the connector stays clean and dry, and keep the charge handle off the ground to reduce grit contamination. Periodically inspect the cable jacket for nicks or abrasion, especially if it runs near storage shelves, bikes, or tools. For outdoor units, check that gaskets and covers remain intact and that water is not pooling near the base of the mount. If the charger has a cooling fan or vents, keep them unobstructed. These small checks take minutes but can prevent intermittent faults that are difficult to diagnose later.
Electrical checks should be cautious and professional when needed. If you install electric car charger hardware and later notice frequent breaker trips, unusual heat near the plug or charger body, or a burning smell, stop using it and call an electrician. Some homeowners also choose to have the installer re-torque connections after a period of use, depending on local practice and the equipment involved. For smart chargers, keep firmware updated and review energy logs occasionally; sudden changes in charging power or repeated session errors can signal a developing issue with the vehicle, the connector, or the home circuit. If your household adds a second EV or major new appliance, revisit your load assumptions, because what was safe at installation may need adjustment. Long-term reliability is largely about respecting the system’s design limits, keeping components clean and protected, and responding early to warning signs instead of hoping they go away.
Final Checklist Before You Install Electric Car Charger Equipment: Ensuring a Smooth, Compliant Result
A successful project comes down to a disciplined checklist that aligns equipment, electrical capacity, and daily usability. Confirm where the car will park most often, measure cable reach to the charge port, and choose a mount location that keeps the connector accessible without creating a tripping path. Verify your panel’s service rating and breaker availability, and ask for a load calculation when the amperage choice is not obvious. Decide whether hardwired or plug-in best fits your long-term plans, and if you choose plug-in, specify an EV-rated receptacle rather than a budget outlet. Make sure the charger model you select is certified by a recognized safety lab and is appropriate for indoor or outdoor use as needed. Also confirm how permits and inspections will be handled, because a compliant installation protects your home and avoids headaches later. These steps reduce change orders, shorten installation day, and increase the odds that everything works perfectly on the first attempt. If you’re looking for install electric car charger, this is your best choice.
When you’re ready to install electric car charger equipment, choose an installer who communicates clearly, provides an itemized quote, and configures the charger to match the circuit limits. Ask where conduit will run, how wall penetrations will be sealed, and how the cable will be managed. If smart features matter, test Wi‑Fi strength at the mounting spot before the unit is fixed in place, and plan improvements if needed. After installation, confirm the breaker is labeled, the charger is set to the correct amperage, and you can start and stop a session reliably. Keep your permit and inspection records, register the charger warranty, and store the installer’s contact information for future adjustments. With good planning and code-compliant work, home charging becomes an everyday convenience that feels effortless, safe, and predictable.
Watch the demonstration video
In this video, you’ll learn how to install an electric car charger at home, from choosing the right charger and checking your electrical panel to running wiring, mounting the unit, and making safe connections. It also covers permits, safety tips, and how to test the charger so it’s ready for reliable daily use. If you’re looking for install electric car charger, this is your best choice.
Summary
In summary, “install electric car charger” is a crucial topic that deserves thoughtful consideration. We hope this article has provided you with a comprehensive understanding to help you make better decisions.
Frequently Asked Questions
Do I need a permit to install an electric car charger at home?
Often yes. Many areas require an electrical permit and inspection; your installer or local building department can confirm requirements.
What’s the difference between Level 1 and Level 2 charging?
Level 1 charging plugs into a regular 120V household outlet, making it convenient but relatively slow. Level 2 charging runs on a 240V supply, delivering much faster charging speeds and usually needing a dedicated circuit—something to plan for when you **install electric car charger** equipment at home.
Can I install an EV charger myself?
If you’re planning to **install electric car charger** equipment at home, a plug-in model can sometimes be a DIY job—provided the existing outlet is correctly wired and up to code. However, for hardwired units or any installation that requires a new circuit, it’s safest to hire a licensed electrician to ensure everything is compliant and properly protected.
How do I know if my electrical panel can support a Level 2 charger?
Before you **install electric car charger** equipment at home, an electrician will evaluate your electrical panel’s capacity, current household loads, and available breaker space—and may recommend a formal load calculation or, if needed, a service or panel upgrade to support safe, reliable charging.
Where should an electric car charger be installed?
Most people choose to **install electric car charger** units in a garage or on a driveway close to where they regularly park, so the cable can reach without creating a tripping hazard. If the charger will be outdoors, it should be placed where it has appropriate weather protection, and it must be mounted at the correct height with the clearances required by the manufacturer and local electrical codes.
How much does it cost to install an electric car charger?
Costs depend on the charger you choose and how much electrical work your home needs. A straightforward setup is usually more affordable, but if you need a long wire run, a panel upgrade, or trenching, the price to **install electric car charger** equipment can rise quickly.
📢 Looking for more info about install electric car charger? Follow Our Site for updates and tips!

Trusted External Sources
- How did you handle getting a charger installed at your house? – Reddit
Jun 8, 2026 … We recently had Big Red Electric, in Las Vegas install an EV charger at our house and the process was super smooth. … Electric car Level 2 … If you’re looking for install electric car charger, this is your best choice.
- Charger Installation | Los Angeles Department of Water and Power
LADWP has teamed up with other City of Los Angeles departments to simplify and speed up the steps needed to **install electric car charger** equipment, making it easier for residents and businesses to get reliable electric service for EV charging.
- Installing Car Charger – Need Guidance : r/evcharging – Reddit
Jan 13, 2026 … I am getting an EV charger installed. This is my first EV car (Kia EV9) and I have no idea about DOs and DONTs and what to look for when getting the charger … If you’re looking for install electric car charger, this is your best choice.
- Find and Install an Electric Vehicle Charger – San Diego – SDGE
To **install electric car charger** equipment safely and efficiently, start by hiring a certified electrician in your area. Next, choose the best location for the unit—such as your garage or a driveway wall—based on easy access, cable reach, and proximity to your electrical panel. Your electrician can then confirm your home’s electrical capacity, recommend the right charger, and ensure everything meets local codes and permitting requirements.
- EV charger install seems very expensive? : r/evs_ireland – Reddit
Dec 11, 2026 … The low cost one doesn’t have fancy features like scheduling or working with solar, but my car does the scheduling and I export my excess solar … If you’re looking for install electric car charger, this is your best choice.