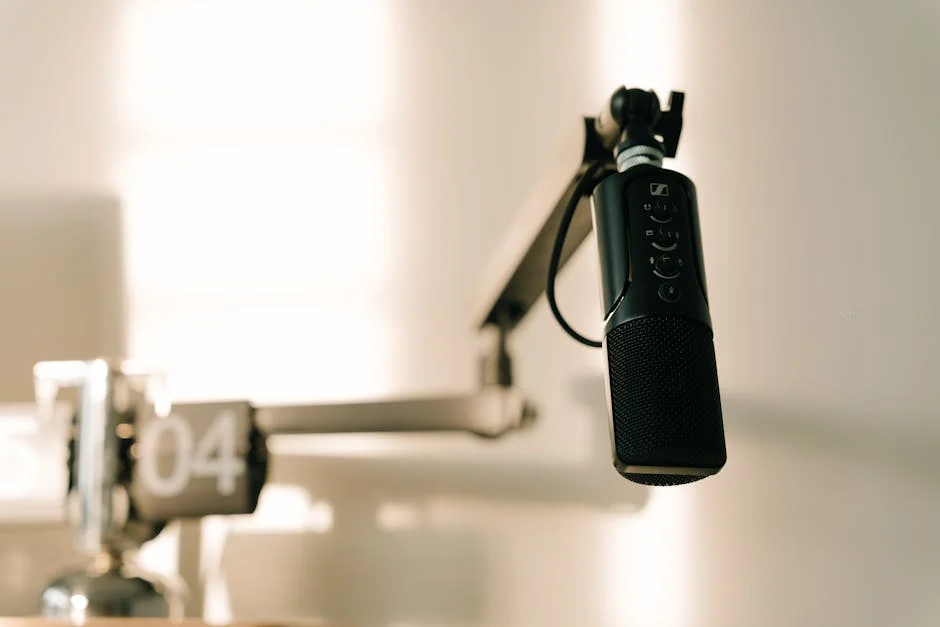
A mic boom arm is one of those pieces of gear that looks simple but has an outsized impact on how comfortable and consistent your audio setup becomes. When the microphone is suspended at the right height and distance, you naturally maintain a stable speaking position, which helps your voice sound even across an entire recording. That stability matters because small changes in distance can cause noticeable differences in volume, bass response, and the amount of room noise captured. Many creators start with a desktop stand, then quickly realize that nudging a mic base, turning a keyboard, or shifting a notebook can create vibrations and bumps that travel right into the mic. A mic boom arm isolates the microphone from desk contact and keeps it floating in a controlled position, reducing accidental noise and making it easier to achieve a clean, broadcast-style tone.
Table of Contents
- My Personal Experience
- Why a Mic Boom Arm Changes the Way You Record
- Key Components and How They Work Together
- Choosing the Right Type: Scissor vs. Tube vs. Low-Profile
- Understanding Weight Capacity, Balance, and Microphone Pairing
- Mounting Options: Clamp, Grommet, Wall, and Desk Compatibility
- Positioning for Better Sound: Distance, Angle, and Room Noise Control
- Accessories That Matter: Shock Mounts, Pop Filters, and Cable Management
- Expert Insight
- Mic Boom Arm Setup for Podcasting, Streaming, Gaming, and Voiceover
- Durability, Noise, and Build Quality: What Separates Good Arms from Great Ones
- Ergonomics and Desk Layout: Making Space Without Sacrificing Comfort
- Maintenance, Troubleshooting, and Long-Term Care
- Buying Considerations: Matching Your Budget to Real-World Needs
- Bringing It All Together for a Cleaner, More Flexible Setup
- Watch the demonstration video
- Frequently Asked Questions
- Trusted External Sources
My Personal Experience
I finally bought a mic boom arm after getting tired of my desk mic picking up every little bump and keyboard clack. The first night I set it up, I realized how much space my old stand was stealing—suddenly my desk felt usable again. It took a bit of trial and error to get the tension right, and I definitely over-tightened one joint at first, but once it was dialed in, the mic stayed exactly where I wanted it. The biggest difference was during calls: I could pull the mic close when I was talking and push it out of the way when I wasn’t, without that constant scraping sound. Now it’s one of those upgrades I forget about until I use someone else’s setup and wonder how I ever put up with it.
Why a Mic Boom Arm Changes the Way You Record
A mic boom arm is one of those pieces of gear that looks simple but has an outsized impact on how comfortable and consistent your audio setup becomes. When the microphone is suspended at the right height and distance, you naturally maintain a stable speaking position, which helps your voice sound even across an entire recording. That stability matters because small changes in distance can cause noticeable differences in volume, bass response, and the amount of room noise captured. Many creators start with a desktop stand, then quickly realize that nudging a mic base, turning a keyboard, or shifting a notebook can create vibrations and bumps that travel right into the mic. A mic boom arm isolates the microphone from desk contact and keeps it floating in a controlled position, reducing accidental noise and making it easier to achieve a clean, broadcast-style tone.
Comfort is another major reason a mic boom arm becomes a long-term staple in studios, streaming setups, and home offices. When the mic is always “in the way” on the desk, you either lean around it or push it aside, and both habits compromise audio quality. A good arm lets you pull the mic toward you for speaking, then swing it away when you need the desk clear for writing, drawing, mixing, gaming, or video editing. That simple movement encourages better posture because you stop hunching toward a mic that’s too low or too far away. It also supports consistent technique, such as keeping your mouth at a fixed angle to reduce plosives and sibilance. For anyone doing frequent calls, podcasts, voiceover work, or live streaming, the daily convenience of a mic boom arm often matters as much as the sound improvements, because it keeps the setup ready to use without constant re-adjustment.
Key Components and How They Work Together
Most mic boom arm designs rely on a few core parts that determine how smoothly the arm moves and how securely it holds your microphone. The arm itself is typically made of metal—often steel or aluminum—and may be a scissor-style frame with springs or an internal-spring tube design. The joints are where the real engineering happens: friction washers, tension bolts, and pivot points allow the arm to hold position once you set it. If the joint tolerances are loose, the mic can sag or drift; if they’re too tight, it becomes annoying to reposition. A well-built mic boom arm strikes a balance where movement feels controlled, and the mic stays exactly where you leave it. Many arms also include cable channels or clips to manage the microphone cable, which reduces clutter and prevents the cable from tugging the mic out of position.
Mounting hardware is the other half of the equation, and it’s often overlooked until something slips. A clamp mount grips the desk edge and spreads pressure through a padded contact surface; a grommet mount passes through a desk hole for a more permanent, stable install. Both can work well, but the thickness of your desk and the type of material—solid wood, particle board, glass, or a hollow composite—will influence which mount feels safest. At the end of the arm, you typically have a threaded stud (often 3/8″ or 5/8″) and sometimes an adapter. That thread connects to a mic clip, a shock mount, or an inline accessory like an angle adapter. The compatibility between your microphone mount and the mic boom arm threading is essential, because forcing mismatched threads can strip hardware or create wobble that shows up as handling noise. When all these components match correctly, the system behaves like a single stable support, not a stack of loose parts.
Choosing the Right Type: Scissor vs. Tube vs. Low-Profile
Scissor-style arms are common because they offer a large range of motion at a reasonable price, and they fold up neatly when not in use. They typically use external springs or elastic bands to help counterbalance the mic’s weight. The advantage is reach and flexibility; the trade-off is that cheaper scissor arms can transmit spring noise or creak at joints, especially if they’re not lubricated and tightened properly. Higher-quality scissor models use better pivot hardware and stronger materials, which reduces bounce and makes the arm feel more “locked in.” If you frequently reposition your microphone during a session—switching between speaking, singing, and instrument capture—a scissor mic boom arm can be very practical, as long as it’s rated for the weight of your mic and shock mount.
Tube-style arms with internal springs often look cleaner and can feel smoother to move, because the support mechanism is hidden inside the arm. Many people prefer them for on-camera setups since they appear more minimal and less “industrial.” Low-profile arms are another category designed to sit below the line of sight, keeping the frame out of the camera shot while still giving you a stable mic position. This style is popular for streamers and video podcasters who want an unobstructed face view. The right choice depends on desk layout and how you like to work: if you need maximum vertical travel, a traditional scissor mic boom arm may be easiest. If aesthetics, silent movement, and camera framing matter most, a tube or low-profile design tends to integrate better. The best approach is to measure your desk height, monitor placement, and typical speaking position so you can choose an arm that reaches your mouth without forcing the microphone to hover awkwardly in front of a screen.
Understanding Weight Capacity, Balance, and Microphone Pairing
Weight capacity is not a marketing detail; it’s the difference between a mic that stays put and one that slowly sinks out of frame. Every mic boom arm has a rated load range, often given as a minimum and maximum weight. The minimum matters because some arms rely on counterbalance tension; if the mic is too light, the arm may spring upward or refuse to stay lowered. The maximum matters because heavier microphones—especially large dynamic broadcast mics or big condenser mics in a shock mount—can exceed what entry-level arms can handle. It’s also important to account for accessories: a shock mount, pop filter, inline preamp, and even a heavy XLR connector all add weight and leverage. If your microphone sits far out on the arm, the effective torque increases, and an arm that “should” hold the weight might still sag when fully extended.
Balancing the system is about more than simply tightening bolts. Ideally, you want the mic boom arm to hold position at common angles without extreme tension that makes repositioning jerky. If you constantly crank the joints down to prevent droop, you may wear out washers and threads, and you’ll also create a setup that’s frustrating to adjust quickly. A better strategy is choosing an arm with a comfortable overhead margin—meaning it can handle your mic with room to spare. If you use a classic broadcast-style dynamic mic, pair it with an arm rated for heavier loads and consider a quality shock mount to reduce desk vibration. If you use a small diaphragm condenser or a compact USB mic, a lighter arm may be sufficient, but you should still prioritize rigidity and joint quality. The right pairing makes the microphone feel like it’s floating in place, encouraging consistent mic technique and reducing the temptation to touch the mic body, which often introduces noise.
Mounting Options: Clamp, Grommet, Wall, and Desk Compatibility
How you mount a mic boom arm determines both stability and long-term convenience. Clamp mounts are the most common because they require no permanent modification. They work best on desks with a clean, accessible edge and enough thickness for the clamp to grip securely. A good clamp has wide pads and a firm screw mechanism that doesn’t loosen over time. If your desk is thin particle board, be cautious: overtightening can dent the surface or even crack it. For glass desks, a clamp can be risky unless it’s specifically designed with broad, protective padding. If you notice the arm leaning or the clamp twisting when you move the mic, that’s often a sign the desk edge isn’t providing enough friction or support. In those cases, adding a support plate or choosing a different mounting method can prevent accidents.
Grommet mounting is often the most stable option for a desk setup because it anchors the mic boom arm through a hole, distributing load in a way that resists rotation. Many desks already have cable grommets that can be repurposed, but you need to confirm the hole diameter and ensure the desk material can handle the pressure. Wall mounts are another solution, especially in small studios where desk space is limited or where the desk is too fragile for clamping. A wall-mounted arm can reduce desk vibration and keep the microphone off your work surface entirely, but it requires careful placement to ensure the mic reaches your mouth comfortably. You also need to mount into studs or use appropriate anchors for the wall type. When selecting any mount, consider the path of the cable and how you’ll route it to your interface or computer. Clean routing prevents accidental tugs that can pull the mic out of position, and it keeps movement smooth when you reposition the mic boom arm during a session.
Positioning for Better Sound: Distance, Angle, and Room Noise Control
Proper positioning is where a mic boom arm pays for itself, because it enables repeatable placement that improves tone and intelligibility. A common starting point for speech is keeping the mic about 4 to 8 inches from your mouth, slightly off-axis—meaning the mic is not pointed directly at your lips but angled a bit to the side. This helps reduce plosives and harsh bursts of air while keeping the voice present and detailed. With an arm, you can set that position precisely and return to it every time you record. The height matters as well: a mic aimed slightly downward toward your mouth can sound natural and reduce nasal resonance for some voices, while a mic aimed upward can capture more room sound and emphasize certain frequencies. The ability to fine-tune height and angle without stacking books or moving a desk stand is a key advantage of using a mic boom arm.
Room noise and reflections are also influenced by placement. If your mic is too far away, you’ll need more gain, which brings up the sound of your room—fans, traffic, neighbors, and reverberation. A boom arm makes it easier to keep the mic close without cluttering the desk, which allows you to lower gain and capture a cleaner signal. You can also position the microphone so its least sensitive side faces a noise source, depending on the polar pattern. For example, a cardioid mic rejects sound from the rear, so aiming the back of the mic toward a keyboard or PC fan can reduce those noises. The arm lets you experiment quickly: move the mic a few inches, change the angle, and listen. Small adjustments can make a big difference in clarity. Once you find the sweet spot, the mic boom arm helps you lock it in, so your recordings remain consistent even if you step away and come back later.
Accessories That Matter: Shock Mounts, Pop Filters, and Cable Management
A mic boom arm becomes significantly more effective when paired with the right accessories. A shock mount is often the most valuable add-on because it decouples the microphone from mechanical vibrations. Even with an arm, vibrations can travel through the desk and into the mount, especially if you type, tap, or move a mouse during recording. A shock mount uses elastic suspension to reduce those low-frequency thumps and rumbles. Not every microphone requires one, but many large condenser mics and broadcast dynamics benefit from the extra isolation. Pop filters and foam windscreens are equally important for voice work. They reduce plosives from “p” and “b” sounds and help keep saliva from reaching the mic grille. A pop filter mounted on the arm or on a separate gooseneck can also serve as a distance guide, helping you maintain consistent mic technique.
Expert Insight
Mount the mic boom arm so the microphone approaches from the side or slightly above, keeping the arm out of your line of sight and reducing desk vibrations. Aim for a consistent 2–6 inches from your mouth, then lock the joints firmly to prevent drift during long sessions.
Manage cable slack before tightening everything: run the mic cable along the arm with Velcro ties, leaving a small service loop near the mic to avoid tugging when you reposition. If the arm sags or creaks, adjust the tension screws in small increments and balance the load with the correct counterweight or a lighter shock mount. If you’re looking for mic boom arm, this is your best choice.
Cable management is the accessory category that improves both sound and workflow. A dangling cable can rub against the arm, bump the desk, or tug the microphone when you move it, creating noise and instability. Many arms include built-in channels or clip-on guides, but you can also use reusable hook-and-loop ties to secure the cable along the arm’s length with gentle slack at the joints. The goal is to let the mic boom arm move freely without the cable acting like a spring. If you use XLR, choose a flexible cable that doesn’t resist bending at the pivot points. If you use USB, keep in mind that some USB cables are stiff and can transmit movement; routing becomes even more important. Inline preamps and adapters can add weight and leverage, so position them carefully—sometimes it’s better to place an inline preamp closer to the interface end of the cable rather than hanging it near the microphone. When accessories are chosen and placed thoughtfully, the mic boom arm feels smoother to use, and your recordings have fewer unexpected noises.
Mic Boom Arm Setup for Podcasting, Streaming, Gaming, and Voiceover
Different use cases place different demands on a mic boom arm, even if the goal is always clear audio. For podcasting, stability and repeatable placement are priorities. Many podcasters prefer having the mic come in from the side at mouth level, leaving the space in front of them open for notes or a laptop. An arm also helps maintain consistent distance between co-hosts and guests, especially if each person has a dedicated boom. For streaming and gaming, camera framing and desk space become major factors. Streamers often want the mic close for a rich sound, but they also need a clear view of the monitor and a clean shot for the camera. A low-profile or internally sprung mic boom arm can keep the frame out of the shot, while still allowing quick adjustments when the streamer leans back or shifts position during long sessions.
| Option | Best for | Pros | Cons | Key features to look for |
|---|---|---|---|---|
| Desk clamp mic boom arm | Most home studios, streamers, podcasters with a sturdy desk | Space-saving; flexible positioning; clean cable routing; quick to adjust | Needs a solid desk edge; can transmit desk bumps without isolation | Clamp range & padding, max load capacity, internal/clip cable management, 360° swivel, tension adjustment |
| Grommet mount mic boom arm | Permanent, ultra-stable setups (studio desks with a cable hole) | Most stable; minimal wobble; keeps desk edge clear | Requires drilling or an existing grommet; less portable | Grommet diameter compatibility, base reinforcement plate, max load, smooth bearings, low-profile base |
| Low-profile mic boom arm | On-camera creators who want the arm out of frame (or below monitors) | Cleaner visuals; easier monitor clearance; often quieter movement | Can have shorter reach; may cost more for premium builds | Horizontal reach, height range, silent joints, quick mic swap (3/8″ & 5/8″ adapters), counterbalance for heavier mics |
Voiceover work benefits from a slightly different approach: the microphone is often positioned to capture a controlled, intimate tone with minimal room sound. A boom arm allows you to place the mic at a consistent angle, often just off to the side and slightly above mouth level, while keeping the floor and stand clutter-free. That can matter when reading scripts, because page turns and hand movements can cause vibrations on a desk stand. For gaming chats and everyday calls, the priorities may shift toward convenience—being able to swing the mic out of the way instantly. In all these scenarios, the mic boom arm becomes a tool that supports habits: you stop holding the mic, you stop leaning into a desktop stand, and you stop compromising placement for the sake of desk space. The result is not only better audio but also a setup that feels professional and ready whenever you press record or go live.
Durability, Noise, and Build Quality: What Separates Good Arms from Great Ones
Build quality is where many mic boom arm options diverge sharply, even if they look similar in product photos. The most common issues with cheaper arms are sagging joints, noisy springs, and clamp mechanisms that loosen over time. Creaking can happen when metal parts rub under tension, especially if the arm uses external springs that shift slightly as you move it. Some noise can be addressed with proper tightening and occasional lubrication at pivot points, but persistent creaks often indicate poor tolerances or low-quality hardware. Another problem is “bounce,” where the microphone oscillates after you let go of the arm. That movement can be annoying on camera and can also cause the mic to drift away from your ideal position. A more rigid frame with better joint design will settle quickly and feel more controlled.
Great arms tend to use stronger materials, more precise joints, and better finishes that resist scratches and corrosion. The clamp or grommet base is usually heavier and more stable, and the threading at the mic end is cleanly machined to prevent wobble. Internal-spring designs can reduce visual clutter and may move more quietly, but the quality still depends on the internal components and how well the arm is balanced. Another durability factor is how the arm handles repeated repositioning. If you move your microphone dozens of times a day, you want joints that don’t loosen and a finish that doesn’t chip where cables rub. Consider also the availability of replacement parts: some reputable manufacturers sell spare clamps, tension hardware, or cable guides, which extends the life of the mic boom arm. Spending a bit more on build quality often saves money long-term, because the arm becomes a stable foundation you can keep through multiple microphone upgrades.
Ergonomics and Desk Layout: Making Space Without Sacrificing Comfort
Desk layout affects how well a mic boom arm fits into your daily routine. If your monitor is centered and close, you may prefer the arm mounted on the side so the mic can approach from a diagonal angle rather than straight across the screen. If you use multiple monitors, you might mount the arm between them or behind a monitor to keep the workspace clear. The goal is to place the base where the arm has room to swing without hitting a wall, lamp, or shelf. You also want to avoid placing it where it blocks drawers, cable ports, or the natural resting position of your hands. A mic that constantly bumps your knuckles or forces you to angle your keyboard is a sign the arm is mounted in the wrong spot or the boom length doesn’t match your desk depth. Small changes—moving the clamp a few inches—can dramatically improve comfort.
Ergonomics also includes how you sit and breathe while speaking. When the microphone is supported by a mic boom arm, you can set it so your head stays upright and your shoulders relaxed. That posture often improves vocal tone and reduces fatigue during long recordings. If you often switch between standing and sitting, consider an arm with enough vertical range to accommodate both positions, or mount it higher so it can drop down when needed. Cable routing should follow the natural edges of the desk to avoid snagging. Another ergonomic consideration is whether the mic blocks your view of notes or a teleprompter. Many people find that bringing the mic from slightly below chin level and off to the side keeps the mouth-to-mic distance consistent while leaving the center of vision open. With a good mic boom arm placement, the microphone becomes part of the workspace rather than an obstacle, and that encourages you to keep the mic close enough for clean audio without feeling cramped.
Maintenance, Troubleshooting, and Long-Term Care
Keeping a mic boom arm working smoothly doesn’t require much effort, but a few habits prevent common issues. Start by checking tension points periodically. Over time, bolts can loosen slightly due to repeated movement, temperature changes, and vibration. If the mic begins to drift downward or the arm won’t hold a position, tighten the relevant joint gradually rather than cranking everything at once. Many arms have multiple adjustment points, and it’s better to distribute tension so the movement remains smooth. If you hear squeaks or creaks, identify the pivot that’s making noise and apply a small amount of appropriate lubricant, avoiding anything that might drip onto your desk or cable. Also inspect the clamp pad or grommet hardware to ensure it’s still gripping securely and not compressing the desk surface in a way that creates instability.
Cable wear is another maintenance item that’s easy to miss. As you reposition the mic boom arm, the cable flexes at the same points repeatedly. If the cable is pulled too tight, it can strain connectors or develop intermittent noise. Leave gentle slack near joints and at the microphone connection, and secure the cable so it doesn’t rub sharply against metal edges. If you use a shock mount, check the elastic bands periodically; they can stretch or degrade over time, especially in hot or very dry environments. For arms with external springs, confirm that the springs are seated correctly and not rubbing against the frame. If the arm suddenly feels weaker, it may be overloaded due to a new accessory or a heavier microphone. In that case, reducing weight, shortening the extension, or upgrading to a higher-capacity mic boom arm can restore stability. With basic care, a quality arm can last for years while maintaining quiet operation and reliable positioning.
Buying Considerations: Matching Your Budget to Real-World Needs
Price ranges for a mic boom arm can vary widely, and the best value comes from matching the arm to your specific microphone and workflow. If you’re using a light USB mic for occasional meetings, you may not need a premium arm, but you still want one that doesn’t wobble and has a clamp that won’t slip. If you’re recording multiple times a week, streaming daily, or using a heavier microphone with a shock mount, it’s worth prioritizing load capacity and joint quality. Pay attention to the arm’s stated weight range, the type of springs, and the mounting options included. Some arms ship with both a clamp and a grommet mount, plus thread adapters; others require separate purchases. The included hardware can change the overall value significantly, especially if you need a specific mounting method for your desk.
It’s also smart to consider how your setup might evolve. Many people upgrade microphones over time, moving from a small starter mic to a heavier dynamic or a large condenser. If you buy an arm that’s barely adequate now, you may end up replacing it later. On the other hand, an overbuilt arm with limited adjustability might not fit a compact desk or a tight corner. Think about reach: measure from the mount point to where your mouth typically is when seated, and ensure the mic boom arm can cover that distance without maxing out its extension. Consider noise and on-camera appearance if you record video. Finally, factor in the small conveniences that affect daily use: smooth movement, easy tension adjustment, solid cable management, and a mount that feels secure. When the arm fits your needs, you stop thinking about it, and that’s often the sign you made the right purchase.
Bringing It All Together for a Cleaner, More Flexible Setup
A well-chosen mic boom arm becomes the backbone of an audio workspace because it supports consistent technique, reduces desk clutter, and makes it easier to capture clean sound without constant reconfiguration. The biggest improvements usually come from better mic placement: keeping the microphone close enough for clarity, angled to reduce plosives, and positioned so it rejects noise sources in the room. Once the arm is mounted securely and balanced for your microphone’s weight, the experience of recording changes. You can sit naturally, keep your desk usable, and move the mic away when you need space. Accessories like shock mounts, pop filters, and tidy cable routing further refine the setup, helping you avoid the little noises and handling issues that can distract from the content you’re creating or the calls you’re running.
When you invest time in selecting the right mounting method, verifying thread compatibility, and dialing in tension, the mic boom arm stops being just another accessory and starts acting like a precision tool. It supports long sessions without fatigue, keeps your microphone exactly where it needs to be, and encourages repeatable habits that translate into more professional audio. Whether your goal is a polished podcast sound, a clean stream mix, clearer meetings, or reliable voiceover recordings, the long-term payoff comes from stability and ease of use. With the microphone always ready at the right height and distance, you spend less time troubleshooting and more time speaking naturally. That’s the practical value of a mic boom arm, and it’s why so many setups feel incomplete without one once you’ve experienced the difference.
Watch the demonstration video
In this video, you’ll learn how a mic boom arm can improve your audio setup by positioning your microphone for clearer sound and less desk noise. It covers key features to look for—like stability, reach, and mounting options—plus simple tips for installation, cable management, and adjusting the arm for comfortable, consistent recording.
Summary
In summary, “mic boom arm” is a crucial topic that deserves thoughtful consideration. We hope this article has provided you with a comprehensive understanding to help you make better decisions.
Frequently Asked Questions
What is a mic boom arm used for?
A **mic boom arm** lifts your microphone off the desk so you can place it right where you need it—close to your mouth for clearer, more consistent sound—while cutting down on vibration noise and keeping your workspace open and clutter-free.
Will a boom arm fit my desk?
Most clamp mounts are designed to grip desk edges about 0.4–2.5 inches (10–65 mm) thick, so it’s worth measuring your desktop first. To keep your **mic boom arm** secure, make sure you have a flat, sturdy edge for a clamp setup—or a suitable grommet hole if you’re using that mounting style.
How do I know if my microphone is compatible with a boom arm?
Before you buy, make sure your mic boom arm can handle your microphone’s weight by comparing it to the arm’s rated load. Also double-check the thread size—most mics use 5/8″-27 or 3/8″—and note that many arms come with an adapter to fit both.
What’s the difference between a low-profile and standard boom arm?
Low-profile options keep your setup sleek by staying beneath your monitor’s sightline, giving you an unobstructed view. A standard **mic boom arm**, on the other hand, typically extends higher and often provides a broader range of vertical adjustment for more flexible positioning.
How can I reduce noise and vibrations with a boom arm?
Use a shock mount to absorb vibrations, leave a little slack in your cable so it doesn’t tug or transmit noise, and tighten every joint to stop creaks before they start. If you’re using a **mic boom arm**, choose a clamp with rubber padding and try not to bump or lean on the desk while recording for the cleanest sound.
Where should I place the mic on a boom arm for best sound?
Position your microphone about 4–8 inches (10–20 cm) from your mouth and angle it slightly to the side to cut down on plosives. Pair it with a pop filter or windscreen for clearer, smoother speech, and use a **mic boom arm** to keep the placement steady and comfortable while you record.
📢 Looking for more info about mic boom arm? Follow Our Site for updates and tips!

Trusted External Sources
- Boom Arm – Amazon.com
Upgrade your setup with a low-profile, adjustable microphone stand featuring a sturdy desk-mount clamp, a screw adapter for wide compatibility, and built-in cable management to keep things tidy. This **mic boom arm** is perfect for podcasting, streaming, gaming, or any studio workspace where you want flexible positioning without the clutter.
- Unpopular Opinion: Tabletop Mic stands are far superior to boom arms
Apr 23, 2026 — If you ask me, a tabletop mic stand beats other setups hands down: it’s more convenient, takes up less space, and makes it easy to dial in the perfect mic placement—especially when paired with a **mic boom arm** for even more flexible positioning.
- PL 2T Professional-Quality Microphone Boom Arm – Heil Sound
The Heil PL2T is a fully articulating, professional-quality microphone boom arm that is perfect for home or studio use.
- Recommendations for a mic and boom arm : r/youtubegaming – Reddit
Nov 20, 2026 … I’m looking to get a mic and boom arm for recording my voice and to use for gaming and want to keep the price under $100. If you’re looking for mic boom arm, this is your best choice.
- ProBoom® Ultima® Gen2 Ultima Low Profile Adjustable Mic Boom …
The ProBoom® Ultima® Gen2 Ultima Low Profile Adjustable **mic boom arm** with a 12” fixed horizontal arm is a core component of our modular mounting system, designed to deliver clean, low-profile positioning and flexible adjustability for a wide range of setups.