A dlp 3d printer is a resin-based additive manufacturing system that uses a digital light projector to cure photopolymer resin layer by layer. Instead of tracing each layer with a laser point, the projector flashes an entire cross-section at once, turning liquid resin into solid plastic in a controlled pattern. That single design choice has ripple effects across speed, surface quality, and repeatability. The projector’s light is typically shaped by a DMD (digital micromirror device), which contains a dense array of tiny mirrors that tilt to form pixels of light. Each pixel corresponds to a small area on the build plane, so the printing “resolution” is often described in terms of pixel size (for example, 35–100 microns depending on the optics and screen). Because the whole layer is exposed at the same time, exposure time depends more on resin chemistry and layer thickness than on the number of parts on the platform. That makes the technology especially attractive when you want to print many small items in a single run without a large penalty in print time.
Table of Contents
- My Personal Experience
- Understanding What a DLP 3D Printer Is and Why It Matters
- How Projection-Based Resin Printing Works: From Pixels to Parts
- DLP vs SLA vs LCD/MSLA: Practical Differences for Real Jobs
- Key Specifications That Actually Affect Print Quality and Accuracy
- Materials and Resins: Choosing the Right Photopolymer for the Job
- Workflow: Slicing, Orientation, Supports, and Managing Peel Forces
- Post-Processing: Washing, Curing, Finishing, and Dimensional Control
- Common Problems and Troubleshooting: Failures, Artifacts, and How to Fix Them
- Expert Insight
- Applications: Where DLP Resin Printing Delivers Strong ROI
- Cost Considerations: Total Cost of Ownership Beyond the Printer Price
- Safety, Handling, and Workspace Setup for Resin Printing
- Choosing the Right DLP System: What to Look for Before You Buy
- Long-Term Maintenance and Consistency: Keeping Output Stable Over Time
- Conclusion: Getting the Best Results from a DLP Resin Workflow
- Watch the demonstration video
- Frequently Asked Questions
- Trusted External Sources
My Personal Experience
I picked up a small DLP 3D printer to make detailed prototypes for a side project, thinking it would be as simple as hitting “print” like my old FDM machine. The first weekend was mostly trial and error—my initial parts stuck to the vat instead of the build plate, and I didn’t realize how much temperature and exposure settings mattered until I dialed them in with a few test prints. Once it clicked, the detail blew me away: tiny text and sharp edges that I could never get with filament. The less glamorous part was the workflow—gloves, isopropyl alcohol, curing, and the constant need to keep resin off everything—but after a few routines it became manageable. Now I use it when I need precision, and I still reach for FDM when I just want something quick and tough without the mess.
Understanding What a DLP 3D Printer Is and Why It Matters
A dlp 3d printer is a resin-based additive manufacturing system that uses a digital light projector to cure photopolymer resin layer by layer. Instead of tracing each layer with a laser point, the projector flashes an entire cross-section at once, turning liquid resin into solid plastic in a controlled pattern. That single design choice has ripple effects across speed, surface quality, and repeatability. The projector’s light is typically shaped by a DMD (digital micromirror device), which contains a dense array of tiny mirrors that tilt to form pixels of light. Each pixel corresponds to a small area on the build plane, so the printing “resolution” is often described in terms of pixel size (for example, 35–100 microns depending on the optics and screen). Because the whole layer is exposed at the same time, exposure time depends more on resin chemistry and layer thickness than on the number of parts on the platform. That makes the technology especially attractive when you want to print many small items in a single run without a large penalty in print time.
Beyond the basic mechanism, it helps to separate marketing terms from engineering realities. Some machines labeled as DLP use a true projector; others are closer to LCD/MSLA systems that use an LCD mask and an LED backlight. Both are “vat photopolymerization,” but a true DLP approach typically offers crisp edge definition and consistent exposure uniformity when well-calibrated. For users comparing resin technologies, the practical outcomes are what matter: dimensional consistency, the ability to capture fine text and sharp corners, and how predictable supports behave. A DLP resin printer can be an excellent choice for dental models, jewelry patterns, miniatures, prototypes, and small-batch functional components—especially when the workflow includes post-curing and proper resin handling. Like any resin system, it also requires attention to safety, ventilation, and cleaning, but the payoff is a combination of detail and throughput that can be difficult to match with filament-based printing. When you understand how projection-based curing works, you can make smarter decisions about resin selection, layer settings, and whether the machine’s pixel geometry matches the tolerances your parts require. If you’re looking for dlp 3d printer, this is your best choice.
How Projection-Based Resin Printing Works: From Pixels to Parts
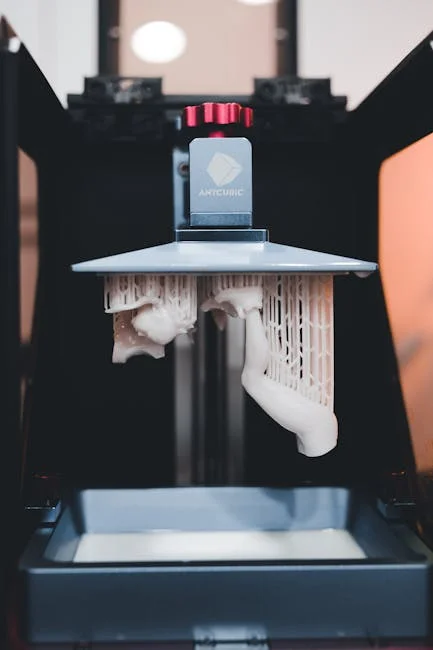
At the heart of projection resin printing is the relationship between light energy and polymerization. The machine contains a vat of liquid photopolymer resin, a build platform that moves along the Z axis, and an optical engine that projects a 2D image for each layer. For each slice of the model, the projector emits a patterned light field that cures the resin where illuminated. The cured layer adheres either to the build platform (top-down machines) or to a transparent window at the bottom of the vat (bottom-up machines, which are far more common in desktop and prosumer systems). In bottom-up configurations, the platform lifts after each exposure to peel the newly cured layer away from the film or glass, allowing fresh resin to flow underneath. This peel step is one of the key constraints on speed and reliability; it influences suction forces, support requirements, and how stable thin features remain during the print. If you’re looking for dlp 3d printer, this is your best choice.
In a dlp 3d printer, the projected image is made of discrete pixels, and those pixels have boundaries. That means the XY detail is often governed by pixel pitch and optical blur, while the Z detail is governed by layer height and exposure control. Anti-aliasing and grayscale exposure techniques can help smooth edges, but they also introduce trade-offs with dimensional accuracy. The resin itself has a working curve: cure depth depends on exposure energy and the resin’s absorption properties. Too much energy can cause overcure, swelling features and closing holes; too little can lead to weak layers, delamination, or fragile supports. A well-tuned print profile balances layer thickness, normal exposure, bottom exposure, lift distance, and lift speed so that each layer cures enough to bond reliably without excessive bleed. Temperature also matters because resin viscosity changes with heat, affecting flow and peel behavior. When settings are dialed in, projection curing can deliver clean text, crisp edges, and repeatable outcomes across a full build plate, which is why many production-minded users favor DLP-style systems for small, detailed parts.
DLP vs SLA vs LCD/MSLA: Practical Differences for Real Jobs
Resin printing often gets grouped into a single bucket, but the exposure system influences performance in ways that show up in daily use. Traditional SLA uses a laser that scans each layer, drawing the shape point by point. This can deliver excellent surface quality and accuracy, but print time scales with the area and complexity of each layer. By contrast, a dlp 3d printer projects the entire layer at once, so time per layer is largely constant regardless of how many parts are on the plate (within reason). LCD/MSLA printers also cure whole layers at once, using an LCD panel to mask UV light. LCD systems can be very cost-effective and offer high nominal resolution, but they rely on consumable screens and can show edge softness depending on panel quality, diffusion, and light uniformity. DLP systems, when built with a stable optical engine, can provide consistent illumination and long-term stability, though they may come with a higher upfront price.
For buyers, the more meaningful comparison is how each technology fits the intended workload. If you print one large object that spans most of the plate, the “whole layer at once” advantage matters less than peel mechanics and resin properties. If you print many small items—dental dies, jewelry masters, miniature batches, connector housings—projection-based machines can shine because you can fill the plate without multiplying print time dramatically. Another practical difference is calibration. DLP optics may require careful focus and keystone correction to ensure the image is square and uniform across the build area. LCD printers tend to be simpler mechanically but may need periodic screen replacement and can vary in brightness across the panel. SLA lasers require galvanometer calibration and can drift if not maintained. None of these options is universally best; the right choice depends on tolerance needs, production volume, and the materials you intend to use. Understanding these trade-offs helps you avoid buying on buzzwords and instead match the machine’s exposure method to your actual parts, post-processing capacity, and desired throughput. If you’re looking for dlp 3d printer, this is your best choice.
Key Specifications That Actually Affect Print Quality and Accuracy
When evaluating a resin machine, spec sheets can be misleading because they highlight headline resolution numbers while ignoring the factors that determine whether parts come off the plate with predictable dimensions. For a dlp 3d printer, one of the most important specs is pixel size at the build plane, which is a function of projector resolution and optical magnification. A 4K projector spread over a large build area yields larger pixels than the same projector focused on a smaller area. Smaller pixels can capture finer detail, but they also increase sensitivity to calibration errors and resin bleed. Equally important is optical uniformity: if the corners receive less energy than the center, you may see inconsistent cure, brittle edges, or dimensional drift across the plate. Look for machines that specify uniformity metrics, provide robust calibration tools, or have a reputation for consistent exposure across the full build region.
Z-axis mechanics matter as much as optics. A rigid linear rail, minimal backlash, and stable lead screw alignment reduce layer shift and Z banding. The peel mechanism—lift distance, speed, and whether the printer uses a flexible film—affects how reliably thin walls and delicate supports survive. Resin temperature control can also be a hidden differentiator; a cold room can increase viscosity, trapping bubbles and causing incomplete resin refill between layers. Then there are consumables: the vat film, the resin itself, and cleaning solvents. A machine that uses readily available films and has a straightforward vat design can reduce downtime. Finally, software features like compensation settings (hole compensation, shrink compensation), support editing, and exposure tests can shorten the time from unboxing to consistent production. If the goal is accuracy, prioritize system stability and calibration workflows over raw pixel counts, because repeatable performance comes from the whole stack working together—optics, mechanics, resin chemistry, and slicing strategy. If you’re looking for dlp 3d printer, this is your best choice.
Materials and Resins: Choosing the Right Photopolymer for the Job
Resin selection is where a dlp 3d printer becomes either a rapid prototyping tool or a production-capable system. Standard resins are often optimized for visual models: they print easily, capture detail, and cure quickly, but they can be brittle and sensitive to UV exposure over time. Engineering resins add toughness, heat resistance, flexibility, or chemical resistance, but they can be more demanding to print and may require longer exposure or warmer operating conditions. Castable resins are designed to burn out cleanly for investment casting, which is critical for jewelry and some industrial applications. Dental resins can be biocompatible and validated for specific uses like surgical guides or temporary crowns, but they require strict process control, validated post-curing, and traceability. The resin choice should be driven by end-use requirements: impact resistance, flexural strength, temperature stability, surface finish, or burnout behavior.
Every resin has a process window that includes exposure energy, layer thickness, and post-cure requirements. Two resins that look similar in a catalog can behave very differently on the same machine. Pigmented resins may require longer exposure because pigments absorb and scatter light; transparent resins can overcure more easily, causing light bleed and swollen features if exposure is excessive. Filled resins—those with ceramic or glass additives—can deliver improved stiffness or heat resistance, but they may settle in the vat and require agitation, and they can be harder on films and cleaning tools. For production workflows, batch-to-batch consistency matters, so it’s worth using reputable suppliers and keeping resin storage conditions stable. Also consider odor, cleaning difficulty, and whether the resin becomes tacky if under-cured. A disciplined approach—documenting settings, using exposure calibration prints, and standardizing post-processing—turns resin choice from guesswork into a reliable lever for achieving the mechanical and cosmetic properties your parts need. If you’re looking for dlp 3d printer, this is your best choice.
Workflow: Slicing, Orientation, Supports, and Managing Peel Forces
A successful resin print is often decided before the machine starts, especially with a dlp 3d printer where layer exposure is uniform but peel forces can be significant. Orientation affects surface quality, dimensional accuracy, and failure risk. Printing a flat surface parallel to the build plate can create suction and lead to layer separation or “cupping,” particularly with hollow parts. Angling the model reduces cross-sectional area per layer, easing peel forces and often improving surface finish by distributing layer lines. However, too steep an angle can increase Z height and extend print time, and it can place critical features on support-contact surfaces. The best orientation is usually a compromise that protects key cosmetic faces, minimizes large flat cross-sections, and places supports where marks are acceptable or easy to sand.
Supports are not just scaffolding; they are a mechanical system that must withstand repeated peel cycles. Light supports reduce scarring but can fail if the part is heavy or the resin is viscous. Heavy supports increase reliability but leave larger contact points that require more finishing. A good strategy is to use strong anchors where the part starts, then transition to lighter supports for detailed regions. Pay attention to islands—small features that appear in a layer before they connect to the rest of the model—because they can stick to the vat film and cause later failures. Many slicers include island detection and support suggestions, but manual review is still valuable for critical parts. Hollowing can reduce resin use and peel forces, but it introduces the need for drain holes and careful cleaning to avoid trapped uncured resin. For production, standardize orientations and support presets by part family so that results remain consistent across operators and batches. This approach reduces trial-and-error and makes print outcomes more predictable, which is essential when the printer is part of a business workflow rather than a hobby experiment. If you’re looking for dlp 3d printer, this is your best choice.
Post-Processing: Washing, Curing, Finishing, and Dimensional Control
Post-processing is where resin parts become truly usable, and it’s also where many quality problems are created if steps are rushed. After a part leaves a dlp 3d printer, it typically carries a thin layer of uncured resin that must be removed through washing. Isopropyl alcohol (IPA) is common, but dedicated wash solutions can reduce odor and improve cleaning performance. Washing time should be long enough to remove surface resin without causing swelling or cracking, especially for delicate parts. Agitation, ultrasonic action, and solvent freshness all matter. After washing, parts should dry fully before curing; residual solvent can cause whitening, tackiness, or brittle surfaces after UV exposure. Support removal timing is another decision point: removing supports before full cure can reduce scarring because the resin is slightly softer, but it can also deform thin features if handled aggressively.
Post-curing completes polymerization and stabilizes mechanical properties. Under-curing can leave parts tacky, weak, or dimensionally unstable, while over-curing can make some resins brittle or cause yellowing. Use a curing unit with known wavelength output (often 405 nm for many resins) and consistent exposure, and follow resin-specific cure schedules. For parts that must fit with tight tolerances—snap fits, press fits, threaded components—dimensional control requires a consistent post-process routine. Measure parts after curing, not before, because shrinkage can occur during final polymerization. Finishing options include sanding, priming, and painting, as well as vapor smoothing for certain specialty resins (less common) or clear coating for transparent parts. If optical clarity is the goal, polishing and controlled curing are essential, and orientation choices should minimize support marks on visible surfaces. Treat post-processing as part of the manufacturing process rather than a cleanup chore; consistent wash and cure steps are the difference between fragile prototypes and dependable parts you can ship or assemble. If you’re looking for dlp 3d printer, this is your best choice.
Common Problems and Troubleshooting: Failures, Artifacts, and How to Fix Them
Even a well-built dlp 3d printer can produce failures if exposure, supports, or resin conditions drift. One common issue is poor bed adhesion, where the print sticks to the vat film instead of the build plate. This can result from insufficient bottom exposure, an un-leveled platform, contaminated build surfaces, or a worn vat film that increases peel force. Another frequent problem is layer separation or delamination, often caused by underexposure, too aggressive lift speeds, or resin that is too cold and viscous to refill properly. Suction-related failures occur with large hollow sections or flat areas; they show up as sudden shifts, torn layers, or a “thunk” sound during peel. Addressing these issues can be as simple as changing orientation, adding vent holes, or adjusting lift parameters to reduce stress on each layer.
| Feature | DLP 3D Printer | LCD/MSLA Resin Printer | SLA (Laser) Resin Printer |
|---|---|---|---|
| How it cures resin | Projects an entire layer at once with a digital light projector | Uses an LCD mask with UV backlight to expose each full layer | Traces each layer with a focused UV laser point |
| Speed (per layer) | Fast and consistent; layer time mostly independent of part count | Fast; similar “whole-layer” exposure, often slightly slower/less uniform than DLP | Slower; depends on how much area the laser must scan |
| Detail & use cases | High sharpness and uniformity; great for miniatures, dental/jewelry, tight tolerances | Excellent detail for the price; popular for hobby prints and small functional parts | Very smooth surfaces and fine detail; common in pro labs and engineering workflows |
Expert Insight
Dial in exposure and lift settings with a simple calibration print before starting any real job. If details look soft or supports fail, adjust exposure in small increments and slow the lift speed to reduce peel forces, then re-test until edges are crisp and supports release cleanly. If you’re looking for dlp 3d printer, this is your best choice.
Improve reliability by controlling resin handling and the build environment. Warm the resin to a stable room temperature, mix it thoroughly, and filter it back into the bottle after each session; keep the vat film clean and tensioned, and re-level the build plate whenever you change the vat or notice first-layer adhesion issues. If you’re looking for dlp 3d printer, this is your best choice.
Artifacts can be more subtle but still damaging to quality. Z banding can come from mechanical wobble, dirty rails, or inconsistent lift motion. “Elephant foot” at the base can occur when bottom layers are overexposed, causing the first few layers to flare outward. Dimensional inaccuracies in holes and slots often come from light bleed and resin overcure; compensation settings in the slicer can help, but they should be validated with calibration parts. Surface roughness can come from partially cured resin sticking to the part, dirty solvent, or inadequate washing. If supports leave pits or scars, adjust contact size, move supports to less visible areas, or change the cure timing for easier removal. A disciplined troubleshooting routine—changing one variable at a time, keeping notes, and using standardized test prints—reduces wasted resin and time. Resin printing rewards consistency: stable temperature, clean vats, fresh solvent, and repeatable settings are more effective than constantly chasing new profiles for every print. If you’re looking for dlp 3d printer, this is your best choice.
Applications: Where DLP Resin Printing Delivers Strong ROI
Projection resin systems are often chosen when detail, repeatability, and batch throughput matter. A dlp 3d printer can be highly effective for dental labs producing models, splints, and guides, where fine margins and consistent scaling are essential. Jewelry makers use castable materials to print intricate patterns that would be difficult to carve by hand, then invest and cast them in precious metals. Product designers rely on resin prototypes to evaluate ergonomics, fit, and appearance before committing to tooling. Miniature and collectible creators value the sharp edges and texture reproduction that resin can deliver, especially when a single build can produce dozens of parts. Small manufacturers may use resin printing for jigs, fixtures, and custom housings, particularly when quantities are low and design changes are frequent.
That said, the best applications are those that respect resin’s strengths and limitations. Resin parts can be strong, but many standard materials are more brittle than injection-molded plastics, and long-term UV exposure can degrade properties if parts are left in sunlight. For functional components, engineering resins can close the gap, but they require careful process control and sometimes additional post-cure steps to reach target properties. Another area where DLP-style printing can excel is microfluidics and small enclosures, provided the resin is appropriate and the design includes features that can be cleaned reliably. The constant-per-layer exposure also makes it attractive for small-batch production: printing one item or fifty can take similar time when they share the same Z height. When you align the technology with parts that benefit from precision and surface quality, the economics can be compelling—less manual finishing, fewer remakes, and faster iteration cycles compared with machining or outsourcing. If you’re looking for dlp 3d printer, this is your best choice.
Cost Considerations: Total Cost of Ownership Beyond the Printer Price
Buying a dlp 3d printer is only the beginning; the real cost is the total system required to produce consistent parts. Consumables include resin, vat films, cleaning solvent, gloves, filters, and paper towels, and these costs scale with production volume. Post-processing equipment—wash stations, curing units, and ventilation—adds to the initial investment but can drastically improve repeatability and reduce labor. Labor itself is a major cost in resin workflows: orienting parts, generating supports, washing, curing, removing supports, and finishing all take time. A machine that prints quickly but requires excessive rework may cost more per part than a slightly slower system with stable, predictable output.
Downtime is another hidden cost. If a printer’s optical engine drifts, if the vat is hard to clean, or if replacement parts are expensive or slow to ship, production schedules suffer. For business use, consider vendor support, spare part availability, and whether the machine ecosystem is open or locked to proprietary resin cartridges. Proprietary ecosystems can simplify profiles and validation, which is valuable in regulated fields, but they may increase material costs. Open resin systems offer flexibility and potentially lower costs, but they require more testing and documentation. Also factor in quality control: calibration prints, measurement tools, and scrap rates. The goal is not just to minimize cost per liter of resin; it’s to minimize cost per acceptable part delivered on time. For many users, the best value comes from a balanced setup—reliable hardware, well-characterized resin options, and a streamlined post-processing station that turns raw prints into finished components efficiently. If you’re looking for dlp 3d printer, this is your best choice.
Safety, Handling, and Workspace Setup for Resin Printing
Resin printing requires a safety-first mindset because uncured photopolymer can irritate skin and eyes, and fumes can be unpleasant or sensitizing over time. A dlp 3d printer should be operated in a well-ventilated area with a workflow designed to prevent spills and cross-contamination. Nitrile gloves, safety glasses, and protective clothing are standard. Keep resin off porous surfaces by using silicone mats or disposable bench covers. Label containers clearly, store resin away from sunlight, and avoid mixing different resin families unless the manufacturer confirms compatibility. Waste handling matters too: do not pour uncured resin or solvent down the drain. Instead, cure waste resin and contaminated paper towels with UV light until solid, then dispose according to local regulations. Used solvent should be stored in sealed containers and either recycled through settling/filtration or disposed of as chemical waste.
Workspace layout can dramatically reduce mess and mistakes. Create separate zones for “dirty” tasks (removing parts, washing) and “clean” tasks (final curing, assembly, painting). Use dedicated tools—scrapers, tweezers, funnels—and avoid using household items that might return to food areas. Consider odor control and air quality: activated carbon filters can help, but proper ventilation and, when feasible, localized extraction near the printer and wash station is more effective. UV safety is also important; curing units should be enclosed, and you should avoid staring at bright UV sources. Finally, plan for emergencies: keep absorbent materials for spills, have a sealed waste bin, and know how to clean resin safely. When safety is built into the routine, resin printing becomes far more comfortable and sustainable, especially for frequent use or shared workspaces. If you’re looking for dlp 3d printer, this is your best choice.
Choosing the Right DLP System: What to Look for Before You Buy
Selecting a resin machine should start with your part requirements: size, tolerance, detail, material properties, and expected volume. A dlp 3d printer may be ideal if you need consistent detail across many parts and want predictable layer times. Evaluate build volume honestly—bigger is not always better if it comes with larger pixel sizes that reduce fine detail. Pay attention to the optical engine’s reputation for uniform exposure, and look for evidence of good calibration tools and community-validated profiles. Mechanical stability is equally important: a solid Z axis, reliable platform leveling, and a well-designed vat reduce failures. Also consider software compatibility. Some printers work best with a specific slicer that includes validated profiles, while others are more open and allow you to choose among popular slicing tools. The best software experience is the one that helps you achieve consistent results with minimal guesswork.
Think about your daily workflow. If you plan to print every day, features like quick-release build plates, easy vat draining, and accessible film replacement can save hours over time. If you are in a regulated or customer-facing environment—dental, medical prototyping, product manufacturing—documentation and repeatability matter. That may push you toward systems with validated resin libraries, stable firmware, and strong vendor support. For makers and small businesses, an open resin approach can be more cost-effective, but it requires more process discipline. Also consider the surrounding ecosystem: wash and cure solutions, spare vats, resin availability, and replacement parts logistics. A printer that produces excellent results but is difficult to maintain can become a bottleneck. By matching the machine to your actual parts, your tolerance expectations, and your willingness to manage process variables, you can choose a system that delivers reliable output rather than occasional impressive prints. If you’re looking for dlp 3d printer, this is your best choice.
Long-Term Maintenance and Consistency: Keeping Output Stable Over Time
Consistency is the real benchmark of a production-ready resin workflow. A dlp 3d printer can produce exceptional detail, but only if its optics, mechanics, and consumables are kept in good condition. Regular maintenance includes cleaning the vat carefully to avoid scratching the film, inspecting for clouding or punctures, and filtering resin to remove cured debris that can cause layer artifacts. The build plate should be kept clean and lightly abraded if the manufacturer recommends it, because a glossy surface can reduce adhesion. Z-axis rails should be kept free of resin splatter and dust; lubrication schedules should follow the manufacturer’s guidance to prevent stick-slip motion that can show up as banding. Optical paths should remain clean as well—dust on lenses or projector windows can reduce exposure uniformity and create print defects that are hard to diagnose.
Process control is just as important as hardware care. Track resin age, storage temperature, and how often it has been exposed to ambient light. Stir or gently agitate resin when required, especially for filled materials that can settle. Standardize your exposure tests and keep a baseline calibration part so you can detect drift early. Solvent management is another long-term factor: dirty IPA redeposits resin, causing tacky surfaces and rough finishes. Use a two-stage wash (dirty then clean) if volume warrants it, and cure or filter wash solutions as part of routine upkeep. Finally, document successful settings per resin and per part type, including orientation and support strategy. Over months of use, this documentation becomes a practical knowledge base that reduces failures and training time. With steady maintenance and controlled variables, resin printing becomes a predictable manufacturing method rather than an experiment, and you can rely on the same quality from week to week and batch to batch. If you’re looking for dlp 3d printer, this is your best choice.
Conclusion: Getting the Best Results from a DLP Resin Workflow
A dlp 3d printer can be a powerful tool for producing high-detail parts with impressive throughput, especially when the workflow is treated as an integrated manufacturing process rather than a single machine on a desk. The strongest results come from aligning the printer’s pixel geometry and build volume with your tolerance needs, selecting resins based on real mechanical and finishing requirements, and using consistent slicing strategies that minimize peel stress. Just as important are the steps after printing—washing, drying, curing, and finishing—because they determine final strength, surface quality, and dimensional stability. When you build repeatability into calibration, maintenance, and safety practices, the technology becomes dependable for prototyping, small-batch production, and specialized applications like dental or casting. With careful setup and disciplined routines, a dlp 3d printer delivers the combination of detail, speed, and consistency that makes resin printing a practical choice for both makers and professional shops.
Watch the demonstration video
In this video, you’ll learn how a DLP 3D printer works and why it’s different from other resin printers. It explains the basics of digital light projection, the key parts of the machine, and how settings like exposure time affect detail, speed, and print quality. You’ll also see common uses and tips for better results.
Summary
In summary, “dlp 3d printer” is a crucial topic that deserves thoughtful consideration. We hope this article has provided you with a comprehensive understanding to help you make better decisions.
Frequently Asked Questions
What is a DLP 3D printer?
A **dlp 3d printer** uses Digital Light Processing technology to project an image onto liquid resin, curing and solidifying a full layer in one go—resulting in fast prints with exceptionally sharp detail and smooth surfaces.
How is DLP different from SLA and LCD resin printing?
DLP uses a projector to expose each layer; SLA uses a laser that traces the layer; LCD uses a backlight shining through an LCD mask. DLP often offers fast layer exposure and sharp detail depending on projector resolution. If you’re looking for dlp 3d printer, this is your best choice.
What are the main advantages of a DLP 3D printer?
Expect high detail and smooth surface finishes with a **dlp 3d printer**, thanks to consistent layer exposure and the potential for faster prints since each full layer is cured in a single projection.
What are common limitations of DLP 3D printers?
With a **dlp 3d printer**, the build volume is often constrained by the projector’s optics, and resin prints typically need extra post-processing—like washing and UV curing—before they’re ready. Material choice also matters, since some resins can produce parts that are more brittle than expected.
What materials can a DLP 3D printer use?
Photopolymer resins come in many options—standard, tough, flexible, dental, castable, and high-temperature—but for the best results with a **dlp 3d printer**, choose only resins that match the printer’s wavelength and supported resin profile.
What post-processing is required for DLP resin prints?
After printing with a **dlp 3d printer**, you’ll usually remove the supports, wash the part in IPA (or an approved cleaner), let it dry thoroughly, and then UV-cure it to achieve full strength. If you want a smoother, more polished look, you can finish it off with light sanding or a protective coating.
📢 Looking for more info about dlp 3d printer? Follow Our Site for updates and tips!

Trusted External Sources
- Guide to Resin 3D Printers: SLA vs. DLP vs. MSLA vs. LCD – Formlabs
Discover what sets SLA, DLP, MSLA, and LCD resin machines apart—including how a **dlp 3d printer** compares on resolution, speed, accuracy, print quality, and overall workflow—so you can choose the right technology for your next project.
- DLP 3D Printing Explained: A Complete Guide for Professionals
As of Feb 24, 2026, DLP 3D printing is a go-to choice for producing highly accurate parts with exceptionally smooth surfaces. With a **dlp 3d printer**, makers and manufacturers can also take advantage of high-performance materials that add real functional benefits—such as improved strength, heat resistance, or durability—depending on the application.
- Are there any DLP 3d printers out there which are decent enough for …
Jan 20, 2026 … I have the Mars 4 dlp and I can say that it’s pretty simple to use. I’m a total noob and I just printed a 1/6 scale figure without a single fail … If you’re looking for dlp 3d printer, this is your best choice.
- What is Digital Light Processing (DLP)? – Markforged
DLP (Digital Light Processing) is a fast, high-precision 3D printing method that cures liquid photopolymer resin into solid parts using projected light. Much like SLA, it builds objects layer by layer, but a **dlp 3d printer** typically exposes an entire layer at once rather than tracing it point by point, which can make printing quicker and more consistent.
- Dlp Printer – Amazon.com
ELEGOO Mars 4 DLP 3D Printer, Desktop Resin 3D Printer with Ultra-Quiet Printing, 20000+ Hours Service Life, and Ultra-Low Operating Power, Printing Size of …