The Anycubic Vyper arrived at a time when many hobbyists were tired of spending the first weeks of ownership calibrating instead of printing. The appeal of this machine is not only its build volume and clean industrial styling, but the way it tries to remove repetitive setup pain points without demanding a premium price. Automatic bed leveling, a sturdy frame, and a direct approach to usability made it a recognizable choice for people who wanted dependable PLA prints quickly, while still being open enough for users who enjoy tuning. For many buyers, the Anycubic Vyper represented a middle ground between entry-level printers that require constant adjustments and higher-cost machines that bundle convenience behind a steeper budget. That positioning is why it gets compared so often to popular i3-style printers and why it still shows up on recommended lists for practical home printing.
Table of Contents
- My Personal Experience
- Overview of the Anycubic Vyper: why it earned so much attention
- Core specifications and what they mean in real prints
- Automatic bed leveling: how the system affects first-layer success
- Build quality, frame rigidity, and vibration control
- Extrusion system and hotend behavior with common filaments
- Print quality expectations: detail, dimensional accuracy, and surface finish
- Slicer setup and profiles: getting reliable results without endless tweaking
- Expert Insight
- Bed surfaces and adhesion strategies for consistent first layers
- Maintenance routine: keeping the Anycubic Vyper dependable over time
- Common upgrades and practical mods that improve real-world printing
- Troubleshooting print failures: diagnosing issues systematically
- Who the Anycubic Vyper is best for: matching the printer to your goals
- Final thoughts on long-term ownership and real value
- Watch the demonstration video
- Frequently Asked Questions
- Trusted External Sources
My Personal Experience
I’ve been running an Anycubic Vyper for a few months now, and it’s been my go-to printer for quick functional parts. The auto bed leveling was the main reason I bought it, and it honestly saved me a lot of the trial-and-error I dealt with on my older machine—most of the time I can start a print without touching the bed at all. My first week was a little bumpy because the stock profile was over-extruding and my first layers looked a bit squished, but after dialing in the Z-offset and dropping the flow a few percent, it started laying down really clean lines. I’ve printed everything from cable clips to a phone stand in PLA and PETG, and the results are solid as long as I keep the bed clean and watch the first layer. The only real maintenance I’ve had to do so far was tightening a couple of eccentric nuts and replacing a worn nozzle, which felt pretty normal for a printer in this price range.
Overview of the Anycubic Vyper: why it earned so much attention
The Anycubic Vyper arrived at a time when many hobbyists were tired of spending the first weeks of ownership calibrating instead of printing. The appeal of this machine is not only its build volume and clean industrial styling, but the way it tries to remove repetitive setup pain points without demanding a premium price. Automatic bed leveling, a sturdy frame, and a direct approach to usability made it a recognizable choice for people who wanted dependable PLA prints quickly, while still being open enough for users who enjoy tuning. For many buyers, the Anycubic Vyper represented a middle ground between entry-level printers that require constant adjustments and higher-cost machines that bundle convenience behind a steeper budget. That positioning is why it gets compared so often to popular i3-style printers and why it still shows up on recommended lists for practical home printing.
From a day-to-day perspective, the biggest draw is consistency. Many printers can produce great results, but only after a careful ritual: leveling, re-leveling after a nozzle bump, and chasing first-layer adhesion issues. This model’s leveling system, combined with a relatively rigid motion platform, aims to make the first layer less of a gamble. It’s not a magic box—filament quality, ambient temperature, slicer settings, and maintenance still matter—but it tends to reduce the number of variables that ruin early prints. That matters for anyone printing functional parts, organizers, brackets, cosplay segments, or classroom models where repeatability is more valuable than chasing exotic materials. A printer that reliably starts and finishes jobs is also more likely to be used often, and that practical advantage is what keeps the Anycubic Vyper relevant even as new releases compete for attention.
Core specifications and what they mean in real prints
Spec sheets can look similar across many Cartesian FDM machines, so the key is translating numbers into outcomes. The Anycubic Vyper is built around a bed-slinger design with a roughly 245 × 245 × 260 mm build area, a size that comfortably fits most household prints: tool organizers, replacement knobs, small enclosures, and multi-part models that can be assembled later. The heated bed supports common materials like PLA and PETG, and the overall structure is designed to be stable at the moderate-to-fast speeds many users prefer. While raw speed claims are easy to advertise, the more meaningful metric is whether the printer can maintain dimensional accuracy and surface quality without constant intervention. In practice, a rigid frame and decent motion components help reduce ringing and layer inconsistencies, especially on tall or narrow parts.
Layer height capability is another area where expectations should be realistic. Yes, you can print at 0.12 mm or even finer with a 0.4 mm nozzle, but print time increases rapidly, and the difference is most noticeable on curved decorative surfaces. For functional prints, 0.2 mm remains a sweet spot for balancing speed and strength. The extruder and hotend configuration are optimized for standard filament diameters and typical temperature ranges, which is why the Anycubic Vyper is commonly recommended for PLA, PLA+, and PETG rather than high-temperature engineering filaments. That doesn’t mean experimentation is impossible; it simply means that stock performance shines when you align your material choices with the printer’s strengths. When buyers match the machine’s capabilities to their goals—reliable everyday printing rather than extreme materials—the results tend to be satisfying and repeatable.
Automatic bed leveling: how the system affects first-layer success
Automatic bed leveling is one of the most practical reasons people choose the Anycubic Vyper. Manual leveling can be learned, but it is sensitive to small changes: a slightly warped bed, a new nozzle, a bumped gantry, or even different bed temperatures can shift the “perfect” adjustment. The Vyper’s leveling system measures multiple points and compensates in firmware, which helps keep the nozzle at an even distance from the bed across the surface. That directly impacts the first layer, which is the foundation for everything that follows. A consistent first layer improves adhesion, reduces warping, and lowers the chance of prints failing in the first ten minutes. Even when the rest of the print settings are not perfectly optimized, a reliable first layer can be the difference between a usable part and a tangled mess of filament.
It’s still important to understand what automatic leveling does and does not do. It does not replace correct Z-offset tuning; it works alongside it. If the nozzle is too high, your first layer will be thin and weak, leading to poor adhesion and gaps. If it’s too low, the nozzle can scrape the bed, over-squish the filament, and cause elephants-foot artifacts that affect dimensional accuracy. The Anycubic Vyper’s interface makes it fairly approachable to dial this in, but the best results come from calibrating with the filament and bed surface you actually plan to use. Also, leveling data can drift over time if you change springs, adjust eccentric nuts, or move the printer. Running a leveling routine periodically is a sensible habit, especially after maintenance. Used correctly, the leveling system is a meaningful quality-of-life improvement that reduces frustration and increases print success for beginners and intermediate users alike.
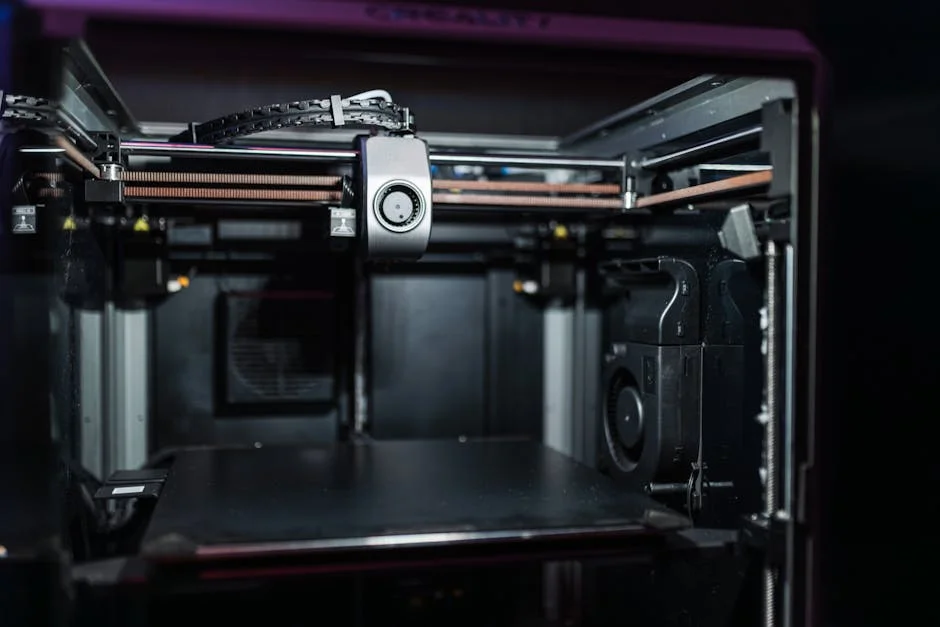
Build quality, frame rigidity, and vibration control
Mechanical stability is a quiet contributor to print quality. The Anycubic Vyper uses a sturdy metal frame and a layout that aims to limit wobble during bed movement. On bed-slinger printers, the heated bed moves along one axis, and heavier prints can amplify vibrations at higher speeds. A well-assembled frame with properly adjusted wheels and belts helps keep motion smooth, which reduces ghosting around corners and improves the look of text or sharp edges. When the printer is placed on a stable surface—ideally a heavy table or a dedicated stand—the difference is noticeable, especially on taller prints where small oscillations can stack up layer by layer.
Assembly and tuning also matter. Even a good design can print poorly if the eccentric nuts are too tight (causing binding) or too loose (causing wobble). Belt tension is another factor: loose belts can cause layer shifts or rounded corners, while overly tight belts can wear components and add noise. Owners who take time to square the frame, confirm the gantry is level, and ensure the bed rolls smoothly typically see better results than those who rush setup. The Anycubic Vyper is relatively approachable here because its construction and access points make adjustments manageable for non-experts. Once dialed in, the machine tends to hold calibration well, making it a solid option for people who want consistent output without turning maintenance into a weekly project.
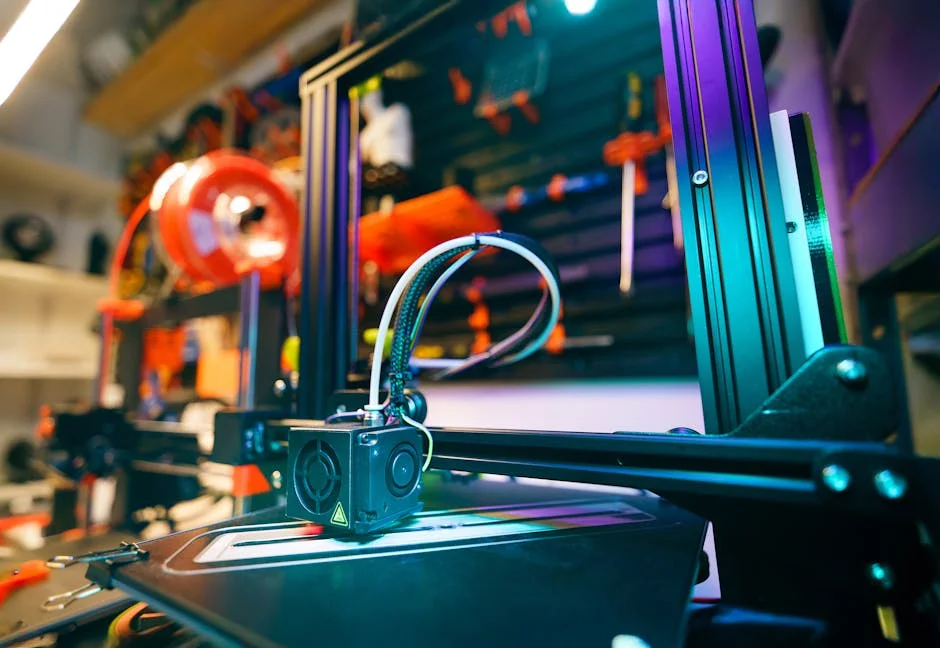
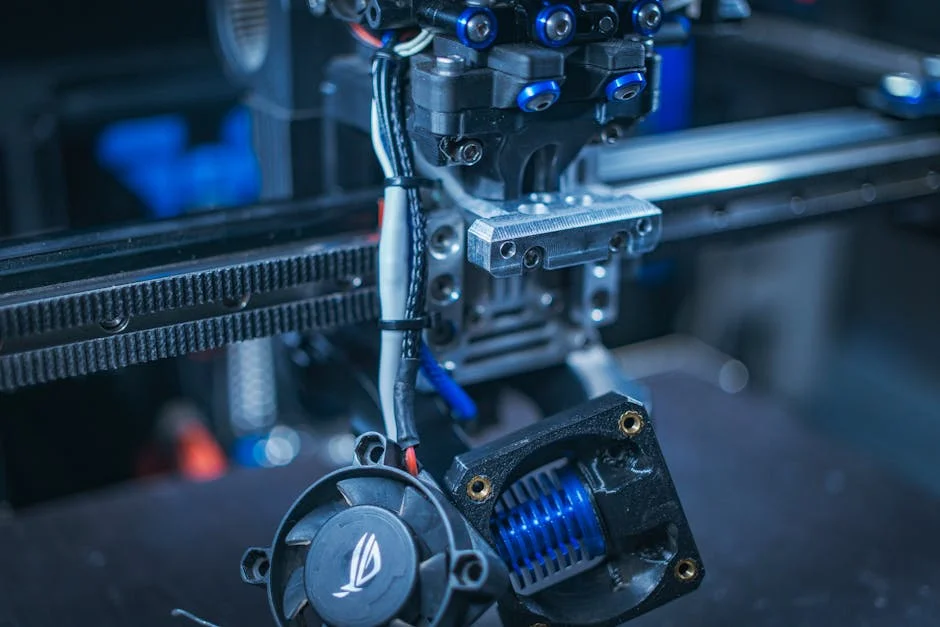
Extrusion system and hotend behavior with common filaments
The extrusion path is where many printers reveal their strengths and limitations. The Anycubic Vyper is generally tuned for mainstream filaments, and that’s a good thing for reliability. PLA and PLA+ are usually straightforward, offering crisp detail and low warping, while PETG benefits from a controlled first layer and appropriate cooling to avoid stringing. With a stock setup, the most common improvements come from careful temperature tuning and retraction calibration rather than hardware changes. Slight adjustments in nozzle temperature can change layer bonding, surface sheen, and bridging performance. Retraction settings can reduce stringing, but too much retraction can cause clogs or inconsistent extrusion, especially on longer prints.
Understanding cooling is equally important. PLA likes strong part cooling for sharp detail, while PETG often needs reduced cooling to maintain layer adhesion. The Anycubic Vyper’s cooling setup can handle typical PLA profiles well, but users should remember that “more fan” is not always better. Excessive cooling can cause weak layers or poor bed adhesion on certain geometries. If you plan to print flexible TPU, the experience can vary depending on filament softness and speed; slower printing and gentle retraction are often required. For abrasive filaments like glow-in-the-dark or carbon-filled blends, a hardened nozzle is recommended to avoid rapid wear. The printer can produce excellent everyday prints when the material choice and settings align with its stock configuration, and that practical focus is why many owners keep it as their main PLA/PETG workhorse.
Print quality expectations: detail, dimensional accuracy, and surface finish
Print quality is best evaluated through real-world objects: calibration cubes, overhang tests, and functional parts that must fit. The Anycubic Vyper can deliver clean walls and consistent layers when properly tuned, especially at moderate speeds. Dimensional accuracy depends on belt tension, steps/mm calibration, and slicer settings like flow rate. Many users find that a simple extrusion multiplier calibration improves fit on parts like snap lids, brackets, and press-fit joints. Surface finish is influenced by layer height, speed, and vibration; for smooth decorative models, slower outer-wall speeds and slightly lower acceleration can reduce ringing. For functional parts, a slightly thicker layer height and increased wall count can improve strength without making prints look rough.
It’s also helpful to separate “cosmetic perfection” from “functional reliability.” A printer might produce a glossy showpiece with perfect seams, but if it fails one out of three jobs, it’s not dependable for practical use. The Vyper’s reputation leans toward consistent completion of prints, which is often more valuable for makers producing parts for projects. Bridging and overhang performance are typically good with the right cooling and speeds, but every model has limits. Expecting perfect 70-degree overhangs without supports is unrealistic for most FDM machines. With sensible support settings and thoughtful model orientation, the Anycubic Vyper can produce impressive results, including clean text, crisp edges, and sturdy mechanical parts, particularly when paired with a well-tested slicer profile.
Slicer setup and profiles: getting reliable results without endless tweaking
Slicer configuration is where a printer becomes “easy” or “mysterious.” The Anycubic Vyper benefits from starting with a proven profile and making small, controlled changes. Key settings include nozzle temperature, bed temperature, retraction distance and speed, cooling behavior, and print speed. For PLA, many people succeed with moderate temperatures and strong cooling, while PETG often requires a slightly hotter nozzle and reduced fan. First-layer speed should generally be slower than the rest of the print to improve adhesion, and a slightly wider first-layer line width can help create a solid foundation. Wall counts and infill patterns matter too: for functional prints, more walls often add strength more effectively than simply raising infill percentage.
Expert Insight
After auto-leveling on the Anycubic Vyper, fine-tune your Z-offset with a first-layer test: adjust in small steps until lines are slightly squished, fully connected, and not dragging. Re-run the leveling routine whenever you change the nozzle, swap build surfaces, or notice first-layer inconsistency.
Keep print quality stable by checking the hotend and extruder path regularly: tighten the nozzle while hot to prevent leaks, clean the part-cooling duct, and ensure the filament spool feeds smoothly without tugging. For fewer clogs and cleaner walls, dry moisture-prone filaments and calibrate flow/extrusion with a simple single-wall cube. If you’re looking for anycubic vyper, this is your best choice.
Another factor is acceleration and jerk (or their equivalents), which influence ringing and corner sharpness. Some users chase speed by increasing acceleration, but the bed-slinger design means the moving bed can introduce vibration on tall models. A balanced approach—moderate speed with stable acceleration—often yields better overall results than pushing extremes. Support settings can also transform outcomes: using tree supports or carefully tuned interface layers can reduce scarring on visible surfaces. When the slicer is tuned thoughtfully, the Anycubic Vyper feels predictable: the same file prints similarly from week to week, and changes in filament brand or color can be compensated with small temperature tweaks. That predictability is the real goal, because it reduces waste and makes the printer feel like a tool rather than an experiment.
Bed surfaces and adhesion strategies for consistent first layers
Bed adhesion is a blend of surface condition, temperature, and first-layer geometry. The Anycubic Vyper’s heated bed can provide strong adhesion for PLA and PETG, but the best results come from keeping the surface clean. Finger oils, dust, and residue from adhesives can cause random adhesion failures that look like “mystery” issues. Regular cleaning with appropriate methods helps maintain consistency. A common approach is wiping the bed with isopropyl alcohol between prints, while occasionally doing a deeper clean when adhesion becomes inconsistent. It’s also important to let the bed reach a stable temperature before starting prints; some materials behave differently if the bed is still warming up.
| Category | Anycubic Vyper | Why it matters |
|---|---|---|
| Auto-leveling & first layer | 16-point strain-gauge auto bed leveling with automatic Z-offset setup | Helps reduce manual tuning and improves first-layer consistency across the build plate. |
| Print speed & quality | Typical ~80–100 mm/s; stable motion system aimed at reliable everyday prints | Balances faster print times with consistent surface quality for most hobby projects. |
| Ease of use & maintenance | Mostly pre-assembled, touchscreen UI, filament runout sensor, resume printing | Quicker setup and fewer failed prints due to outages or filament issues; easier for beginners. |
Adhesion aids should be used thoughtfully. Glue stick or specialized adhesives can help with tricky prints, but they can also create buildup that reduces consistency over time. PETG can sometimes bond too aggressively to certain surfaces, so a release layer may be beneficial to prevent damage. Brims are another simple tactic: adding a brim increases surface area and reduces edge lift on tall, narrow parts. For large flat prints, controlling ambient drafts can be just as important as bed temperature. If your printer sits near a window or air vent, sudden cooling can cause warping even when the bed is hot. With the Anycubic Vyper, most adhesion problems are solved by a correct Z-offset, a clean surface, and a first layer that is slow enough to lay down a uniform bead. When those basics are consistent, the printer becomes far more dependable across different models and materials.
Maintenance routine: keeping the Anycubic Vyper dependable over time
Like any mechanical tool, the Anycubic Vyper performs best with a light, regular maintenance routine rather than occasional emergency fixes. The most common tasks include checking belt tension, ensuring wheels roll smoothly without flat spots, cleaning debris from rails and V-wheels, and verifying that the nozzle is not partially clogged. A partially clogged nozzle often shows up as under-extrusion, weak layers, or rough top surfaces. Cold pulls, nozzle swaps, or careful cleaning can restore consistent flow. It’s also wise to check that the hotend is not leaking filament around the heat block, which can happen if the nozzle is not properly seated when hot. Catching that early prevents messy buildup and temperature instability.
Bed leveling sensors and wiring should also be treated as part of maintenance. If prints begin to show inconsistent first-layer thickness across the bed, re-running the leveling routine and confirming the Z-offset is a good first step. Over time, vibrations can loosen screws, especially if the printer is moved. A periodic check of frame fasteners and gantry alignment helps maintain accuracy. Lubrication needs vary by design, but keeping lead screws clean and appropriately lubricated can reduce Z-banding artifacts. Fans are another overlooked item; dust buildup can reduce cooling efficiency and increase noise. None of these tasks are difficult, but they add up to a printer that feels stable and predictable. Owners who spend a few minutes every couple of weeks on these checks often find that the Anycubic Vyper continues producing consistent prints long after the initial excitement of setup has passed.
Common upgrades and practical mods that improve real-world printing
Many people enjoy upgrading printers, but the best upgrades are those that solve a real problem rather than adding complexity. For the Anycubic Vyper, one of the most practical changes is swapping to a hardened steel nozzle if you plan to use abrasive filaments. Another popular improvement is refining the part-cooling approach with a duct adjustment, though results vary depending on print goals. Some users prioritize quieter operation by replacing fans or adding vibration-damping feet, especially if the printer runs in a shared space. These tweaks can improve quality-of-life without fundamentally changing how the machine operates. It’s usually wise to get stable baseline performance before modifying hardware, so you can measure whether a change actually helps.
Firmware and software adjustments can also be considered “upgrades” when they improve control. Dialing in linear advance (or similar extrusion compensation features, depending on firmware) can sharpen corners and improve consistency in line width, particularly on prints with frequent speed changes. However, not every user needs these tweaks, and overly aggressive tuning can introduce new artifacts. For reliability, spare parts are sometimes more valuable than mods: keeping extra nozzles, a spare Bowden tube (if applicable), and a few common fasteners can reduce downtime. The Anycubic Vyper is often chosen because it is usable without major upgrades, and that’s a strength. Thoughtful mods can improve specific outcomes, but the best approach is incremental: change one variable, test with known models, and only keep the modification if it clearly improves print success or quality.
Troubleshooting print failures: diagnosing issues systematically
When a print fails, the fastest path to a fix is a systematic diagnosis rather than random setting changes. With the Anycubic Vyper, first-layer issues are common starting points: if the print detaches, check Z-offset, bed cleanliness, bed temperature stability, and first-layer speed. If the first layer looks rough or has gaps, check nozzle temperature and extrusion flow. Stringing points toward retraction and temperature, but also humidity in filament; damp PLA can become brittle and oozy, while damp PETG can string heavily and produce rough surfaces. If you hear clicking from the extruder, it may indicate a partial clog, too low temperature, or excessive retraction causing heat creep or poor feeding.
Layer shifts are usually mechanical: belt tension, loose pulleys, snagging filament, or the printer colliding with curled edges due to warping. Ringing and ghosting often respond to reduced acceleration, better frame stability, and ensuring wheels are not too tight. If top surfaces look uneven, increase top layers, adjust infill overlap, or fine-tune flow. If supports are difficult to remove, reduce support density or adjust Z-distance and interface settings. The key is to change one setting at a time and re-test with a small model rather than wasting hours on a large print. The Anycubic Vyper generally responds well to this approach because its baseline behavior is consistent; once you identify the root cause—temperature, motion, or extrusion—the fix usually holds across many prints. That consistency is what makes troubleshooting feel manageable rather than endless.
Who the Anycubic Vyper is best for: matching the printer to your goals
Choosing a printer is less about finding a universally “best” model and more about aligning with your projects. The Anycubic Vyper suits people who want dependable printing with mainstream materials and a smoother setup experience than older entry-level machines. It’s a strong fit for hobbyists who print functional parts for home organization, workshop jigs, DIY electronics enclosures, and school projects. It also works well for makers who print decorative models in PLA and want consistent first layers without constant manual leveling. If you value repeatability and prefer spending time designing and printing rather than calibrating, this machine’s leveling system and general stability can be appealing.
It may be less ideal for users who primarily want to print high-temperature engineering plastics or who want the absolute fastest print speeds with advanced motion systems. While it can be tuned and improved, the core design targets reliability and everyday usability rather than extreme performance. Budget also plays a role: the Vyper’s value proposition has often been its feature set relative to cost, especially for users upgrading from a very basic printer. If your goal is a capable, practical tool that can produce consistent PLA and PETG parts with a reasonable learning curve, the Anycubic Vyper tends to meet expectations. And if you later decide to explore more advanced printing, the experience gained from tuning and maintaining this printer transfers well to other machines and materials.
Final thoughts on long-term ownership and real value
Long-term satisfaction with a 3D printer usually comes down to how often it successfully completes prints and how predictable it feels when you change models, filaments, or seasons. The Anycubic Vyper has earned a reputation for being a reliable daily printer when kept clean, mechanically sound, and paired with sensible slicer settings. Its automatic leveling reduces one of the most common friction points, and its overall design supports consistent results for typical home and workshop materials. It still benefits from the same fundamentals as any FDM machine—dry filament, correct temperatures, stable placement, and periodic maintenance—but it generally does not demand constant attention once dialed in.
If you want a printer that can move from unboxing to useful output without turning setup into a prolonged project, the Anycubic Vyper remains a practical option. It offers enough convenience to lower the barrier for beginners while still leaving room for intermediate users to tune quality, reliability, and workflow. The best way to evaluate its value is to think about what you will print most often and how much time you want to spend adjusting hardware versus producing parts. For many owners, the balance of features and repeatable performance is exactly why the Anycubic Vyper continues to be recommended as a dependable workhorse for everyday 3D printing.
Watch the demonstration video
In this video, you’ll learn what to expect from the Anycubic Vyper 3D printer, including its key features, setup process, and real-world print performance. It covers auto bed leveling, ease of use, print quality, common issues to watch for, and practical tips to help you get reliable results—whether you’re a beginner or upgrading your printer.
Summary
In summary, “anycubic vyper” is a crucial topic that deserves thoughtful consideration. We hope this article has provided you with a comprehensive understanding to help you make better decisions.
Frequently Asked Questions
What is the Anycubic Vyper?
A Cartesian FDM 3D printer known for automatic bed leveling, a direct-drive extruder, and a heated build plate.
How does auto bed leveling work on the Vyper?
The **anycubic vyper** uses a strain‑gauge sensor in its print head to tap several spots across the build plate, creating a detailed leveling mesh that automatically compensates for small bumps and dips in the surface.
What nozzle and filament sizes does the Vyper support?
It typically ships with a 0.4 mm nozzle; common nozzle sizes (e.g., 0.2–0.8 mm) are compatible. It supports 1.75 mm filament such as PLA, PETG, and TPU (with tuned settings). If you’re looking for anycubic vyper, this is your best choice.
Why is the first layer not sticking on my Vyper?
If your first layer isn’t sticking, the usual culprits are a dirty build plate, an off Z-offset, printing the first layer too fast, or using temperatures that don’t suit your filament. On the **anycubic vyper**, start by thoroughly cleaning the bed, then run auto-leveling again, fine-tune the Z-offset, and try slowing down and slightly increasing the first-layer temperature to improve adhesion.
How do I update Anycubic Vyper firmware?
Grab the correct firmware for your mainboard and screen, copy the files onto a microSD card, then follow Anycubic’s step-by-step guide to flash both the display and the mainboard on your **anycubic vyper**.
What slicer settings are a good starting point for the Vyper?
For a solid baseline on the **anycubic vyper**, begin with a 0.2 mm layer height, set your PLA nozzle temperature to about 200–215°C, and keep the bed around 55–65°C. Aim for a print speed in the 40–60 mm/s range, then slow down the first layer for better adhesion. After the first couple of layers (around layer 2–3), turn on adequate part cooling to help sharpen details and improve overall print quality.
📢 Looking for more info about anycubic vyper? Follow Our Site for updates and tips!

Trusted External Sources
- Anycubic Vyper – FDM Leveling-Free 3D Printer
Anycubic Vyper is one of the very few 3D printers that has auto leveling feature under the price segment of $400. 16-point precise auto leveling both greatly …
- Is the Anycubic Vyper any good? There’s no good reviews out there
Mar 9, 2026 … I’d recommend this printer to someone who wants something that has the ability to work right out of the box. It was 15 minutes from box to the beginning of my … If you’re looking for anycubic vyper, this is your best choice.
- Anycubic Vyper
The Anycubic Vyper, which emphasizes user-friendliness, gives us a glimpse of what future popular 3D printers may look like.
- Is there any reason I shouldnt buy a Vyper? : r/AnycubicVyper – Reddit
May 21, 2026 … : r/AnycubicVyper. Close search. Clear search. Ask. Overview of Anycubic Vyper 3D printer. Anycubic Vyper user reviews and experiences.
- Prusa Slicer Profile Anycubic Vyper – PrusaSlicer – Prusa3D Forum
Mar 5, 2026 … Does anyone have a good working profile for the Anycubic Vyper? I used the settings for Anycubic I3 Mega, but i cant seem to get it working as good as my …