An anycubic resin printer sits in a specific sweet spot for people who want high-detail 3D printing without industrial pricing. Resin printing, often called SLA/MSLA in consumer machines, relies on light to cure liquid photopolymer resin layer by layer. That approach produces sharper edges, smoother surfaces, and finer textures than typical filament printing, especially on small features like engraved text, miniature faces, jewelry patterns, dental models, and mechanical parts with tight tolerances. Anycubic has become a recognizable name because it offers a broad lineup—from compact entry-level units to larger-format machines—while keeping workflows approachable. When evaluating anycubic resin printer models, it helps to look beyond marketing terms and focus on the practical elements that determine everyday results: LCD resolution, light uniformity, Z-axis stability, build volume, and the quality of the ecosystem around slicing profiles, replacement parts, and community knowledge.
Table of Contents
- My Personal Experience
- Choosing an Anycubic Resin Printer: What Makes It Different
- How Resin Printing Works on Anycubic Machines
- Understanding Resolution, Pixel Size, and Real-World Detail
- Build Volume, Project Types, and Choosing the Right Size
- Setup Essentials: Location, Ventilation, and Safety
- Slicing and Print Settings That Matter Most
- Resin Choices: Standard, Tough, ABS-Like, and Specialty Options
- Post-Processing: Washing, Curing, and Surface Finishing
- Expert Insight
- Maintenance and Longevity: FEP Film, LCD Care, and Calibration
- Common Print Problems and Practical Fixes
- Workflow Efficiency: Batch Printing, Part Orientation, and Cost Control
- Accessories and Upgrades That Actually Help
- When an Anycubic Resin Printer Is the Right Tool (and When It Isn’t)
- Getting Consistent Results Over Time
- Watch the demonstration video
- Frequently Asked Questions
- Trusted External Sources
My Personal Experience
I picked up an Anycubic resin printer to make small tabletop minis, and the first weekend was a mix of excitement and sticky reality. The test print came out surprisingly sharp, but I underestimated how much the workflow matters—leveling the plate, getting the exposure right, and especially washing and curing without making a mess. I learned quickly to warm the resin a bit, wear gloves every time, and keep a dedicated tray and paper towels nearby because drips happen no matter how careful you are. After a couple of failed prints from supports that were too thin, I started using heavier supports and hollowing larger parts, and the success rate jumped. It’s not as “press print and walk away” as I hoped, but once I got a routine down, the detail I can get from it still feels kind of magical.
Choosing an Anycubic Resin Printer: What Makes It Different
An anycubic resin printer sits in a specific sweet spot for people who want high-detail 3D printing without industrial pricing. Resin printing, often called SLA/MSLA in consumer machines, relies on light to cure liquid photopolymer resin layer by layer. That approach produces sharper edges, smoother surfaces, and finer textures than typical filament printing, especially on small features like engraved text, miniature faces, jewelry patterns, dental models, and mechanical parts with tight tolerances. Anycubic has become a recognizable name because it offers a broad lineup—from compact entry-level units to larger-format machines—while keeping workflows approachable. When evaluating anycubic resin printer models, it helps to look beyond marketing terms and focus on the practical elements that determine everyday results: LCD resolution, light uniformity, Z-axis stability, build volume, and the quality of the ecosystem around slicing profiles, replacement parts, and community knowledge.
Another reason an anycubic resin printer attracts attention is the balance between speed and predictability. MSLA printers can produce entire layers at once, so print time depends more on model height than on how many parts sit on the build plate. That can be a big advantage for batch printing. Still, resin printing is not “set and forget.” You’ll manage resin handling, post-curing, washing, and occasional calibration. Anycubic’s machines generally aim to reduce friction with features like pre-tensioned FEP films (on some vats), user-friendly touch interfaces, and widely shared exposure settings. The real differentiator, though, comes from how well a particular machine matches your use case. A miniatures hobbyist may prioritize fine pixel size and consistent exposure, while a functional prototyping user might prefer a larger plate and robust Z-axis components. Understanding these tradeoffs early makes the whole experience smoother, and it prevents the common mistake of buying based only on “K” resolution numbers.
How Resin Printing Works on Anycubic Machines
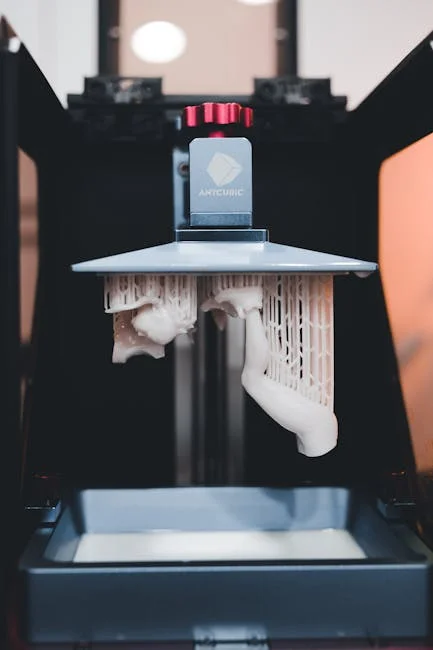
Every anycubic resin printer follows the same core principle: a UV light source projects or masks light through an LCD screen, curing a thin layer of resin against a transparent film at the bottom of the vat. In MSLA machines, the LCD acts as a mask, letting UV light through only where each layer should harden. The build plate lifts after each layer, peeling the cured layer from the film, and then returns for the next exposure. This peel-and-lift motion is why Z-axis rigidity matters so much. If the axis flexes, layers can shift, details can blur, and supports can fail. When you’re comparing models, you’re really comparing how stable the mechanical system is during repeated peel cycles, and how consistent the light engine is across the screen.
Exposure control is the other half of the story. Different resins need different exposure times based on pigmentation, viscosity, and the resin’s sensitivity to UV. An anycubic resin printer typically lets you tune normal layer exposure, bottom exposure, number of bottom layers, lift distances, and lift speeds. Those settings define adhesion and detail. Overexposure can lead to swollen features, loss of sharp edges, and supports that fuse too aggressively. Underexposure can cause brittle layers, partial curing, and print failures that leave cured fragments in the vat. Because resin printing is sensitive to temperature, you’ll also see changes across seasons or in a garage workshop. Many users stabilize results by printing in a controlled room, warming resin, or using an enclosure. Anycubic machines can perform well in a variety of environments, but the key is respecting the process: clean vat film, level build plate, correct exposure, and careful post-processing. Once those habits are routine, the technology becomes far less mysterious and far more reliable.
Understanding Resolution, Pixel Size, and Real-World Detail
Marketing often highlights 4K, 6K, 8K, or 12K screens, but the meaningful metric for an anycubic resin printer is pixel size (often expressed in microns). Pixel size depends on both LCD resolution and screen dimensions. A smaller screen with a given resolution yields smaller pixels and potentially finer detail. A larger screen with the same resolution yields bigger pixels and slightly softer micro-detail, even though the overall print area is larger. For miniatures, jewelry masters, and figurines, smaller pixels can produce crisper textures and less visible stepping on gentle curves. For functional parts, the difference may be less important than dimensional accuracy, resin choice, and proper orientation.
Real-world detail also depends on the optical system and how evenly the light is distributed. Even if an anycubic resin printer has a high-resolution screen, uneven light can cause center-to-edge exposure differences, which show up as inconsistent curing, elephant foot variations, or slightly different surface finish across the plate. Another practical factor is anti-aliasing and grayscale control in the slicer. Many slicers can smooth edges by modulating exposure at pixel boundaries, which can reduce jaggedness on diagonal lines. However, aggressive anti-aliasing can slightly soften crisp edges and text. The best approach is to treat resolution as one tool, not the whole story. If you need extremely sharp lettering, you might reduce anti-aliasing and tune exposure carefully. If you want a more sculpted look on organic models, modest anti-aliasing paired with good resin and post-curing can create impressive results. For most users, the combination of correct exposure, stable temperature, and good support strategy matters more than jumping to the highest “K” number available.
Build Volume, Project Types, and Choosing the Right Size
Build volume is the first constraint you feel when you start printing regularly. An anycubic resin printer with a compact plate can still be incredibly productive if you batch small items: tabletop miniatures, dice masters, small mechanical gears, keycaps, and decorative parts. Small machines often have excellent pixel density because the screen is smaller, and they tend to be easier to keep warm and stable. They also use less resin per failed print and make vat maintenance less expensive. If you’re learning resin printing, a compact unit can be a forgiving way to develop habits without the higher cost of larger vats, larger FEP sheets, and higher resin consumption.
On the other hand, larger build volumes unlock different workflows: helmets and cosplay parts in fewer pieces, bigger terrain tiles, larger figurines, and plates full of production parts. A larger anycubic resin printer can also improve throughput by allowing more items per run, but it comes with tradeoffs. Larger plates amplify leveling sensitivity and peel forces. Supports must be stronger, lift settings may need adjustment, and resin temperature becomes more critical because bigger prints mean longer runs. Additionally, post-processing becomes more involved: larger wash containers, more IPA or alternative wash fluid, and more thorough curing. When choosing size, consider not just the biggest object you might print once, but what you’ll print weekly. If your typical output is small and detailed, a smaller plate with high pixel density can outperform a large-format machine for your needs. If you routinely want bigger objects, going larger can save time and assembly effort, provided you’re willing to optimize settings and handling.
Setup Essentials: Location, Ventilation, and Safety
Resin printing deserves a thoughtful workspace. An anycubic resin printer uses liquid photopolymer resin that can irritate skin and has noticeable odor, especially in poorly ventilated rooms. A practical setup includes nitrile gloves, eye protection, paper towels, a silicone mat or disposable liners, and a dedicated waste container for contaminated wipes and supports. Ventilation matters: a room with a window and an exhaust fan is ideal, and many users add a small enclosure with a ducted fan to direct fumes outside. Even if a resin is labeled “low odor,” it still benefits from proper airflow. Keeping the machine away from direct sunlight is also important, because stray UV can partially cure resin in the vat or on tools.
Temperature stability is another overlooked factor. Many resins print best in a warm range, and cold resin can lead to underexposure symptoms, weak supports, and layer separation. If your anycubic resin printer lives in a garage or basement, consider a small heater, a fermentation belt around the vat area (used carefully), or an enclosure that retains warmth. Keep IPA or wash solutions away from open flames and store chemicals responsibly. A clean workflow reduces failures: label tools, dedicate a scraper to the build plate, and avoid cross-contaminating your wash stations with uncured resin. If you develop a routine—gloves on, pour resin, print, drip, wash, cure, clean—you’ll spend less time troubleshooting and more time producing consistent parts. Safety isn’t a barrier to resin printing; it’s simply part of doing it well.
Slicing and Print Settings That Matter Most
Slicer settings are where an anycubic resin printer becomes personalized to your resin and your goals. The most impactful parameters are normal exposure time, bottom exposure time, bottom layer count, lift distance, lift speed, and retract speed. Bottom layers act like a foundation; they need enough exposure to adhere firmly to the build plate. Too little bottom exposure can cause prints to detach and stick to the vat film. Too much can create an oversized “elephant foot” and make parts harder to remove. Normal exposure is a balance between detail and strength: shorter exposures preserve fine edges but can weaken thin features, while longer exposures strengthen parts but can blur detail. A sensible approach is to start with a known community profile for your specific resin and machine, then run a small calibration model to fine-tune.
Supports are equally critical. Even the best anycubic resin printer cannot overcome poor support strategy. Orientation reduces suction and peel forces; angling a model can help resin drain and reduce large cross-sectional layers that stress the peel cycle. Support tip size and density should match the part’s weight and geometry. For miniatures, you often want many light supports on delicate features, plus a few medium supports on heavier areas. For functional parts, you might accept more aggressive supports and sand the marks later. Hollowing large parts can save resin and reduce peel force, but it requires drain holes and thorough cleaning inside, or you risk trapped uncured resin that can crack a print over time. Finally, consider layer height: thinner layers can improve surface smoothness but increase print time; thicker layers can be strong and fast but may show stepping. The best settings are the ones that deliver repeatable results with your resin, your temperature, and your typical model types.
Resin Choices: Standard, Tough, ABS-Like, and Specialty Options
Choosing resin is as important as choosing an anycubic resin printer. Standard resins can produce excellent detail and smooth surfaces, making them popular for display models and prototypes. However, many standard formulations are relatively brittle, especially in thin sections. ABS-like or tough resins aim to improve impact resistance and flex, making them better for functional parts, snap fits, and components that get handled frequently. If you print miniatures for tabletop play, a tougher resin can reduce breakage on swords, spears, and thin arms. For engineering-like prototypes, a tougher resin can better represent how a part will behave when assembled, though it still won’t match injection-molded plastics perfectly.
Specialty resins expand what an anycubic resin printer can do. Water-washable resins reduce dependence on IPA, but they still require careful waste handling because resin-contaminated water is not safe to pour down the drain. High-temperature resins can handle heat better for molds or fixtures, though they may be more demanding to print. Flexible resins can create rubber-like parts, but they often require different support strategies and exposure tuning. Castable resins are used for investment casting, especially in jewelry, and they prioritize clean burnout with minimal ash. Dental or biocompatible resins exist, but they require strict handling and curing procedures, and they should be used only with appropriate guidance and equipment. The practical takeaway is that resin selection should follow the job: detail-focused display pieces, durable play pieces, functional prototypes, or special processes like casting. Once you find a resin that matches your needs, you can dial in a stable profile and keep your print success rate high.
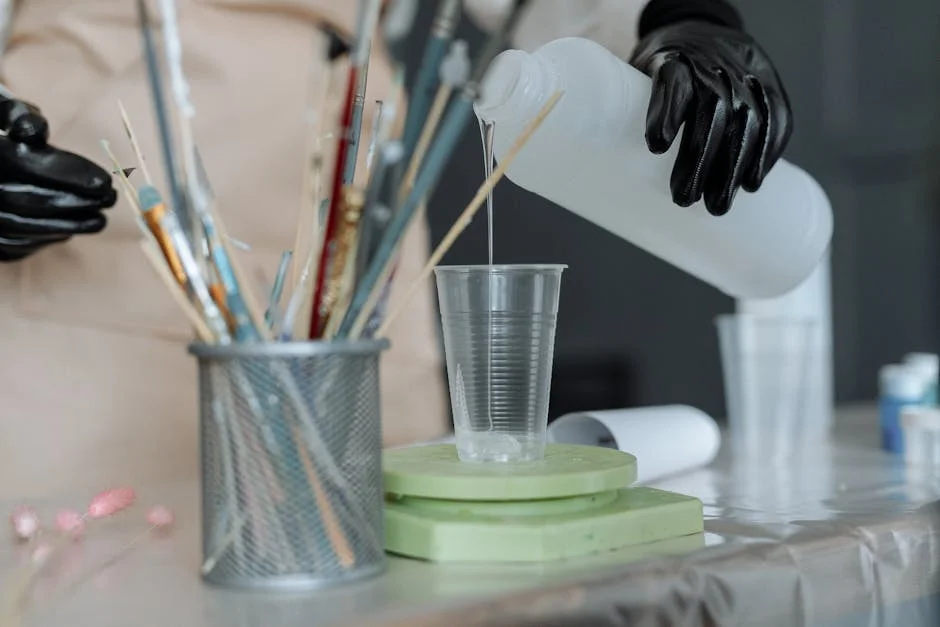
Post-Processing: Washing, Curing, and Surface Finishing
Post-processing is where resin prints become usable objects. After a run on an anycubic resin printer, the print is coated with uncured resin. Washing removes that residue so the surface can cure properly and feel dry. IPA is common, but there are also resin detergents and alternative solvents designed for photopolymer cleanup. Many users use a two-stage wash: a “dirty” wash to remove most resin, then a “clean” wash for a final rinse. This approach keeps your second bath cleaner longer and improves surface quality. Agitation helps, whether through a wash station, a magnetic stirrer, or manual shaking in a sealed container. After washing, allow the model to dry completely before curing; trapped solvent can cause whitening or tacky spots.
| Model | Best for | Key strengths | Trade-offs |
|---|---|---|---|
| Anycubic Photon Mono 2 | Beginners and budget-friendly resin printing | Sharp detail for the price, fast mono screen curing, easy setup and wide community support | Smaller build volume than larger models; fewer premium convenience features |
| Anycubic Photon Mono X 6K | Medium-to-large prints and higher detail at scale | Larger build volume, higher-resolution screen for finer surfaces, good throughput for batches | Takes more resin per print; needs more space and careful leveling; higher upfront cost |
| Anycubic Photon M3 Premium | Enthusiasts and pros needing top-tier detail and consistency | Very high resolution and crisp edges, robust build quality, strong results for miniatures and prototypes | Pricier and more demanding workflow (resin handling, post-processing, and calibration) |
Expert Insight
Dial in exposure with a quick calibration print before starting a big job. Run a small exposure test whenever you change resin, room temperature, or layer height, then save the winning settings as a dedicated profile to avoid repeated failures and wasted resin. If you’re looking for anycubic resin printer, this is your best choice.
Improve reliability by controlling adhesion and cleanliness: level the build plate, lightly scuff it if prints keep detaching, and keep the FEP film spotless. After each session, strain resin back into the bottle, wipe the vat and plate, and check the FEP for clouding or nicks to prevent sudden print defects. If you’re looking for anycubic resin printer, this is your best choice.
Curing completes polymerization and improves strength and stability. Some anycubic resin printer owners use dedicated UV curing stations, while others use UV nail lamps or sunlight. Dedicated curing is more controlled and consistent. Over-curing can make some resins more brittle and can slightly yellow clear resins, so it’s worth timing your cure and rotating parts for even exposure. Support removal can happen before or after curing depending on the resin and your preference. Removing supports before full cure can reduce scarring because the resin is slightly softer, but it can also deform thin features if handled roughly. After curing, sanding and priming can produce a paint-ready finish. For display pieces, a filler primer can hide micro-layer lines, and careful sanding can remove support marks. Clear resins can be polished and coated for transparency, though perfect clarity is challenging. Post-processing takes time, but it’s also where resin printing shines: with a consistent routine, you can achieve professional-looking surfaces from a consumer machine.
Maintenance and Longevity: FEP Film, LCD Care, and Calibration
Keeping an anycubic resin printer reliable means treating the vat and screen as precision components. The FEP (or similar) film at the bottom of the vat is a wear item. Over time it can become cloudy, scratched, or punctured, which affects release and can lead to failures. If you notice repeated adhesion issues, odd surface artifacts, or visible damage, replacing the film can restore performance. Always filter resin when returning it to the bottle, because tiny cured fragments can damage the film on the next print. Cleaning the vat gently—using soft tools and avoiding sharp scraping—extends film life. When a print fails, it’s tempting to scrape aggressively, but patience saves parts and prevents leaks.
LCD protection is equally important. Resin leaks can damage screens, and cured resin on the LCD can cause pressure points that lead to cracks. Many anycubic resin printer users add a screen protector to reduce risk, especially if they print frequently. Keep the build plate clean and periodically check leveling. If you see first-layer inconsistencies or adhesion problems, re-leveling is often the fastest fix. Z-axis maintenance matters too: keep rails clean, lubricate according to manufacturer guidance, and ensure the lead screw is not collecting resin drips or dust. Firmware updates and slicer updates can improve usability and sometimes add format support or bug fixes, but it’s wise to keep notes of working profiles before changing too much at once. A well-maintained resin printer can run for years, and most reliability issues come down to routine cleaning, careful handling, and replacing consumables before they become catastrophic.
Common Print Problems and Practical Fixes
Even with a solid anycubic resin printer, certain issues are common and usually solvable. Prints sticking to the vat film instead of the build plate often point to insufficient bottom exposure, too few bottom layers, a poorly leveled plate, or a contaminated build surface. Cold resin can also contribute because viscosity increases and curing behavior changes. Layer lines that look wavy or inconsistent can indicate Z-axis wobble, loose screws, or lift settings that are too aggressive. Suction-related failures—where large flat areas detach or tear—often improve with better orientation, adding drain holes for hollow parts, and reducing cross-sectional area per layer. Support failures typically come from underexposure, supports that are too light for the model’s weight, or a model that creates high peel forces at certain layers.
Surface defects have their own patterns. “Elephant foot” at the base is usually too much bottom exposure or too many bottom layers, and it can be reduced by lowering bottom exposure or adding a small chamfer in the model. “Pock marks” and voids can come from trapped resin, insufficient washing, or bubbles. Cloudy surfaces can result from incomplete drying before curing or from wash fluid that is too dirty. If your anycubic resin printer produces brittle parts, consider reducing cure time slightly, switching to a tougher resin, or adjusting exposure. If details look soft, reduce normal exposure, reduce anti-aliasing, or ensure the resin is well mixed and the temperature is stable. The most effective troubleshooting method is changing one variable at a time and keeping notes. Resin printing rewards careful iteration: once you find the right combination of resin, temperature, and settings, the machine can produce remarkably consistent output.
Workflow Efficiency: Batch Printing, Part Orientation, and Cost Control
Resin printing can be efficient when you plan around the strengths of an anycubic resin printer. Because layer time is largely constant, filling the build plate with multiple parts often costs little extra time compared to printing a single part of the same height. That makes batch printing ideal for miniatures, production runs of small components, and sets of prototypes. The key is ensuring adequate spacing for resin flow and support placement, and avoiding arrangements that create large, synchronized suction events. Strategic orientation can also reduce cleanup: placing support contact points on hidden surfaces, angling parts to minimize “cups,” and using hollowing only when it truly helps. For repeated jobs, saving a known-good layout and support scheme can turn resin printing into a predictable production tool.
Cost control comes from reducing failures, managing consumables, and choosing resin wisely. An anycubic resin printer uses consumables like gloves, paper towels, wash fluids, and vat films. A tidy station reduces waste: drip the build plate over the vat, let parts drain, and use a silicone squeegee or soft spatula to recover resin carefully. Filtering resin back into the bottle prevents debris from causing future failures, which saves both time and material. Consider the true cost of large prints: not just resin volume, but also longer wash and cure cycles, more support material, and more finishing time. If you print for clients or sell prints, document your settings and track resin usage per job so pricing stays consistent. Efficiency isn’t only about speed; it’s about repeatability. When your workflow is stable, you can run an anycubic resin printer like a small manufacturing station rather than a constant experiment.
Accessories and Upgrades That Actually Help
Not every accessory is necessary, but a few additions can make an anycubic resin printer easier to live with. A wash-and-cure station is one of the most impactful upgrades because it standardizes post-processing. Consistent washing improves surface quality and reduces sticky residue, while controlled curing improves strength and reduces tackiness. A flexible build plate system can make part removal easier, though it may require careful re-leveling and attention to Z-height. A screen protector can prevent costly damage from minor leaks. A dedicated resin funnel with a fine metal filter helps you return resin to the bottle without introducing debris. Simple tools like flush cutters for supports, soft brushes for washing, and a UV flashlight for spot-curing drips can also streamline cleanup.
Environmental control accessories can be equally valuable. If your printing area is cool, a small enclosure that retains heat can improve success rates more than any “performance” add-on. A temperature and humidity monitor gives you context when settings suddenly stop working. For odor management, a vented enclosure or a small extractor fan with appropriate ducting can make resin printing more comfortable, especially for long sessions. If you work with multiple resins, labeling bottles, using dedicated vats, or thoroughly cleaning between resins can prevent unexpected behavior. The best upgrades are the ones that reduce variability and mess. When your anycubic resin printer operates in a controlled routine—stable temperature, clean resin, consistent washing and curing—print quality becomes predictable, and the machine feels less like a hobby gamble and more like a dependable tool.
When an Anycubic Resin Printer Is the Right Tool (and When It Isn’t)
An anycubic resin printer is a strong choice when detail, surface finish, and small-feature accuracy matter. If you paint miniatures, create collectible figures, design jewelry, prototype small mechanical parts, or need smooth cosmetic surfaces, resin printing is hard to beat at the consumer level. The ability to reproduce fine textures—fabric weave, hair strands, embossed logos—often changes what’s possible for makers. Resin printing also shines for molds, masters, and patterns where surface quality reduces downstream work. For small-batch production, a resin printer can produce consistent parts repeatedly, especially once a profile is tuned and the workflow is standardized.
There are also cases where resin is not the best fit. If you need very large parts that must be highly impact-resistant, filament printing with engineering materials might be more practical and less messy. If you need food-safe items, resin is generally unsuitable unless you use certified materials and follow strict procedures. If you want a machine that can sit in a living room with minimal odor and minimal chemical handling, resin printing may feel demanding. And if you primarily need quick, rough prototypes where surface finish doesn’t matter, a filament printer may be faster to iterate with less post-processing. The right perspective is to treat an anycubic resin printer as a precision tool with a specific workflow. When the project aligns with its strengths—detail, smoothness, and accuracy—the results can look professionally manufactured. When the project conflicts with its limitations—chemical handling, post-processing time, and material characteristics—another technology may be more comfortable.
Getting Consistent Results Over Time
Consistency is what turns an anycubic resin printer from a novelty into a dependable part of your workshop. The foundation is repeatable preparation: keep resin bottles shaken or stirred, maintain a stable temperature, and verify the build plate is clean and properly leveled. Use a known slicer profile for each resin and avoid making multiple changes at once. If you switch resins frequently, note exposure times and lift settings for each one, because pigments and formulations behave differently. Keep your vat film in good condition and filter resin after failures. Small habits—like letting the build plate drip for a minute, or wiping the rim of the vat before closing—reduce mess and prevent contamination that can cause random failures later.
It also helps to standardize post-processing. Use consistent wash times, refresh wash fluid before it becomes saturated, and cure for a measured duration rather than guessing. If you paint or finish prints, keep the same primer and sanding routine so you can compare results. Over time, you’ll develop a “house profile” for your anycubic resin printer that fits your environment and your typical jobs. That profile is more valuable than any default setting list because it reflects real conditions: your room temperature, your preferred resins, and your tolerance for support marks versus failure risk. Once you reach that point, resin printing becomes a predictable pipeline: model, slice, print, wash, cure, finish. The learning curve is real, but it’s finite. With a stable workflow and routine maintenance, an anycubic resin printer can deliver high-detail parts run after run, and the final paragraph of any successful print story is the same: the anycubic resin printer produced the clean surface and sharp detail you were aiming for.
Watch the demonstration video
In this video, you’ll learn the essentials of using an Anycubic resin 3D printer—from setup and safety to dialing in exposure settings for clean, detailed prints. It covers resin handling, leveling the build plate, troubleshooting common failures, and post-processing steps like washing and curing, so you can get reliable results faster. If you’re looking for anycubic resin printer, this is your best choice.
Summary
In summary, “anycubic resin printer” is a crucial topic that deserves thoughtful consideration. We hope this article has provided you with a comprehensive understanding to help you make better decisions.
Frequently Asked Questions
Which Anycubic resin printer should I choose?
Pick based on build volume, XY resolution, and speed. Smaller models suit minis and prototypes; larger models are better for big parts. Also consider features like auto-leveling, air filtration, and resin vat type. If you’re looking for anycubic resin printer, this is your best choice.
What resin types work with Anycubic resin printers?
Most Anycubic MSLA models are designed to work with 405nm UV resins, so you can choose from standard, ABS-like, tough, flexible, water-washable, or even castable options. To get the best results from your **anycubic resin printer**, just confirm the resin’s curing wavelength and review the printer’s compatibility notes before you start printing.
How do I get better print adhesion and reduce failures?
Level the build plate, clean the vat and plate, use correct exposure settings, and ensure proper supports. Warm the resin (about 20–25°C), tighten the vat film, and avoid overfilling to reduce suction issues. If you’re looking for anycubic resin printer, this is your best choice.
How do I dial in exposure settings for my resin?
Begin with the manufacturer’s recommended settings for your **anycubic resin printer**, then run an exposure calibration test to fine-tune your normal exposure and bottom layer settings. Keep in mind that switching resin brands, changes in room temperature, or adjusting layer height will typically mean you’ll need to re-calibrate for the best results.
What post-processing steps are required after printing?
After printing on an **anycubic resin printer**, rinse your part in IPA (or the manufacturer-recommended cleaner), remove the supports, and then fully UV-cure it for a strong, clean finish. Be sure to handle resin-contaminated waste responsibly—let any leftover resin on paper towels cure completely before throwing them away, and dispose of all contaminated materials according to local guidelines.
What safety precautions should I follow with resin printing?
Wear nitrile gloves and eye protection, avoid skin contact, and ventilate the area or use filtration. Keep resin away from food areas, store it sealed and out of sunlight, and clean spills promptly. If you’re looking for anycubic resin printer, this is your best choice.
📢 Looking for more info about anycubic resin printer? Follow Our Site for updates and tips!

Trusted External Sources
- Is Anycubic “That” bad? : r/3Dprinting – Reddit
As of Oct 6, 2026, I’m ready to buy a new high-speed 3D printer. After hours of digging through reviews, Reddit threads, and comparison posts, I’ve narrowed down my options by crossing a few brands off the list—and now I’m seriously considering an **anycubic resin printer** as a top contender.
- Resin 3D Printers For Professionals & Beginners Will Love
Anycubic designs and manufactures high-performance desktop 3D printers and accessories that bring professional-grade results to everyday makers. With a focus on precision engineering and intuitive, user-friendly features, an **anycubic resin printer** makes it easier to create highly detailed models, prototypes, and parts—whether you’re just getting started or refining an advanced workflow.
- Anycubic 3D Printer | For Freedom to Make
The Anycubic Kobra S1 Combo is an exciting 3D printer that works well for both beginners and seasoned makers. With a user-friendly setup and features that appeal to experienced enthusiasts, it’s built to make printing smoother and more enjoyable from the very first project. And if you’re also comparing options like an **anycubic resin printer**, the Kobra S1 Combo offers a compelling alternative for creators who want reliable results without a steep learning curve.
- Anycubic 3D Printers | Best FDM & Resin of 2026 | Official Store
Anycubic designs high-performance desktop 3D printers and accessories built for creators who want reliable results without the hassle. Blending precision engineering with intuitive, user-friendly features, an **anycubic resin printer** makes it easy to produce crisp, detailed prints—whether you’re prototyping, crafting miniatures, or bringing intricate designs to life.
- Anycubic Resin 3D Printers: High Quality, Unlimited Imagination
Anycubic is a leading maker of high-performance desktop 3D printers and accessories, known for blending precision engineering with easy-to-use design. Whether you’re prototyping, creating detailed miniatures, or producing functional parts, an **anycubic resin printer** helps you achieve sharp detail and reliable results—making professional-quality 3D printing more accessible for makers of all skill levels.