Level 2 charger installation is one of the most impactful home upgrades for electric vehicle owners because it directly changes how convenient daily driving feels. Instead of relying on slower charging from a standard wall outlet, a properly installed Level 2 EV charging station can add meaningful range during the same hours you already spend at home—overnight, during dinner, or while working. The practical difference shows up quickly: fewer trips to public chargers, less time waiting in parking lots, and more predictable morning readiness. A dedicated 240-volt circuit paired with a compatible EVSE (Electric Vehicle Supply Equipment) gives a stable, faster charge rate than Level 1, and it can be tuned to match the vehicle’s onboard charger capabilities. That means the same equipment can serve different EV models over time, provided the amperage and connector type are appropriate. Many households also find that a home charging setup improves overall trip planning, because the car begins each day with a consistent state of charge and fewer surprises.
Table of Contents
- My Personal Experience
- Understanding Level 2 Charger Installation and Why It Matters
- Choosing the Right Charger: Hardwired vs Plug-In, Amperage, and Smart Features
- Electrical Capacity and Panel Considerations Before Installation
- Permits, Codes, and Inspection: What Compliance Looks Like
- Site Planning: Location, Cable Reach, and Weather Protection
- Wiring, Breakers, and Safety Basics for a Reliable EV Charger Install
- Installation Timeline and What to Expect on the Day of Service
- Expert Insight
- Cost Drivers: What Influences the Price of Home Charger Installation
- Utility Rates, Rebates, and Incentives That Can Offset Installation Costs
- Common Mistakes to Avoid: Reliability, Safety, and Future-Proofing
- Maintenance, Troubleshooting, and Long-Term Performance
- Working With an Electrician: How to Get Accurate Quotes and Quality Work
- Final Thoughts on Level 2 Charger Installation for Home and Business
- Watch the demonstration video
- Frequently Asked Questions
- Trusted External Sources
My Personal Experience
When I bought my EV, I tried getting by on a regular wall outlet, but it quickly became a nightly hassle and I was always doing math to see if I’d have enough range for the next day. I finally scheduled a level 2 charger installation, and the electrician started by checking my panel capacity and measuring the run to the garage. In my case, we had to add a 60‑amp breaker and run new conduit along the basement ceiling, which wasn’t cheap but also wasn’t as disruptive as I feared. The permit and inspection added a few days to the timeline, but once it was signed off, the difference was immediate—I plug in after dinner and wake up to a full battery without thinking about it. Looking back, the upfront cost stung, but the convenience has made it feel like one of the best home upgrades I’ve done.
Understanding Level 2 Charger Installation and Why It Matters
Level 2 charger installation is one of the most impactful home upgrades for electric vehicle owners because it directly changes how convenient daily driving feels. Instead of relying on slower charging from a standard wall outlet, a properly installed Level 2 EV charging station can add meaningful range during the same hours you already spend at home—overnight, during dinner, or while working. The practical difference shows up quickly: fewer trips to public chargers, less time waiting in parking lots, and more predictable morning readiness. A dedicated 240-volt circuit paired with a compatible EVSE (Electric Vehicle Supply Equipment) gives a stable, faster charge rate than Level 1, and it can be tuned to match the vehicle’s onboard charger capabilities. That means the same equipment can serve different EV models over time, provided the amperage and connector type are appropriate. Many households also find that a home charging setup improves overall trip planning, because the car begins each day with a consistent state of charge and fewer surprises.
Beyond convenience, Level 2 charger installation has implications for safety, electrical capacity, and long-term property value. A professional EV charger install typically includes a load evaluation, correct breaker sizing, proper wire gauge selection, and adherence to local electrical codes. Those details matter because charging is a continuous, high-load use case: a charger running at 32–48 amps for hours is not the same as a short burst from a kettle or microwave. Done correctly, home charger installation reduces nuisance breaker trips and minimizes heat buildup at connections. It can also support future energy goals, like pairing with solar production or time-of-use rate plans. For many homeowners, installing a Level 2 charger becomes part of a broader electrical modernization—upgraded panels, smart load management, or surge protection—especially as more appliances become electric. A well-planned EVSE installation balances speed, cost, and safety so that charging becomes a seamless part of daily life rather than a recurring hassle.
Choosing the Right Charger: Hardwired vs Plug-In, Amperage, and Smart Features
Picking equipment is a core part of Level 2 charger installation, because the EVSE you choose influences circuit requirements, installation method, and everyday usability. A major decision is hardwired versus plug-in. Hardwired units are permanently connected to the electrical system, typically allowing higher amperage options and a clean, tamper-resistant setup. Plug-in chargers connect to a dedicated receptacle such as a NEMA 14-50 or 6-50, offering flexibility if you anticipate moving, replacing the unit, or using the receptacle for other purposes. However, plug-in installations require the correct receptacle type, a matching plug on the EVSE, and careful attention to receptacle quality and torque specs. Not all receptacles are built for continuous high loads; heavy-duty industrial-grade components generally perform better than bargain options. The best choice depends on charging needs, budget, and whether local code or your utility incentives favor one approach.
Amperage selection is another key part of EV charger install planning. Many modern EVs can accept 32–48 amps on Level 2, while some can take more. The charger’s output must align with what the vehicle can actually accept, but it also must fit within your home’s electrical capacity. For continuous loads, circuits are typically sized so that the charger’s maximum draw is no more than 80% of breaker rating, meaning a 40-amp charger usually requires a 50-amp circuit, and a 48-amp charger typically requires a 60-amp circuit. Smart features can add value: Wi‑Fi connectivity for scheduling, energy tracking, remote start/stop, and load management. If your utility offers time-of-use rates, smart scheduling can reduce costs by charging when electricity is cheaper. Some smart EVSE models integrate with solar or home energy management systems, helping route surplus solar generation to the car. The right features should support reliability first; a stable unit with a good warranty and strong safety certifications (such as UL or ETL listing) is often more important than the longest feature list. If you’re looking for level 2 charger installation, this is your best choice.
Electrical Capacity and Panel Considerations Before Installation
A successful Level 2 charger installation begins with understanding your home’s electrical service and available capacity. Many houses have 100-amp, 150-amp, or 200-amp main service, and the usable headroom depends on existing loads like HVAC, electric water heaters, ranges, dryers, and pool equipment. The electrician typically evaluates the panel’s bus rating, the main breaker size, and the existing circuit distribution to determine whether a new 240-volt circuit can be added safely. This isn’t just a question of whether there is an open breaker slot; it’s also about whether adding a continuous charging load will push the system beyond what it can reliably support. A formal load calculation may be required by code, and it can reveal whether a simple breaker addition is sufficient or whether upgrades are advisable. Older panels, crowded panels, or panels from manufacturers with known reliability issues may also influence the approach.
If capacity is tight, there are options besides a full service upgrade. Some homeowners choose a lower-amperage EVSE installation that still provides strong overnight charging while staying within existing limits. Others use smart load management systems that dynamically reduce charger output when the home’s other loads spike, allowing a faster charger without overloading the service. In certain cases, a subpanel can be added to create space and organize new circuits, though it doesn’t increase overall service capacity by itself. A main panel upgrade, while more expensive, can be a strategic investment if you plan to add additional electric loads like heat pumps, induction cooking, or a second electric vehicle. The best EV charging installation plan is one that matches realistic driving patterns: many drivers don’t need the maximum possible amperage if their daily miles are moderate, and right-sizing can avoid expensive electrical work while still delivering the convenience that makes home charging so appealing. If you’re looking for level 2 charger installation, this is your best choice.
Permits, Codes, and Inspection: What Compliance Looks Like
Permitting and code compliance are often the difference between a safe, insurable Level 2 charger installation and a risky shortcut. Many jurisdictions require an electrical permit for a new 240-volt circuit and EVSE installation, and the work may need to be performed by a licensed electrician. Code requirements often cover breaker sizing, conductor type, conduit use, GFCI protection rules for receptacles, working clearances around the panel, and mounting height or location restrictions for the charging equipment. Some localities also specify that EVSE must be listed by a recognized testing laboratory. While these requirements can feel like hurdles, they exist because EV charging is a prolonged, high-current application that can expose weak connections or undersized wiring. A permitted installation provides documentation that the work meets minimum safety standards at the time it was performed.
Inspection typically involves verifying that the circuit is correctly sized, the wiring method is acceptable, and the charger is installed per manufacturer instructions. The inspector may check labeling, breaker type, torque markings or compliance with torque specs, and proper grounding and bonding. If a plug-in EV charger is used, the receptacle type and GFCI requirements may be scrutinized closely, especially in garages or outdoor locations. For outdoor charger installation, weatherproof ratings, in-use covers, and conduit sealing can be important. Compliance also matters for incentives: utility rebates and government credits often require proof of permit and final inspection, along with a receipt for the EVSE. A professional EVSE install that includes permitting can reduce future headaches if you sell the home, file an insurance claim, or need service work later. The small extra effort up front often pays back through safety, reliability, and smoother access to financial incentives. If you’re looking for level 2 charger installation, this is your best choice.
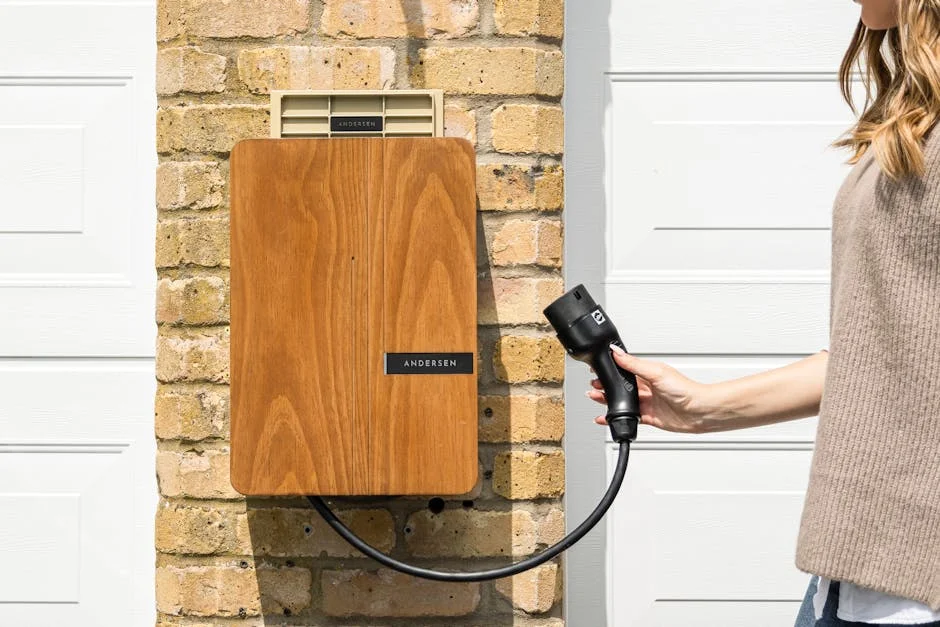
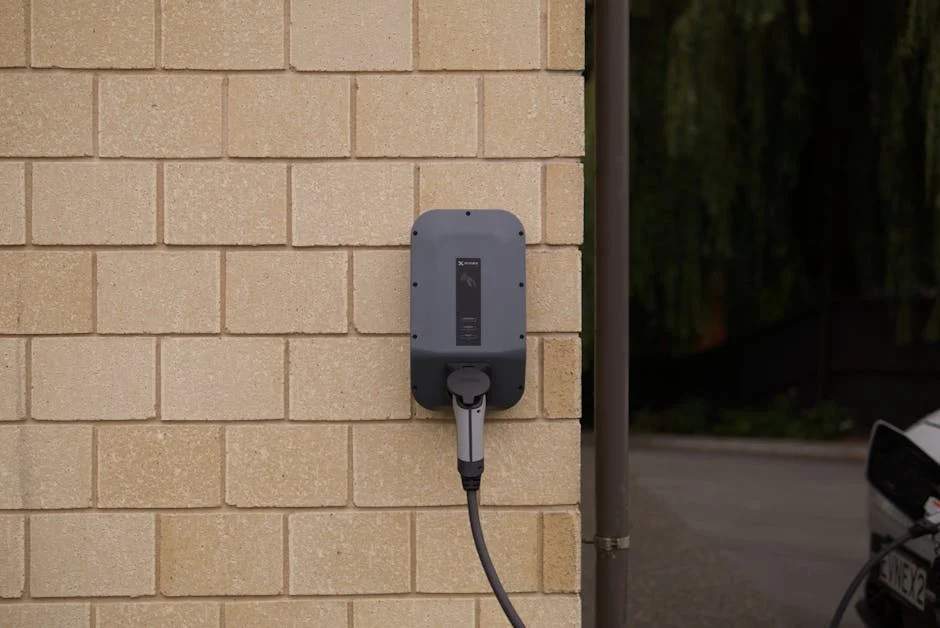
Site Planning: Location, Cable Reach, and Weather Protection
Site planning shapes the day-to-day experience of Level 2 charger installation more than many people expect. The ideal charger placement minimizes cable strain, avoids trip hazards, and keeps the connector easy to reach regardless of how you park. Some households back in, others pull in nose-first, and some switch depending on who is driving. Because charge ports vary by vehicle model and can be located on the front fender, rear quarter panel, or even the nose, choosing a location that works for multiple vehicles can prevent frustration later. Cable length is a major factor: longer cables provide flexibility but can be harder to store neatly and may be more exposed to damage. Wall-mounted cable hooks or integrated holsters help keep the connector off the floor and reduce wear. A thoughtful location also considers door swing clearance, storage shelves, and the path people walk when carrying groceries or moving equipment through the garage.
Environmental conditions matter for both indoor and outdoor EV charger installation. In a garage, temperature swings, humidity, and dust can still impact equipment, but exposure is generally controlled. Outdoors, the unit must be rated for the conditions it will face: rain, direct sun, freezing temperatures, and potential impact from vehicles or yard equipment. Weatherproof enclosures, appropriate IP or NEMA ratings, and correct conduit fittings become essential. Mounting height should keep the connector accessible while avoiding snow accumulation or splash zones. If the charger is installed on an exterior wall, cable routing should avoid sharp bends and protect the line from abrasion. For detached garages or long runs, the trenching route and conduit path should be planned to reduce cost and avoid obstacles like tree roots, driveways, or landscaping features. Good site planning also considers lighting; a well-lit charging area makes it easier to connect at night and reduces the chance of dropping the connector or dragging the cable across rough surfaces. If you’re looking for level 2 charger installation, this is your best choice.
Wiring, Breakers, and Safety Basics for a Reliable EV Charger Install
The technical heart of Level 2 charger installation is the dedicated 240-volt circuit, and reliability depends on getting the details right. Breaker sizing must match the charger’s continuous load requirement, which typically means selecting a breaker rated at least 125% of the charger’s maximum current draw. Conductor size and insulation type must be appropriate for the amperage, distance, and installation method, whether using copper conductors in conduit, cable assemblies where allowed, or other approved wiring methods. Voltage drop can become relevant on longer runs; if the charger is far from the panel, upsizing conductors may improve performance and reduce heat. Connections must be properly stripped, seated, and torqued to manufacturer specifications. Many charging issues blamed on the EVSE are actually caused by loose terminations or subpar receptacles that overheat under continuous load. A clean, code-compliant wiring job helps the charger deliver consistent current without temperature-related throttling or interruptions.
Safety measures vary depending on whether the charger is hardwired or plug-in. For plug-in installations, certain codes require GFCI protection for the receptacle, which can introduce compatibility issues with some EVSE models if not handled carefully. Using a high-quality receptacle and ensuring the plug is fully inserted reduces arcing risk. For hardwired installations, the EVSE may incorporate internal ground-fault protection as part of its design, and the wiring method typically reduces points of failure compared to a receptacle and plug connection. In both cases, grounding and bonding must be correct, and the circuit should be clearly labeled at the panel. Surge protection is also worth considering; power surges can damage electronics in the EVSE or vehicle charging system, and whole-home surge protectors can add a layer of defense. Ultimately, a reliable home charger installation is less about “making it work” and more about building a system that can run for hours, day after day, without heat buildup, nuisance trips, or gradual degradation of connections. If you’re looking for level 2 charger installation, this is your best choice.
Installation Timeline and What to Expect on the Day of Service
Most Level 2 charger installation projects follow a predictable sequence, even though the exact steps vary by home layout and panel location. Before the scheduled day, a contractor may request photos of the electrical panel, the proposed charger location, and the route between them. This helps estimate materials, determine whether wall fishing is possible, and identify potential obstacles like finished drywall, masonry, or crowded joist bays. On installation day, power may be shut off briefly while the electrician works in the panel, and there may be noise or dust if drilling through studs, concrete, or exterior walls is required. If conduit is installed along walls or ceilings, the path is usually chosen to be as neat and protected as possible, but it still must comply with clearance rules and physical protection requirements. When the EVSE is mounted, the installer will typically confirm that the unit is level, the cable holster is positioned for easy use, and the charger is not in a location prone to impact.
Expert Insight
Before buying a Level 2 charger, confirm your panel capacity and circuit requirements: most units need a dedicated 240V circuit (often 40–60A). Have an electrician perform a load calculation and plan the shortest practical cable run to reduce installation cost and voltage drop. If you’re looking for level 2 charger installation, this is your best choice.
Choose the right mounting location and hardware for daily use: place the unit near the charge port with enough slack for different parking positions, and use a NEMA-rated enclosure if installed outdoors. If you’re using a plug-in model, install the correct receptacle (e.g., NEMA 14-50 or 6-50) on a properly sized breaker and avoid extension cords. If you’re looking for level 2 charger installation, this is your best choice.
After the physical work is complete, commissioning and testing are essential steps in a professional EVSE installation. The electrician may verify voltage at the charger, confirm that the breaker and wiring remain cool under load, and test the unit’s basic functions. Some chargers require app setup, Wi‑Fi pairing, firmware updates, and configuration of maximum current draw to match the circuit rating. Setting the correct amperage limit is critical; a charger capable of 48 amps must be configured appropriately if it is installed on a 40-amp or 50-amp circuit. The installer may also demonstrate cable management, explain indicator lights, and provide guidance on scheduling if time-of-use rates apply. If permits are involved, the final inspection might be scheduled for a later date, and it’s normal for the electrician to provide paperwork and labeling in the meantime. A smooth EV charging installation should end with a charger that starts reliably, maintains stable power, and fits naturally into your parking routine. If you’re looking for level 2 charger installation, this is your best choice.
Cost Drivers: What Influences the Price of Home Charger Installation
The cost of Level 2 charger installation depends on a combination of electrical complexity, distance, and site conditions rather than just the price of the charging unit. One of the biggest drivers is the length of the circuit run from the electrical panel to the charger location. Longer runs require more wire or conduit, more labor, and sometimes larger conductors to limit voltage drop. The type of construction also matters: unfinished garages often allow easier routing, while finished walls can increase labor due to drywall repair or complex fishing. If the installation requires drilling through brick, concrete, or stone, labor and tooling needs increase. Another major factor is panel readiness. If the panel is full, obsolete, or lacks sufficient capacity, the project may involve adding a subpanel, rearranging circuits, installing load management, or upgrading the main service. Those steps can raise costs but may also improve overall electrical safety and future flexibility.
| Option | Best for | Key installation considerations |
|---|---|---|
| Hardwired Level 2 Charger | Permanent, clean installs and maximum reliability | Requires a dedicated circuit and electrician; may need a panel upgrade; typically higher max amperage; permits/inspection often required. |
| Plug-in Level 2 Charger (NEMA 14-50/6-50) | Flexibility (easy replacement or relocation) | Needs a properly rated receptacle on a dedicated circuit; GFCI and correct outlet type/quality matter; cord length and outlet placement affect mounting. |
| Load-Managed / Smart Level 2 Installation | Homes with limited electrical capacity or multiple EVs | Uses dynamic load management to avoid panel upgrades; requires compatible EVSE and configuration; may need CT sensors and Wi‑Fi/app setup; still typically permitted/inspected. |
Equipment choices influence price as well. A basic, reliable Level 2 EVSE can be more affordable than a premium smart charger, but smart features sometimes unlock utility rebates or provide energy tracking that helps reduce operating costs. Plug-in installations may require a high-quality receptacle, an appropriate box, and potentially GFCI breaker protection, while hardwired installations may have slightly different material costs but fewer connection points. Outdoor installations can add weatherproof components, trenching, or protective bollards if the charger is near a driveway. Labor rates vary by region, and permitting fees differ by jurisdiction. When comparing estimates, it’s important to confirm what is included: permit acquisition, inspection scheduling, wall patching, conduit painting, load calculation, and configuration of the charger’s amperage setting. A clear scope reduces surprises and helps ensure the EV charger install is completed to a standard that supports years of dependable charging. If you’re looking for level 2 charger installation, this is your best choice.
Utility Rates, Rebates, and Incentives That Can Offset Installation Costs
Many homeowners reduce the net cost of Level 2 charger installation by combining rebates, tax credits, and time-of-use rate strategies. Utility companies in some areas offer incentives for installing a qualifying EVSE, especially if the charger can be scheduled to charge during off-peak hours or can participate in demand response programs. These programs may require a Wi‑Fi connected charger or a specific list of approved models, and they often require documentation such as a paid invoice, proof of permit, and sometimes photos of the installed equipment. Certain regions also provide rebates for panel upgrades when they are necessary to support EV charging, recognizing that electrical capacity is a barrier to adoption. Because incentive programs change frequently, it helps to check eligibility before purchasing equipment so you don’t accidentally buy a model that doesn’t qualify.
Rate plans can be just as valuable as upfront rebates. If your utility offers time-of-use pricing, charging overnight can significantly reduce the cost per mile compared to charging during peak evening hours. Smart scheduling built into many EVSE models makes this easy, but even vehicles without advanced scheduling can often be set to charge at specific times. Some households coordinate charging with solar production, especially if they work from home and can charge during daylight. Others use energy monitoring to understand how much electricity the vehicle consumes and to verify that the billing matches expectations. When incentives require a permitted EVSE installation, working with a licensed electrician who provides itemized invoices can streamline the paperwork. The combined effect of rebates and optimized charging times can make home charger installation feel less like a luxury and more like an efficient household investment that lowers operating costs while improving daily convenience. If you’re looking for level 2 charger installation, this is your best choice.
Common Mistakes to Avoid: Reliability, Safety, and Future-Proofing
Several avoidable mistakes can undermine Level 2 charger installation, even when the charger itself is a reputable brand. One common issue is undersizing wiring or using the wrong wiring method for the environment. EV charging is a continuous load, and conductors must be sized appropriately not only for amperage but also for the run length and installation conditions. Another mistake is choosing a cheap receptacle for a plug-in setup; low-grade receptacles can loosen over time, creating heat and potential failure points. Similarly, failing to torque lugs and terminals to specification can cause intermittent charging interruptions that are difficult to diagnose. Poor placement is another frequent problem: a charger mounted where the cable must stretch tightly, cross walkways, or rub against sharp edges will experience more wear, and the daily annoyance can add up. Overlooking Wi‑Fi signal strength for smart chargers can also lead to frustration if the unit frequently disconnects and fails to follow schedules.
Future-proofing is often overlooked during EV charger install planning. Some homeowners install the minimum circuit for their current vehicle but later add a second EV and wish they had planned for a dual charger setup or at least a pathway for a second circuit. Others skip load management when it would have prevented the need for a costly service upgrade. Planning conduit routes with extra capacity, leaving space in the panel, and choosing a charger with adjustable output can reduce future costs. Another mistake is ignoring outdoor exposure: UV radiation can degrade plastics, and water intrusion can corrode connections if fittings are not properly sealed. Finally, skipping permits to save time can backfire if you need to prove code compliance for rebates, insurance, or resale. A well-executed EVSE installation prioritizes safe electrical design, quality components, correct configuration, and realistic planning for how your household’s transportation needs may evolve. If you’re looking for level 2 charger installation, this is your best choice.
Maintenance, Troubleshooting, and Long-Term Performance
After Level 2 charger installation, ongoing maintenance is usually minimal, but a few habits can preserve performance and reduce downtime. Periodically inspect the charging cable for cuts, kinks, or crushed sections, especially if it is stored near the garage floor or exposed to vehicle tires and tools. Keep the connector clean and dry, and avoid leaving it where it can collect dust, snow, or standing water. If the charger is outdoors, check that weather seals remain intact and that conduit fittings are secure. Some smart chargers receive firmware updates that improve stability or add features; applying updates can resolve connectivity issues and improve compatibility with utility programs. For plug-in chargers, it’s wise to occasionally check that the plug fits tightly and that the receptacle faceplate is secure. Any signs of discoloration, melting, or unusual odors should be treated as urgent, and charging should be stopped until the system is inspected by a qualified electrician.
Troubleshooting often starts with simple checks: confirm the vehicle is set to accept charging, verify scheduled charging settings, and look for error codes on the EVSE. If charging stops unexpectedly, the breaker may be tripping due to overload, a ground-fault event, or a wiring issue that becomes apparent under sustained current. Some chargers reduce output if they detect overheating at internal sensors; this can be caused by high ambient temperatures, restricted airflow, or poor connections. Wi‑Fi related issues can affect scheduling and monitoring, but most chargers will still deliver power even if connectivity drops, depending on the model. If you notice repeated interruptions, reduced charge rates compared to normal, or a connector that feels unusually warm, a professional evaluation can prevent bigger problems. Long-term performance is best supported by quality installation practices, correct amperage configuration, and using the charging equipment as intended rather than relying on adapters, extension cords, or improvised setups that add resistance and risk. If you’re looking for level 2 charger installation, this is your best choice.
Working With an Electrician: How to Get Accurate Quotes and Quality Work
Hiring the right professional is a major factor in a smooth Level 2 charger installation, and a good process starts with clear information. Provide the electrician with the EV make and model, the charger model (if already chosen), and photos of the electrical panel with the door open so they can see breaker types and available space. Share the intended charger location and describe how you park, since that influences cable reach and mounting position. Ask whether they will pull permits and coordinate inspections, and confirm that the quote includes all materials, labor, and configuration steps. A strong estimate typically specifies circuit amperage, breaker size, wiring method, and whether the charger will be hardwired or plug-in. If trenching or wall repair is possible, request a line item for those tasks so the scope is transparent. The goal is to avoid vague pricing that later grows due to “unforeseen” basics that could have been clarified up front.
Quality indicators include licensing, insurance, familiarity with EVSE installation requirements, and willingness to explain design choices. An electrician should be comfortable discussing continuous load calculations, conductor sizing, and options if the panel lacks capacity. They should also follow manufacturer instructions for mounting height, ventilation clearances, and torque specifications. If you are considering a higher-output charger, ask how they will ensure the amperage setting is matched to the circuit. For plug-in setups, ask which receptacle brand and grade they plan to use and whether a GFCI breaker is required by local code for that configuration. A professional EV charger install is not only about making the charger power on; it is about building a safe, durable circuit that will perform for years. When you choose an installer who documents the work, labels the panel clearly, and supports permitting and inspection, you reduce risk and increase the likelihood that your Level 2 charging setup remains dependable as your household’s EV needs grow. If you’re looking for level 2 charger installation, this is your best choice.
Final Thoughts on Level 2 Charger Installation for Home and Business
Level 2 charger installation is ultimately about aligning charging speed, electrical safety, and daily convenience in a way that fits your property and driving habits. The best outcomes come from thoughtful equipment selection, a realistic assessment of electrical capacity, and careful planning of charger location and cable management. Whether the charger is installed in a garage, on an exterior wall, or at a small commercial property, the same principles apply: use a dedicated circuit, size components for continuous load, comply with permits and codes, and prioritize reliable connections over shortcuts. When those fundamentals are done well, charging becomes an automatic routine rather than a recurring task that requires special attention. The result is a more predictable ownership experience, reduced dependence on public charging, and a setup that can adapt as EV technology and household transportation needs evolve.
For many properties, the most cost-effective approach combines right-sized amperage, quality hardware, and eligibility for rebates or time-of-use savings, while leaving room for future expansion. A well-executed EVSE installation can also support broader electrification goals, from solar integration to smarter energy management, without compromising safety. If there is one guiding principle, it is to treat charging as a long-duration electrical appliance that deserves the same level of care as any major home system. With proper planning and professional workmanship, level 2 charger installation becomes a dependable infrastructure upgrade that pays dividends in convenience, confidence, and long-term value every time the vehicle plugs in.
Watch the demonstration video
In this video, you’ll learn the essentials of installing a Level 2 EV charger—from choosing the right charger and circuit size to understanding permits, wiring, and panel capacity. It also covers ideal placement, safety considerations, typical installation steps, and what to expect for costs and timelines so you can plan your setup with confidence. If you’re looking for level 2 charger installation, this is your best choice.
Summary
In summary, “level 2 charger installation” is a crucial topic that deserves thoughtful consideration. We hope this article has provided you with a comprehensive understanding to help you make better decisions.
Frequently Asked Questions
What is a Level 2 EV charger?
A Level 2 charger uses a 240V circuit (typically 30–60A) to deliver faster charging than a standard 120V outlet.
Do I need a permit to install a Level 2 charger?
In most areas, you’ll need an electrical permit—and often a follow-up inspection—for **level 2 charger installation**. The easiest way to confirm what’s required is to check with your local building department or ask your electrician.
What electrical capacity is required for a Level 2 charger?
Most homes will need a dedicated 240V circuit matched to your charger—often with a 40A or 50A breaker—and your electrical panel must have enough spare capacity to support a safe, code-compliant **level 2 charger installation**.
Should I hardwire the charger or use a 240V outlet?
Hardwiring is often the more durable option and can support higher amperage, while a plug-in outlet makes swaps and replacements easier—either way, safety comes down to using the correct rating and proper setup during your **level 2 charger installation**.
Where is the best place to install a Level 2 charger?
Place it close to where you normally park so the cable run stays short and efficient, ensure the area is well‑ventilated, add weather protection if it’s outdoors, and confirm the cord can comfortably reach your vehicle’s charge port for a smooth **level 2 charger installation**.
How much does Level 2 charger installation typically cost?
Pricing for a **level 2 charger installation** can range quite a bit depending on your electrical panel’s capacity, how far the wiring needs to run, and whether trenching is required. In many cases, homeowners spend anywhere from a few hundred to a few thousand dollars—plus the cost of the charger itself.
📢 Looking for more info about level 2 charger installation? Follow Our Site for updates and tips!

Trusted External Sources
- Level 2 charger installation : r/electricvehicles – Reddit
Dec 18, 2026 … I got a certified electrician to do it for just around $500, it required adding the new breaker, rewiring some of the existing ones to make room … If you’re looking for level 2 charger installation, this is your best choice.
- Home Flex Hardwired Level 2 EV Charger – ChargePoint
A certified ChargePoint technician will reach out within 24 hours with a free, no-obligation quote for a safe, dependable **level 2 charger installation** you can trust.
- I don’t know where to begin to install a level 2 charger at my house …
Dec 29, 2026 … Your lightning has a CCS port. The top portion is called J1772. This is for AC (slower) charging at home. The two big pins at the bottom are for DC fast … If you’re looking for level 2 charger installation, this is your best choice.
- Level 2 EV Charger Installation: The Complete Guide
Here’s a simple, step-by-step overview of **level 2 charger installation** at home. Start by evaluating your driving habits, where you park, and whether your electrical panel has enough capacity to support a faster charger. Next, pick a convenient, safe location—typically in a garage or near your driveway—where the unit can be mounted and easily reached by the charging cable. From there, you’ll choose the right charger for your vehicle and power needs, and then have a qualified electrician handle permitting, wiring, and final setup to ensure everything is code-compliant and ready for reliable daily charging.
- Do I need a level 2 charge station at home? : r/electricvehicles – Reddit
As of May 10, 2026, what I really care about is keeping costs down—I’d much rather avoid dropping $1,000 just to buy a charger and pay for a **level 2 charger installation**.