A flashforge 3d printer has earned a strong reputation among makers, educators, and small businesses because it balances reliability, print quality, and user-friendly operation in a way that feels practical rather than experimental. Many people approach desktop additive manufacturing with a mix of excitement and caution: excitement about rapid prototyping and customization, and caution about calibration headaches, inconsistent first layers, and the constant tinkering that can come with some open-frame machines. Flashforge has positioned its ecosystem to reduce that friction through enclosed designs, guided setup, and firmware that aims to keep the printing process predictable. For someone who wants to move from idea to object without spending every weekend adjusting eccentric nuts and chasing bed-leveling issues, the appeal is immediate. A key reason is that the machines are often designed as cohesive appliances, where the motion system, electronics, and software are intended to work together out of the box. That doesn’t mean there is no learning curve—3D printing always rewards understanding materials, temperatures, and slicing—but it does mean the baseline experience is typically less chaotic than a purely DIY kit approach.
Table of Contents
- My Personal Experience
- Why a Flashforge 3D Printer Stands Out in Home and Professional Workspaces
- Core Technologies and How They Influence Print Results
- Choosing the Right Flashforge Model for Your Needs
- Setup, Calibration, and First-Layer Success
- Material Compatibility: PLA, PETG, ABS, TPU, and Beyond
- Slicing Software and Workflow Optimization
- Print Quality: Layer Lines, Accuracy, and Surface Finish
- Expert Insight
- Reliability Features: Enclosures, Sensors, and Recovery Options
- Maintenance and Troubleshooting for Long-Term Performance
- Use Cases: Education, Prototyping, Small Business Production, and Creative Work
- Cost of Ownership: Filament, Parts, Time, and Practical Value
- Best Practices for Consistent Results and Confident Printing
- Watch the demonstration video
- Frequently Asked Questions
- Trusted External Sources
My Personal Experience
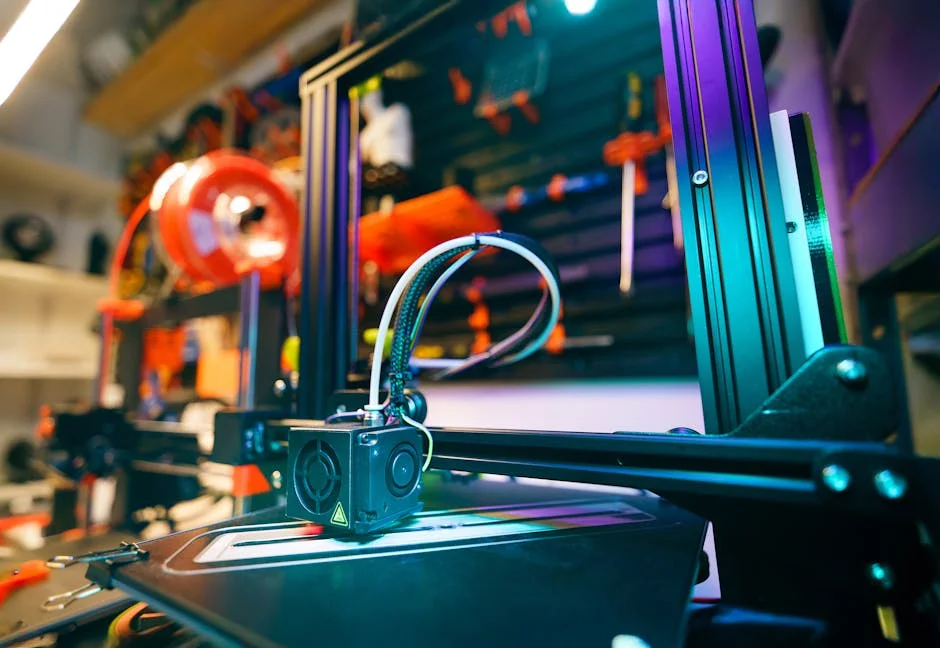
I bought a FlashForge 3D printer last year to make small parts for my hobby projects, and it quickly became one of those tools I use more than I expected. Setup was mostly straightforward, but I had to spend an evening dialing in bed leveling and figuring out the best nozzle temperature for the PLA I had on hand. Once I got the first clean print, I started cranking out practical stuff—cable clips, a replacement knob for a broken drawer, and a simple phone stand—and it was honestly satisfying to go from a measurement to a usable part in a couple of hours. The slicer profiles were a decent starting point, though I learned fast that slowing down the first layer and keeping the build plate clean mattered more than any fancy setting. It’s not perfect—I’ve had a few spaghetti failures and a clogged nozzle—but overall the FlashForge has been reliable enough that I’m comfortable leaving it to run while I’m in the next room.
Why a Flashforge 3D Printer Stands Out in Home and Professional Workspaces
A flashforge 3d printer has earned a strong reputation among makers, educators, and small businesses because it balances reliability, print quality, and user-friendly operation in a way that feels practical rather than experimental. Many people approach desktop additive manufacturing with a mix of excitement and caution: excitement about rapid prototyping and customization, and caution about calibration headaches, inconsistent first layers, and the constant tinkering that can come with some open-frame machines. Flashforge has positioned its ecosystem to reduce that friction through enclosed designs, guided setup, and firmware that aims to keep the printing process predictable. For someone who wants to move from idea to object without spending every weekend adjusting eccentric nuts and chasing bed-leveling issues, the appeal is immediate. A key reason is that the machines are often designed as cohesive appliances, where the motion system, electronics, and software are intended to work together out of the box. That doesn’t mean there is no learning curve—3D printing always rewards understanding materials, temperatures, and slicing—but it does mean the baseline experience is typically less chaotic than a purely DIY kit approach.
Another factor behind the popularity of a flashforge 3d printer is the breadth of models that cover different budgets and use cases, from compact units for classrooms to larger-format machines for functional parts and light production. Enclosure design matters more than many buyers realize: it helps stabilize temperature, reduces drafts that can cause warping, and can make printing materials like ABS more manageable. It also improves safety and noise control, which is crucial in offices, libraries, and homes. In addition, Flashforge often integrates features like assisted leveling, filament runout detection, and resume printing after power loss—small conveniences that become major time savers when you’re printing long jobs overnight or producing multiple iterations of a prototype. When those features are combined with consistent extrusion and a sturdy frame, the end result is a machine that can be used as a tool rather than a project in itself. For teams that need repeatable parts—jigs, fixtures, brackets, housings, and educational models—repeatability is the real value, and that’s where these printers frequently aim to deliver.
Core Technologies and How They Influence Print Results
The performance of any flashforge 3d printer is shaped by a handful of core technologies: the motion system, the hotend and extruder arrangement, the build surface, and the way the printer manages temperature across the build volume. Many models use Cartesian motion with a stable metal frame, which can translate into better dimensional accuracy when properly tuned because the axes move in predictable ways. Stability matters for surface finish: fewer vibrations can mean less ringing on walls and cleaner corners. On the extrusion side, Flashforge has offered both direct-drive and Bowden-style setups across various generations. Direct drive tends to be favored for flexible filaments like TPU because the filament path is shorter and better controlled, while Bowden can be lighter on the moving carriage and potentially faster for certain print styles. Understanding which extrusion approach a specific machine uses helps you predict how it will handle materials, retraction settings, and fine details like stringing. Hotend design, including nozzle type and thermal break quality, affects how consistently the printer can melt and deposit filament at different speeds.
Temperature management is equally important. An enclosed flashforge 3d printer can hold a warmer, more stable ambient environment, which reduces the thermal gradients that lead to warping and layer splitting, particularly with ABS and similar plastics. Heated beds also play a critical role in first-layer adhesion, and many Flashforge models pair the bed heater with surfaces that are designed to grip filament during printing and release when cool. Beyond the physical components, firmware features influence results through motion planning, acceleration limits, and safety checks. A printer with well-tuned acceleration and jerk settings can maintain quality without forcing you to print painfully slowly. Meanwhile, sensors such as filament runout detection and door-open alerts (on some enclosed units) can prevent wasted material and failed jobs. Even the user interface contributes to quality indirectly; when changing temperatures, speeds, and fan settings is straightforward, users are more likely to make informed adjustments instead of “set and forget” printing that leads to avoidable failures. All of these elements combine to define what you’ll see in real prints: smooth top layers, crisp text, reliable overhangs, and parts that match the intended dimensions.
Choosing the Right Flashforge Model for Your Needs
Selecting a flashforge 3d printer is less about chasing the highest advertised speed and more about matching the machine’s strengths to your workflow. Start with build volume, but interpret it realistically: larger beds enable bigger parts, yet they also increase the chance of first-layer issues across a wider surface and can extend warm-up times. If your typical projects are small enclosures, brackets, miniatures, or classroom demonstrations, a compact printer may produce the same quality with fewer variables to manage. If you expect to print helmets, cosplay props, architectural models, or multiple parts in one batch, a larger format becomes valuable. Next, consider enclosure type. Fully enclosed designs are ideal for shared spaces and for materials that benefit from thermal stability. Open-frame printers can be perfectly adequate for PLA and PETG, but they’re more sensitive to drafts and temperature swings. Noise can also matter; enclosed frames and damped motion systems often sound more like a quiet appliance than a workshop tool.
Material compatibility should guide your choice as well. A flashforge 3d printer that is optimized for PLA and PETG can be an excellent everyday workhorse, but if you anticipate ABS, ASA, or more engineering-focused filaments, look for stronger hotend temperature capability, a stable heated bed, and preferably an enclosure. For TPU, a direct-drive extruder is usually the safer bet. Also evaluate convenience features that match your tolerance for manual adjustment. Assisted leveling, sturdy build plates, and a dependable filament path reduce downtime. Connectivity can matter in teams: Wi‑Fi or Ethernet printing and monitoring can streamline a print farm or classroom, while USB-only workflows are simpler but more hands-on. Finally, consider the ecosystem: slicer compatibility, availability of spare parts, and how quickly you can get replacement nozzles, build plates, or extruder components. A printer that is easy to maintain tends to remain productive for years, while one that relies on hard-to-find components can become frustrating when a small part fails. Matching these factors to your real-world use is the fastest route to satisfaction.
Setup, Calibration, and First-Layer Success
Getting consistent results from a flashforge 3d printer begins with setup habits that prioritize first-layer quality. Even if the machine includes assisted leveling, it helps to understand what leveling actually means: ensuring the nozzle maintains a uniform gap to the build surface across the entire printable area. A first layer that is too high won’t adhere and may curl at corners; too low can cause over-squish, leading to rough bottoms, elephant’s foot, and even clogged nozzles if filament cannot exit cleanly. Start by placing the printer on a stable surface and checking that the build plate is properly seated. If the printer uses a removable plate, confirm it is fully locked into position. During calibration, use a simple first-layer test pattern that prints lines or squares across the bed. This reveals not only leveling issues but also whether the bed is clean and whether the nozzle temperature and bed temperature are appropriate for the material. Many users improve reliability dramatically by adopting a routine: clean the plate, preheat, run a quick first-layer test when changing materials, and only then start long prints.
Beyond leveling, filament handling affects early success. A flashforge 3d printer will perform best when filament is dry, smoothly unwound, and correctly loaded. Moist filament can cause popping, inconsistent extrusion, and weak layers—issues that often appear as random surface defects and poor bridging. If you live in a humid environment, storing filament in sealed containers with desiccant can make prints more consistent. Loading filament carefully matters too: trim the filament end at an angle, feed it straight, and ensure the extruder is gripping it properly. For slicing, start with conservative settings: moderate speeds, adequate first-layer height, and slightly higher first-layer temperature can improve adhesion. Cooling should be adjusted per material; PLA usually benefits from strong part cooling after the first layers, while ABS often needs minimal cooling to prevent cracking. With a stable routine, the printer becomes predictable. Predictability is the hidden advantage, because once the first layer is dependable, you can focus on design and iteration rather than constantly restarting prints.
Material Compatibility: PLA, PETG, ABS, TPU, and Beyond
Material choice determines how a flashforge 3d printer will be used day to day, because each filament behaves differently during extrusion and cooling. PLA remains the most common option due to its ease of printing, low warping, and clean detail. It’s well suited for decorative objects, prototypes that don’t face high temperatures, and educational models where quick success matters. PETG is often the next step for functional parts, offering more toughness and heat resistance than PLA while still being relatively manageable. PETG, however, can be stringy and may require careful retraction tuning, clean nozzles, and a build surface that releases reliably to avoid damaging the plate when removing parts. ABS and ASA provide higher temperature resistance and durability for enclosures, automotive-style parts, and outdoor applications (ASA is especially known for UV resistance). These materials benefit significantly from an enclosed build area and stable temperatures to reduce warping and layer separation.
Flexible filaments like TPU open up use cases such as gaskets, grips, protective bumpers, and wearable components, but they demand controlled feeding. A flashforge 3d printer with a direct-drive extruder generally handles TPU more smoothly because the filament has less room to buckle. Even with the right hardware, flexible prints often require slower speeds, gentler retraction, and careful tuning of flow rate. Beyond these mainstream materials, some users explore composites like carbon-fiber-filled PLA or PETG for stiffness and improved aesthetics. Those materials can be abrasive and may require hardened nozzles to avoid rapid wear. When planning to print abrasives, also consider the extruder gear and filament path components, since wear can impact consistency over time. For each filament, the best results come from aligning temperature, cooling, and print speed with the material’s behavior. The same model can produce dramatically different outcomes depending on whether you print PLA fast with strong cooling or print ABS slowly in a warm enclosure. Treat materials as part of the system, not just a consumable, and the printer becomes a more versatile manufacturing tool.
Slicing Software and Workflow Optimization
A flashforge 3d printer typically performs best when slicing settings are tailored to the printer’s motion capabilities and the filament being used. Many users rely on manufacturer-supported slicers or popular third-party options, and the choice often comes down to how much control you want over parameters like acceleration, retraction, seam placement, and advanced supports. The slicer translates a 3D model into toolpaths, and small choices can have large effects: wall count influences strength, layer height influences surface finish and print time, and infill pattern influences weight and rigidity. For functional parts, increasing perimeters often improves strength more effectively than adding high-percentage infill. For cosmetic parts, careful seam placement and ironing settings can improve the appearance of top surfaces. Support settings matter too; the difference between cleanly removable supports and scarred surfaces is often in support interface density, Z-gap, and the use of tree-like supports where appropriate.
Workflow optimization also includes model preparation and file management. Before slicing, it helps to check models for manifold errors, thin walls, and non-watertight geometry, especially when downloading files from repositories. A flashforge 3d printer can only print what the toolpath instructs; if the model contains intersecting faces or walls thinner than the nozzle can handle, the slicer may omit features or create weak sections. Scaling and orientation are equally important. Orienting a part to reduce supports can improve surface quality and reduce print time, but orientation also determines layer direction and therefore strength. Parts tend to be weaker between layers than within a layer, so orienting load-bearing features to maximize layer adhesion can improve durability. For teams, consistent naming conventions and saved slicer profiles reduce mistakes. Create profiles for “draft PLA,” “quality PLA,” “PETG functional,” and “ABS enclosed,” then refine them gradually based on print results. Over time, this produces a repeatable pipeline: design, check geometry, orient, slice with a known profile, print, and document changes. That repeatability is what turns 3D printing from experimentation into dependable production.
Print Quality: Layer Lines, Accuracy, and Surface Finish
Print quality on a flashforge 3d printer is influenced by mechanical precision, thermal stability, and how well the slicer settings match the machine. Layer lines are a natural artifact of fused filament fabrication, but their prominence can be reduced through smaller layer heights, consistent extrusion, and appropriate print speeds. If you see inconsistent layers—some thicker, some thinner—look for causes such as partial nozzle clogs, inconsistent filament diameter, or temperature fluctuations. Ringing or ghosting around sharp corners often indicates vibrations or aggressive acceleration settings. Reducing speed slightly, tightening belts where applicable, and ensuring the printer sits on a stable surface can improve results. Overhang performance depends heavily on cooling and nozzle temperature; too hot and the plastic sags, too cool and it may not bond properly. Bridging requires a balance of cooling, speed, and extrusion multiplier so the filament spans gaps without drooping.
| Model | Best for | Build Volume (approx.) | Key Features |
|---|---|---|---|
| FlashForge Adventurer 5M | Fast, everyday home printing | 220 × 220 × 220 mm | High-speed printing, auto bed leveling, quick-swap nozzle, enclosed design |
| FlashForge Adventurer 4 | Reliable enclosed printing for ABS/PETG | 220 × 200 × 250 mm | Enclosed chamber, HEPA/filtration (varies by bundle), removable build plate, quiet operation |
| FlashForge Creator Pro 2 | Dual-material & dual-color projects | 200 × 148 × 150 mm | Independent dual extruders (IDEX), duplication/mirror modes, enclosed build area, flexible material support |
Expert Insight
Run a quick calibration routine before long prints: level the bed, set the correct nozzle-to-bed gap, and print a small first-layer test square. A clean, slightly squished first layer prevents warping and improves adhesion on FlashForge printers, especially when switching filament types. If you’re looking for flashforge 3d printer, this is your best choice.
Dial in material profiles instead of relying on defaults: start with the recommended temperature range on the spool, then adjust in 5°C steps while watching for stringing or under-extrusion. Save separate profiles for PLA, PETG, and ABS (including fan and retraction settings) to get consistent results across different models and brands. If you’re looking for flashforge 3d printer, this is your best choice.
Dimensional accuracy also matters for functional parts like snap-fits, threaded components, and enclosures. A flashforge 3d printer can produce accurate parts when steps-per-mm are correct and extrusion is calibrated, but real-world accuracy includes material shrinkage and slicer compensation. For example, holes often print undersized due to how perimeters are laid down, so designers may oversize holes slightly or use horizontal expansion settings. For press-fit components, printing a small tolerance test can save hours of frustration. Surface finish is not only about layer height; it’s also about consistent cooling and seam management. Random seams can hide zits across the model, while aligned seams keep imperfections in one place that can be sanded. If the final part needs a smooth look, post-processing is part of the plan: sanding, filler primer, and painting work well for PLA and PETG, while ABS can be chemically smoothed in controlled conditions. The key is to define what “quality” means for the job—visual perfection, mechanical strength, or precise fit—and then tune the printer and slicing profile to that goal rather than chasing a single universal setting.
Reliability Features: Enclosures, Sensors, and Recovery Options
Reliability is where a flashforge 3d printer often aims to justify its place compared with more hobby-oriented machines. Enclosures contribute to reliability by reducing drafts, stabilizing temperature, and keeping curious hands away from hot components. For educational settings, an enclosed printer can be the difference between a safe, manageable classroom tool and a device that requires constant supervision. Sensors like filament runout detection prevent prints from continuing in mid-air when a spool empties, which saves time and material. Resume printing after power loss can be valuable in areas with unstable electricity, though it’s still wise to recognize that resuming perfectly depends on how the machine records position and how well the part remains adhered to the bed during the outage. Some models also include door sensors or temperature safeguards that pause printing under certain conditions, adding another layer of protection.
Reliability is also about consistency over many jobs. A flashforge 3d printer that holds its calibration, maintains stable extrusion, and avoids frequent clogging becomes a dependable part of a workflow. That consistency is influenced by maintenance habits, but features can help: well-designed filament paths reduce tangles, sturdy spool holders prevent drag, and accessible hotends make nozzle changes less intimidating. Connectivity features—whether network printing or monitoring—can also improve reliability in a practical sense by making it easier to start prints, check progress, and manage multiple machines. However, reliability is not just hardware; it’s also the predictability of the software environment and profiles. When firmware updates, slicer versions, and profiles are managed carefully, the printer behaves like a stable production tool. When settings change randomly between jobs, even the best machine will feel unreliable. The most productive setups treat the printer like a small manufacturing cell: controlled inputs (dry filament, known profiles), controlled environment (stable placement and enclosure), and controlled maintenance (cleaning, inspections, and scheduled replacement of wear items).
Maintenance and Troubleshooting for Long-Term Performance
Maintaining a flashforge 3d printer is largely about preventing small issues from turning into failed prints. Regular cleaning of the build surface improves adhesion and reduces the temptation to overcorrect with higher temperatures or excessive brims. Depending on the plate type, cleaning might involve mild soap and water, isopropyl alcohol, or manufacturer-recommended methods, but the goal is the same: remove oils and residue so the first layer bonds predictably. Nozzle care is equally important. If you notice under-extrusion, gaps in top layers, or inconsistent walls, a partial clog may be forming. Performing a cold pull (when compatible with the hotend) or using cleaning filament can restore flow. Keeping the extruder gears free of filament dust and ensuring proper tension helps maintain consistent feeding. Fans should also be checked; a failing part-cooling fan can ruin overhangs and bridges, while a failing hotend heatsink fan can cause heat creep and jams.
Troubleshooting becomes easier when symptoms are mapped to likely causes. Stringing often points to retraction settings, filament moisture, or too-high nozzle temperature. Warping can indicate insufficient bed adhesion, drafts, incorrect bed temperature, or a dirty plate. Layer shifting typically relates to belt tension, pulleys, or collisions caused by curled edges. If a flashforge 3d printer starts producing rough surfaces, check for loose components, worn nozzles, or inconsistent filament diameter. Wear items should be treated as consumables: nozzles, PTFE tubes (where used), build surfaces, and sometimes extruder gears will eventually need replacement. Keeping a small kit of spare parts reduces downtime, especially if the printer supports a business workflow. Finally, document changes. If you adjust temperature, retraction, or belt tension, note it along with the results. Over time, this record becomes a personalized troubleshooting guide that reflects your environment, your filaments, and your typical models. Consistent maintenance doesn’t just prevent failure; it improves print quality and makes the machine more predictable, which is the real goal for long-term satisfaction.
Use Cases: Education, Prototyping, Small Business Production, and Creative Work
A flashforge 3d printer fits naturally into education because it can turn abstract concepts into tangible objects quickly. Geometry, engineering principles, and design thinking become easier to teach when students can hold a printed gear, bridge truss, or anatomical model. Instructors often value enclosed designs and simplified interfaces because they reduce supervision burdens and help students focus on the learning objective rather than the mechanics of the machine. Schools also benefit from repeatability: once a profile is tuned for PLA, a class can produce consistent results across multiple projects. Beyond schools, prototyping is a major reason people invest in desktop additive manufacturing. Iterating on a product enclosure, testing a bracket’s fit, or refining an ergonomic grip becomes much faster when you can print a revision the same day. The ability to validate size, feel, and assembly before committing to machining or injection molding can save substantial cost and time.
Small businesses and creators also use a flashforge 3d printer for short-run production, custom orders, and tooling. Jigs and fixtures for workshops, drill guides, alignment tools, and packaging inserts can be printed as needed. For e-commerce sellers, customization is a competitive advantage: personalized nameplates, bespoke mounts, camera accessories, cosplay parts, and decorative items can be produced in batches without holding large inventories. The key is understanding the limits of FFF parts and designing accordingly—using thicker walls, adding fillets, and orienting parts for strength. Creative professionals use 3D printing for props, art installations, and concept models, often combining prints with traditional fabrication methods like sanding, painting, and casting. When a printer is reliable, it supports creativity rather than interrupting it. The machine becomes part of a broader workflow: design digitally, print physical components, refine by hand, and assemble into a finished product. That hybrid approach is where desktop printing shines, offering both speed and flexibility while keeping production within reach of individuals and small teams.
Cost of Ownership: Filament, Parts, Time, and Practical Value
The purchase price of a flashforge 3d printer is only one part of the total cost. Filament is the most obvious ongoing expense, and costs vary widely by material and brand. PLA is generally affordable, while specialty materials like ASA, flexible TPU, or composite filaments cost more. Print failures also have a cost, not only in wasted filament but in time and opportunity. That’s why reliability and ease of use matter economically: fewer failed prints means lower effective cost per part. Replacement parts should be considered too. Nozzles wear, especially when printing abrasive materials, and build surfaces degrade over time. Fans and extruder components can eventually need service. Understanding what parts are readily available and how easy they are to replace helps you estimate long-term ownership. Energy consumption is usually modest for desktop printers, but long prints and heated beds do add up, particularly when printing higher-temperature materials that require more heat.
Time is often the most valuable resource. A flashforge 3d printer that needs constant babysitting can be more expensive than a slightly pricier machine that runs smoothly. Consider the time spent on calibration, maintenance, and troubleshooting, and ask how that fits your goals. If printing is a hobby, tinkering may be part of the enjoyment. If printing supports a business, downtime has a real cost, and predictable operation becomes a priority. Practical value comes from what the printer enables: faster prototyping cycles, reduced outsourcing, and the ability to produce custom parts on demand. For households, value might be measured in repaired items, organization solutions, and creative projects. For businesses, value might be measured in product development speed and the ability to fulfill niche orders profitably. When viewed through that lens, the right machine can pay for itself not through theoretical savings but through real workflow advantages—faster iterations, reduced lead times, and the freedom to experiment without waiting on external vendors.
Best Practices for Consistent Results and Confident Printing
Consistency with a flashforge 3d printer comes from controlling variables. Start with filament: keep it dry, label spools with material and brand, and avoid mixing settings between very different filaments without testing. Use a small set of validated slicer profiles rather than constantly changing dozens of parameters at once. When you need to improve a result—less stringing, stronger walls, better bridging—change one variable, test, and document the outcome. Environmental control matters too. Even with an enclosure, placing the printer away from open windows, heating vents, and direct sunlight helps stabilize printing conditions. Keep the build plate routine consistent: clean it the same way, avoid touching it with bare fingers, and let it cool before removing parts when appropriate. These habits reduce the “mystery failures” that frustrate many users.
Design practices also contribute. Add chamfers to reduce elephant’s foot impact, use fillets to improve strength and reduce stress risers, and design supports out of the model when you need clean surfaces in critical areas. For threaded parts, consider heat-set inserts or printed thread standards designed for FFF. For snap-fits, print small test pieces to validate tolerances. If you run multiple prints, schedule maintenance like nozzle inspection and belt checks at regular intervals. A flashforge 3d printer can be a dependable production tool when treated like one: controlled inputs, controlled settings, and a stable process. Over time, you’ll develop a sense for how the printer sounds when it is running well, how the first layer should look, and which adjustments are most effective for specific materials. That confidence is the point where printing becomes less about troubleshooting and more about creating. With steady habits and a focus on repeatability, a flashforge 3d printer can deliver high-quality parts for learning, prototyping, and practical everyday manufacturing.
Watch the demonstration video
In this video, you’ll learn the basics of using a FlashForge 3D printer—from setup and calibration to loading filament and starting your first print. It also covers key settings in the slicer, common troubleshooting tips, and how to improve print quality for cleaner, more reliable results.
Summary
In summary, “flashforge 3d printer” is a crucial topic that deserves thoughtful consideration. We hope this article has provided you with a comprehensive understanding to help you make better decisions.
Frequently Asked Questions
Which FlashForge 3D printer should I choose for beginners?
For most beginners, a FlashForge Adventurer-series printer is a common pick due to enclosed design, guided setup, and broad PLA support; choose based on build volume and features like auto-leveling. If you’re looking for flashforge 3d printer, this is your best choice.
What filaments work with FlashForge 3D printers?
Many models support PLA and PETG; some also support ABS/ASA (best with an enclosure) and specialty filaments depending on nozzle/hotend limits. Check your specific model’s temperature range and filament path. If you’re looking for flashforge 3d printer, this is your best choice.
Do FlashForge printers require bed leveling?
Even if your **flashforge 3d printer** includes auto-leveling or assisted leveling, you’ll likely still need to make the occasional manual tweak—especially dialing in the Z-offset—to keep your first layer sticking smoothly and consistently.
What slicer software should I use with a FlashForge printer?
FlashPrint is the official choice and usually the simplest way to get reliable presets up and running on a **flashforge 3d printer**. That said, many models can also be used with Cura or PrusaSlicer by loading compatible profiles or exporting to a supported file format.
How do I fix poor first-layer adhesion on a FlashForge printer?
Clean the build surface, confirm bed temperature and Z-offset, slow the first layer, increase first-layer width, and use a brim if needed; also ensure the bed is level and the nozzle is not partially clogged. If you’re looking for flashforge 3d printer, this is your best choice.
How often should I maintain a FlashForge 3D printer?
Regularly clean the nozzle and build plate, check belt tension, lubricate rods/rails as recommended, and inspect extruder gears; do a deeper check after heavy use or if print quality changes. If you’re looking for flashforge 3d printer, this is your best choice.
📢 Looking for more info about flashforge 3d printer? Follow Our Site for updates and tips!

Trusted External Sources
- Flashforge 3D Printers | Best for Beginners and Makers
Explore Flashforge’s best 3D printers for home, education & professionals. Top-quality, affordable prints. Experience advanced 3D printing today!
- Why You Should Avoid Flashforge Printers – Honest Review & My …
Mar 25, 2026 … Over the years, I’ve worked with a range of 3D printers—from a DIY RepRap build to more polished, name-brand machines—but I didn’t expect a commercial unit to be less dependable than something I assembled myself. With the flashforge 3d printer, I kept running into reliability issues that made me miss the consistency I used to get from my homebuilt setup.
- FLASHFORGE: 3d Printer – Amazon.com
The FlashForge Adventurer 5M **flashforge 3d printer** makes high-speed printing easy with fully automatic leveling and speeds up to 600 mm/s. Its 280°C direct-drive extruder and quick 3-second detachable nozzle design help you swap parts fast and keep projects moving—no fuss, just reliable, smooth prints.
- FDM 3D Printer | Flashforge 3D Printers for Precision 3D Printing
Flashforge FDM 3D Printer. Perfect for home use, schools, DIY projects, and small businesses. Easy to use, budget-friendly, and powerful enough to bring your …
- Where do I get models or 3D printable for my Flashforge Adventurer …
Aug 2, 2026 … Once you’ve done that open your flashforge software, open the stl file and you’ll see it available to print. You may want to Google the steps to … If you’re looking for flashforge 3d printer, this is your best choice.