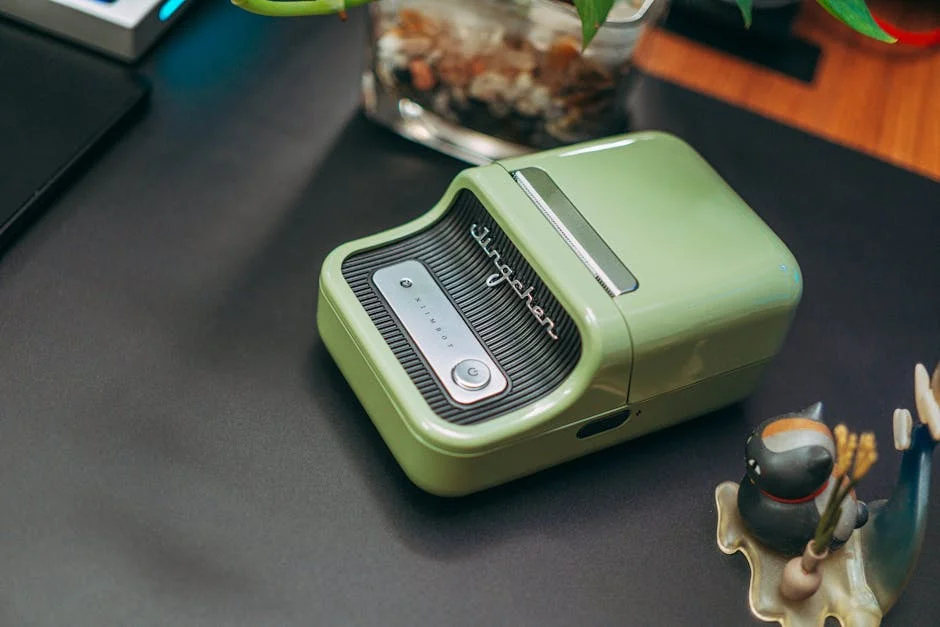
The Anycubic Photon earned attention because it brought resin printing into a price range that felt realistic for hobbyists, small studios, and makers who needed high-detail parts without stepping into industrial budgets. When people say “resin detail,” they usually mean crisp edges, smooth curves, and small features that survive cleanup and finishing. The Anycubic Photon line built its reputation on delivering those traits with an approachable workflow: a compact machine footprint, a straightforward touchscreen interface, and an ecosystem of profiles and community knowledge that lowered the learning curve. For miniature painters, jewelry prototypers, cosplay prop builders, and product designers, the appeal is not only the resolution on paper but the consistent ability to reproduce textures, embossed lettering, and fine mechanical features. That consistency matters when you’re printing multiple iterations of a part, comparing tolerances, or trying to match a surface finish across batches.
Table of Contents
- My Personal Experience
- Why the Anycubic Photon Became a Go-To Resin Printer
- Core Technology: MSLA Resin Printing and What It Means in Practice
- Model Variants and Feature Differences Across the Photon Line
- Setup Essentials: Leveling, First Layers, and a Reliable Starting Baseline
- Slicer Settings That Matter Most: Exposure, Lift, and Support Strategy
- Resin Selection for the Anycubic Photon: Standard, Tough, and Specialty Options
- Print Quality and Detail: Miniatures, Prototypes, and Surface Finish Expectations
- Post-Processing Workflow: Washing, Curing, and Finishing Without Damage
- Expert Insight
- Maintenance and Longevity: FEP Care, LCD Protection, and Routine Checks
- Troubleshooting Common Failures: From Stuck Prints to Layer Lines
- Safety, Ventilation, and Responsible Resin Handling
- Use Cases and Project Ideas: Where the Photon Shines Most
- Buying Considerations: What to Check Before Choosing a Photon Setup
- Getting Consistent Results Over Time: Process Control and Repeatability
- Final Thoughts on Choosing and Using the Anycubic Photon
- Watch the demonstration video
- Frequently Asked Questions
- Trusted External Sources
My Personal Experience
I picked up an Anycubic Photon to print miniatures and small functional parts, and the first weekend was a mix of excitement and mild frustration. The detail blew me away right away—tiny faces and armor plates came out sharper than anything I’d managed on my FDM printer—but I learned quickly that resin printing is all about routine. My first few prints failed because I rushed the leveling and didn’t shake the resin enough, and I ended up scraping a half-cured pancake off the FEP. Once I slowed down, dialed in exposure for my room temperature, and started warming the resin a bit before printing, it became surprisingly consistent. The mess is real, though: gloves, paper towels, and the constant smell if I forget to run the fan. Still, when I pull a clean, crisp print off the build plate after a long overnight run, it feels worth the extra steps.
Why the Anycubic Photon Became a Go-To Resin Printer
The Anycubic Photon earned attention because it brought resin printing into a price range that felt realistic for hobbyists, small studios, and makers who needed high-detail parts without stepping into industrial budgets. When people say “resin detail,” they usually mean crisp edges, smooth curves, and small features that survive cleanup and finishing. The Anycubic Photon line built its reputation on delivering those traits with an approachable workflow: a compact machine footprint, a straightforward touchscreen interface, and an ecosystem of profiles and community knowledge that lowered the learning curve. For miniature painters, jewelry prototypers, cosplay prop builders, and product designers, the appeal is not only the resolution on paper but the consistent ability to reproduce textures, embossed lettering, and fine mechanical features. That consistency matters when you’re printing multiple iterations of a part, comparing tolerances, or trying to match a surface finish across batches.
Another reason the Anycubic Photon remains widely referenced is the way it fits into a complete “bench-to-finish” routine. Resin printing is not just about the printer; it’s about the whole chain: slicing settings, resin choice, temperature control, post-wash, cure, and safe handling. The Photon family gained traction because many users could assemble a reliable routine with readily available accessories such as wash-and-cure stations, replacement vats, and build plates. Even if you later upgrade to a newer model, the lessons learned on an Anycubic Photon—support strategy, exposure tuning, and maintenance habits—carry over to almost every LCD/MSLA resin printer. That makes it a logical starting point for anyone who wants to build skills that remain useful as projects become more demanding.
Core Technology: MSLA Resin Printing and What It Means in Practice
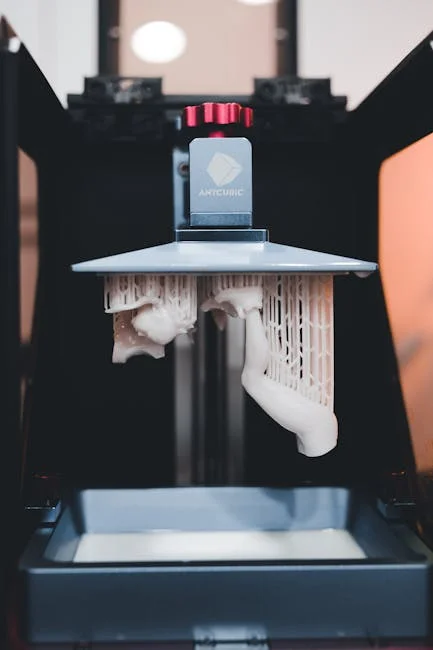
Understanding what the Anycubic Photon is doing under the hood helps you diagnose problems and push quality higher. The Photon is an MSLA-style resin printer (masked stereolithography), which uses an LCD screen to mask UV light and cure entire layers at once. Instead of tracing a laser line, the printer exposes a full layer in a single step, which can make print times more predictable. In practical terms, this means a detailed miniature head and a flat plate of small parts can take similar time per layer, with total duration driven by layer count and exposure values rather than the area of each layer. For many workflows, that predictability is valuable: you can estimate print windows, plan post-processing, and schedule multi-part jobs without the surprises common in technologies that scan each layer.
MSLA also influences how you think about orientation and supports. Because an LCD exposes a whole layer, peel forces during layer separation become a major driver of failures. On an Anycubic Photon, you’ll often see better reliability when you orient models to reduce large flat cross-sections and when you use supports that distribute peel stresses gradually. This is why angled orientations, hollowing (when appropriate), and carefully placed supports can matter as much as raw resolution. It also explains why settings like bottom exposure and lift speeds are so critical; they control how well the first layers anchor to the build plate and how gently each layer separates from the FEP film. When you treat the Photon as a system—light source, LCD mask, resin chemistry, mechanical lift, and peel dynamics—you gain more levers to improve success rates and surface finish.
Model Variants and Feature Differences Across the Photon Line
“Anycubic Photon” can refer to multiple generations and sizes, and knowing the differences helps you choose the right tool for your projects. Earlier Photon models established the baseline: dependable detail, a modest build volume, and a simple interface that prioritized essential controls. Later variants typically introduced higher-resolution monochrome screens, faster exposure times, improved light uniformity, and sometimes larger build plates. Monochrome screens are particularly important because they allow more UV transmission and can reduce exposure times while extending screen life. If you print frequently, that can translate into both speed gains and fewer consumable replacements over the long run.
Beyond screen type, consider build volume, Z-axis stability, and ecosystem compatibility. Larger Photon models can print more parts in a batch or accommodate taller props, but they also increase resin consumption and can amplify peel forces because the surface area of each layer can be bigger. A smaller Anycubic Photon can be easier to dial in for miniatures and small prototypes because the vat is smaller, the forces are more manageable, and temperature control is easier in a compact enclosure. Meanwhile, accessories like wash-and-cure stations, build plate upgrades, and replacement vats may vary by model, so it’s worth checking what fits your exact unit. Choosing among Photon variants is less about chasing the newest spec and more about matching your typical part size, desired throughput, and tolerance for maintenance and tuning.
Setup Essentials: Leveling, First Layers, and a Reliable Starting Baseline
Getting consistent results from an Anycubic Photon starts with a careful initial setup. Build plate leveling is the most repeated advice in resin printing because it directly affects first-layer adhesion. A plate that is slightly tilted can cause one side to under-squish, leading to partial adhesion, warped rafts, or outright failures that leave cured resin stuck to the FEP. Many users benefit from taking leveling slowly, ensuring the plate is snug but not overly tight, and confirming that the plate compresses evenly against the screen using the manufacturer’s paper method or a calibrated shim approach. Once the plate is level, the next goal is to establish a baseline for bottom layers: enough bottom exposure and a sufficient number of base layers to hold the print through peel forces, but not so much that supports become fused and hard to remove.
Temperature and resin handling also belong in “setup,” even though they feel like environment rather than configuration. Most resins behave more predictably in a warm, stable range, and the Anycubic Photon will punish cold resin with failed supports, brittle layers, or incomplete curing. If your workspace is cool, warming the resin bottle in a controlled way or using a gentle enclosure heater can improve consistency. It also helps to mix resin thoroughly and strain it back into the bottle after failures to remove cured fragments that can puncture the FEP. A reliable baseline setup is not glamorous, but it is what turns the Photon from a “sometimes machine” into a dependable production tool for small runs, client prototypes, or a steady stream of tabletop miniatures.
Slicer Settings That Matter Most: Exposure, Lift, and Support Strategy
The slicer is where the Anycubic Photon becomes tailored to your resin, your room, and your model style. Exposure time is the setting everyone focuses on, but it’s better viewed as a balance between detail, strength, and success. Underexposure can preserve sharp edges but leads to weak supports and layer separation. Overexposure can make supports stronger and reduce failures, but it can also soften fine details, thicken walls, and close small holes. A practical approach is to start from a known community profile for your specific Photon model and resin type, then run a calibration print to refine normal exposure and bottom exposure. Many users keep notes for each resin, because “one profile fits all” rarely works across different brands, colors, and viscosity levels.
Lift distance and lift speed are just as important because they control the peel event. On an Anycubic Photon, an aggressive lift speed can cause suction and tearing, especially with large cross-sections or hollow parts without proper venting. Slower lifts and a slightly higher lift distance can reduce failures at the cost of longer prints. Support strategy ties everything together: use heavier supports for load-bearing regions and lighter touchpoints for visible surfaces, while ensuring islands are supported early. For miniatures, orienting the model to hide support marks on the underside can improve aesthetics, but you still need structural supports on the first contact points to prevent wobble. When slicer settings are tuned, the Photon can deliver repeatable results that feel “dialed in,” where failures become rare and surface quality becomes predictable enough for paid work or time-sensitive projects.
Resin Selection for the Anycubic Photon: Standard, Tough, and Specialty Options
Resin choice shapes both the printing experience and the final part performance on an Anycubic Photon. Standard resins are often the easiest to start with because they cure reliably and show detail well. They can be brittle, though, which matters for functional prototypes, snap-fit features, or parts that will be handled frequently. Tough or ABS-like resins improve impact resistance and can make prototypes feel more like injection-molded plastics, but they may require different exposure settings and can be more sensitive to temperature. Water-washable resins simplify cleanup, yet they still require responsible disposal and can sometimes be more brittle than expected. If you’re printing miniatures, you might prioritize detail and paintability; if you’re printing mechanical parts, you might prioritize toughness and dimensional stability.
Specialty resins open new possibilities but demand more discipline. Flexible resins can produce gaskets or bendable components, but they can be tricky to support and may need longer post-cure times. High-temperature resins can survive heat exposure, useful for molds or engine-bay prototypes, but they often require careful curing protocols. Castable resins are popular for jewelry patterns, though they require clean burnout schedules and precise post-processing to avoid ash or residue. The Anycubic Photon can handle many resin types, but each one benefits from its own calibration and workflow. Keeping a small “resin log” with exposure times, lift settings, and post-cure notes can save hours later. Resin selection is also a safety decision: different resins have different odors and handling requirements, so it’s wise to choose materials that match your ventilation and protective equipment setup.
Print Quality and Detail: Miniatures, Prototypes, and Surface Finish Expectations
Print quality on the Anycubic Photon is often described in terms of detail and smoothness, but it’s more accurate to think in categories: geometric accuracy, surface texture, and feature survivability. For miniatures, the Photon excels at reproducing facial features, cloth folds, and ornamental trim, especially when layer heights are chosen to balance time and smoothness. Very fine layers can reduce stepping on angled surfaces, though they increase print duration and may expose weaknesses in support placement. For prototypes, dimensional accuracy depends on exposure tuning, resin shrinkage, and calibration of the Z-axis steps. Small holes and thin walls can print well, but they may require compensation in CAD or slicer settings if you need tight fits. The best approach is to print a small test coupon that includes holes, pins, walls, and text, then adjust based on measured results.
Surface finish is also influenced by orientation. A model printed flat can show suction-related artifacts and “elephant foot” at the base, while a model printed at an angle can show support marks and a slightly different texture on the supported surfaces. The Anycubic Photon can produce parts that look injection-smooth after priming, but raw prints may have a slight sheen or micro-texture depending on resin and cure. If you need a showpiece finish, plan for light sanding, filler primer, and controlled curing to avoid over-hardening the surface. For functional parts, consider whether you need smoothness or whether a slightly textured finish improves grip or paint adhesion. In many cases, the Photon’s real advantage is that it gives you a repeatable starting surface that can be finished to professional standards without heroic effort.
Post-Processing Workflow: Washing, Curing, and Finishing Without Damage
Post-processing is where Anycubic Photon prints become safe to handle and ready for paint, assembly, or evaluation. Washing removes uncured resin from the surface and from cavities, which prevents tackiness and improves cure consistency. Isopropyl alcohol is common, but dedicated cleaning solutions also work; the key is to keep wash liquid reasonably clean and to avoid soaking parts so long that they swell or soften. A two-stage wash—first a “dirty wash” to remove most resin, then a “clean rinse” for final clarity—can produce better results and extend the life of your solvent. After washing, thorough drying is important because residual solvent can interfere with curing and can leave a cloudy surface. Compressed air or a gentle fan helps, especially for miniatures with deep recesses.
Expert Insight
Dial in exposure with a simple calibration routine: print a small exposure test, then adjust normal exposure in 0.2–0.5s steps until fine text and sharp edges appear without swollen details. Once set, save the profile for each resin type and keep room temperature consistent to avoid re-tuning. If you’re looking for anycubic photon, this is your best choice.
Improve reliability by focusing on build plate prep and resin handling: level the plate carefully, lightly scuff it if adhesion is inconsistent, and tighten the vat film evenly to prevent suction issues. Filter resin back into the bottle after each session, clean the vat before cured bits accumulate, and replace the FEP when you see clouding or persistent print failures. If you’re looking for anycubic photon, this is your best choice.
Curing completes polymerization and improves strength, but over-curing can make parts brittle and can exaggerate warping in thin sections. A controlled UV cure, rotating the part for even exposure, tends to produce the best balance. If you use a wash-and-cure station, keep curing times conservative and increase only as needed. Support removal timing is another decision point: some people remove supports after a brief cure to reduce bending, while others remove supports before curing to make them easier to clip. With the Anycubic Photon, a common approach is to wash, partially cure for a short period to firm the model, remove supports carefully, then finish curing. For finishing, sanding and priming can hide support marks, and a thin coat of primer often reveals whether you need additional cleanup. With practice, the post-processing workflow becomes predictable, and the Photon’s output looks consistently professional.
Maintenance and Longevity: FEP Care, LCD Protection, and Routine Checks
Keeping an Anycubic Photon running well is largely about protecting consumables and catching small issues early. The FEP film at the bottom of the vat is critical: it must remain clear, smooth, and properly tensioned. Cloudy or scratched FEP can reduce detail and increase adhesion failures, while punctures can leak resin onto the LCD. Many users replace FEP proactively after a certain number of prints or when they notice increased sticking and hazy layer artifacts. Resin spills should be cleaned promptly and safely, because cured resin fragments can create pressure points that damage the screen. A screen protector designed for resin printers can add a layer of insurance against accidental leaks, and it’s often a worthwhile upgrade if you print frequently.
| Model | Best for | Key strengths | Trade-offs |
|---|---|---|---|
| Anycubic Photon (Original) | Budget entry into resin printing | Proven, simple workflow; good detail for minis/jewelry; wide community support | Older tech vs newer Photon lines; slower/less uniform exposure than modern mono screens |
| Anycubic Photon S | Users wanting smoother prints and quieter operation | Improved light distribution and stability; generally better surface quality than the original | Incremental upgrade; still behind newer mono-screen models in speed |
| Anycubic Photon Mono | Faster printing and sharper detail per dollar | Mono LCD enables quicker cure times; crisp detail; strong value for frequent printing | Typically smaller ecosystem of legacy accessories; may require dialing in exposures for different resins |
Routine checks also include the build plate surface, Z-axis motion, and vat cleanliness. A build plate that develops a polished, overly smooth surface can reduce adhesion, while a plate with gouges can create uneven contact. Lightly scuffing the plate (when appropriate and with care) can restore grip, but it should be done evenly and sparingly. The Z-axis should move smoothly without binding; periodic lubrication and keeping the lead screw clean can prevent layer shifts. The Anycubic Photon’s UV light source and LCD are also long-term considerations; consistent exposure results depend on stable light output and an LCD that hasn’t degraded. If you notice sudden changes in cure behavior, it’s worth checking for resin on the screen, a damaged FEP, or a failing LCD. Preventive maintenance takes less time than troubleshooting repeated failures and helps the Photon remain a reliable part of your workshop.
Troubleshooting Common Failures: From Stuck Prints to Layer Lines
When an Anycubic Photon print fails, the symptoms often point to a short list of causes. If a print sticks to the FEP and leaves the build plate empty, first-layer adhesion is usually the culprit: leveling, bottom exposure, or contamination on the plate. Increasing bottom exposure slightly, adding a couple of base layers, and confirming the plate is truly level can solve many of these failures. If supports print but the model is missing or deformed, the issue may be underexposure, insufficient support density, or an orientation that creates large islands. In those cases, raising normal exposure modestly and strengthening key supports can restore reliability. Temperature also reappears as a frequent hidden variable; resin that is too cold becomes more viscous and less reactive, which can make previously successful settings suddenly fail.
Layer lines, banding, or repeating artifacts can be mechanical or optical. A Z-axis that binds or a lead screw that needs cleaning can create periodic shifts. Loose build plate hardware can introduce tiny tilts that show as lines across the print. Optical artifacts can come from a dirty LCD, a damaged FEP, or resin pigment settling that changes cure behavior mid-print. The Anycubic Photon responds well to systematic troubleshooting: change one variable at a time, record results, and avoid stacking multiple changes in a single attempt. When a failure occurs, strain the resin to remove cured bits, inspect the FEP under good light, and check the screen for smudges or leaks. Most issues are recoverable with routine adjustments, and once you learn the machine’s patterns, you can often predict the fix from the failure type.
Safety, Ventilation, and Responsible Resin Handling
Resin printing with an Anycubic Photon is rewarding, but it requires consistent safety habits. Liquid photopolymer resin can irritate skin and should be handled with gloves, and splashes should be avoided by pouring slowly and using funnels. Ventilation matters because resin odors and vapors can build up in small rooms. A well-ventilated workspace or an enclosure with exhaust to a safe area can make printing more comfortable, especially for long runs. Eye protection is also sensible when scraping prints or handling solvents, since small droplets can travel farther than expected. Keeping paper towels, a spill mat, and a dedicated waste container near the printer helps you respond quickly to drips and reduces the chance of spreading resin to door handles, tools, or other household surfaces.
Responsible disposal is part of the workflow. Used alcohol or cleaning solution becomes contaminated with resin and should not be poured down the drain. Many users cure the contaminated liquid in sunlight or under UV, allow resin solids to precipitate, then filter and dispose of solids according to local regulations. Cured resin is generally safer than liquid resin, but it should still be disposed of thoughtfully. With an Anycubic Photon, it’s easy to print often, which means it’s easy to accumulate waste if you don’t have a plan. Setting up a small station for washing, curing, and waste handling keeps the process tidy and reduces exposure risks. Safety practices do not need to be complicated, but they do need to be consistent, and they help ensure resin printing remains a sustainable, enjoyable part of your making routine.
Use Cases and Project Ideas: Where the Photon Shines Most
The Anycubic Photon is at its best when you need fine detail, smooth surfaces, and repeatable small-to-medium parts. Tabletop miniatures are a classic match: you can print squads, terrain details, and character models with sharp features that take paint well. For cosplay and prop work, the Photon can produce master patterns, greeblies, emblems, buckles, and intricate surface panels that would be tedious to sculpt by hand. In product design, it can generate early prototypes that communicate form and ergonomics, while also allowing functional checks for assemblies, clearances, and snap features when paired with a tougher resin. Model makers use Photon prints for scale components, architectural details, and replacement parts where a clean surface reduces finishing time.
Small-batch production is another area where a Photon setup can be surprisingly effective. If you have a niche product—custom knobs, cable organizers, small enclosures, decorative components, or personalized tokens—the Anycubic Photon can produce consistent parts with minimal variation once profiles are tuned. The key is to standardize: one resin, one profile, consistent temperature, and repeatable post-processing. You can also use Photon prints as masters for silicone molds, enabling resin casting or even low-run polyurethane parts. For jewelry, castable resins can produce patterns for investment casting, though success depends heavily on burnout schedules and careful handling. Across these use cases, the Photon’s value is not only “high resolution,” but the ability to turn digital designs into physical objects with a surface quality that feels premium after modest finishing.
Buying Considerations: What to Check Before Choosing a Photon Setup
If you’re evaluating an Anycubic Photon purchase, the decision is easier when you match the machine to your constraints: space, budget, and intended part size. Measure the area where the printer will live, and include room for washing and curing, because resin printing is a multi-step workflow. Consider whether you want a monochrome-screen Photon variant for faster prints and potentially longer screen life, or whether an older model meets your needs at a lower cost. Also consider noise and odor management: a compact printer in a bedroom or shared space is rarely ideal unless you have strong ventilation plans. Check availability and cost of consumables such as FEP sheets, replacement vats, and LCD screens for your specific Photon model, because long-term ownership costs are shaped by how easy it is to source parts.
Community support and slicer compatibility matter too. The Anycubic Photon is widely used, which means settings guidance and troubleshooting tips are easy to find, but your exact model still benefits from profiles tailored to its screen type and light power. Make sure you’re comfortable with the slicer options available for the Photon line and that you can export the correct file format for your machine. If you plan to print engineering parts, consider whether you’ll invest in tougher resins and whether your post-processing setup can handle them. Finally, budget for essentials: gloves, filters, a wash container or wash station, UV curing, and a safe waste plan. A well-rounded setup makes the Anycubic Photon feel like a complete tool rather than a device that creates extra chores.
Getting Consistent Results Over Time: Process Control and Repeatability
Consistency is what separates occasional success from dependable output on an Anycubic Photon. Once you have settings that work, lock down variables: keep resin bottles labeled with exposure notes, store resin at stable temperatures, and avoid mixing different resin types unless you’re intentionally experimenting. Before each print, stir or gently agitate resin to ensure pigments and additives are evenly distributed. Keep the vat clean and inspect the FEP for clouding and scratches, because small changes in film clarity can show up as subtle shifts in cure and adhesion. Many users also find it helpful to standardize the orientation strategies they use for common part types—miniatures at a specific angle, flat functional parts with chamfered edges and careful venting, and hollow parts with consistent drain hole placement.
Repeatability also comes from documenting what works. A simple log—resin brand and color, room temperature, layer height, normal exposure, bottom exposure, lift speed, and post-cure time—can reduce troubleshooting dramatically. If a print fails, you can compare conditions and identify what changed. Over time, you’ll develop a small library of “known good” profiles for the Anycubic Photon that match your most common jobs. This approach is especially valuable if you sell prints or rely on the Photon for client deliverables, because it reduces variability and rework. With a stable process, the printer becomes less of an experiment and more of a production device, turning out parts that meet expectations day after day, and making the Anycubic Photon a tool you can trust when deadlines matter.
Final Thoughts on Choosing and Using the Anycubic Photon
The Anycubic Photon remains a practical choice for makers who want resin detail without turning the hobby into a constant troubleshooting exercise. Its strengths show up when you treat it as a complete workflow: thoughtful setup, calibrated exposure, careful orientation, and disciplined post-processing. The machine can produce miniatures with crisp features, prototypes with clean surfaces, and small production parts that look and feel refined after curing and finishing. Like any resin printer, it demands respect for safety and a willingness to maintain consumables, but the payoff is a level of fidelity that’s difficult to match with filament printing at a similar scale.
Long-term satisfaction with an Anycubic Photon comes from dialing in a repeatable routine and resisting the urge to change too many variables at once. Choose a resin that matches your goals, stabilize your environment, and keep notes so you can return to known-good settings whenever you try a new model or material. When you do that, the Anycubic Photon becomes more than a first resin printer—it becomes a dependable workshop tool that can support creative projects, functional design work, and detailed production runs with confidence.
Watch the demonstration video
In this video, you’ll learn what the Anycubic Photon resin 3D printer is, how it works, and what you need to get started. It covers key features, basic setup, slicing and printing steps, and practical tips for achieving cleaner prints and smoother results—plus common mistakes to avoid for a better first print.
Summary
In summary, “anycubic photon” is a crucial topic that deserves thoughtful consideration. We hope this article has provided you with a comprehensive understanding to help you make better decisions.
Frequently Asked Questions
What is the Anycubic Photon?
The Anycubic Photon is a desktop resin (MSLA/SLA-style) 3D printer designed for high-detail prints using UV-curable photopolymer resin.
What types of resin can the Anycubic Photon use?
It works with a wide range of 405nm UV resins—standard, ABS-like, tough, plant-based, and water-washable options—as long as they’re formulated for 405nm curing, making it a great match for printers like the **anycubic photon**.
How do I level the build plate on an Anycubic Photon?
Loosen the plate screws, home the Z axis with paper on the LCD, press the plate flat, tighten screws, then set Z=0 per the printer’s menu instructions for your model. If you’re looking for anycubic photon, this is your best choice.
Why are my Anycubic Photon prints not sticking to the build plate?
If your prints keep failing, the usual culprits are too little bottom exposure, an unlevel build plate, a build surface that’s dirty or greasy, resin that’s too cold, or a FEP film that’s worn out or not properly tensioned. On an **anycubic photon**, a few quick tweaks to your exposure settings and a careful re-check of leveling and cleanliness can often get you back to reliable prints.
What slicer software works with the Anycubic Photon?
Common options include Anycubic Photon Workshop, Lychee Slicer, and ChiTuBox, depending on your Photon model and supported file formats/firmware.
How do I maintain the Anycubic Photon for consistent results?
To keep your **anycubic photon** running smoothly, regularly clean the resin vat and build plate, and check the FEP film—replacing it if it becomes scratched, cloudy, or worn. If your model supports it, add a screen protector to safeguard the LCD, and don’t forget to periodically re-level the build plate and refresh your print profiles and settings for consistent results.
📢 Looking for more info about anycubic photon? Follow Our Site for updates and tips!

Trusted External Sources
- Anycubic Photon Workshop ( LCD )
A professional LCD slicing software tailored for Anycubic series products, supporting automatic support generation, remote printing, and video monitoring.
- Resin 3D Printers For Professionals & Beginners Will Love
… Sale price $599.00 Regular price $699.00. Unit price / per. Anycubic Photon Mono M7 Pro. – $240 Top. Anycubic Photon Mono M7 Pro.
- r/AnycubicPhoton – Reddit
On Nov 23, 2026, the r/AnycubicPhoton community was buzzing with activity—a dedicated space for fans of the **anycubic photon** and the wider Anycubic resin printer lineup. It’s a great place to chat about resin printing, swap tips, and post questions to get help from other makers.
- Anycubic Photon – LCD/DLP/SLA 3D Printer
Anycubic is a leading maker of high-performance desktop 3D printers and accessories, known for blending precision engineering with approachable, user-friendly design. From hobbyists to professionals, the brand helps creators turn ideas into detailed, reliable prints—especially with popular models like the **anycubic photon**, which delivers impressive accuracy in a compact setup.
- Anycubic Photon 1 is a good deal on 2026 to get this printer? Is so …
Mar 6, 2026 — It’s not the fastest machine out there, but the **anycubic photon** still delivers impressively solid results. Honestly, a lot of the so-called “improvements” introduced over the years seem less about better performance and more about cutting manufacturing costs.