Electric charger installation has moved from a niche upgrade to a mainstream electrical project as more drivers switch to plug-in vehicles. A charger is not just a convenience outlet; it is a piece of power equipment that must match the vehicle’s needs, the property’s electrical capacity, and local safety requirements. When the setup is done correctly, daily charging becomes predictable, efficient, and safer than relying on extension cords or improvised solutions. The best outcomes come from treating the work as a structured electrical design task: evaluate the service panel, confirm wiring paths, select protective devices, and choose a charger that supports the right amperage and smart features. That approach reduces nuisance breaker trips, overheating risks, and the frustrating “slow charge” experience that often happens when the circuit is undersized.
Table of Contents
- My Personal Experience
- Understanding Electric Charger Installation for Homes and Businesses
- Choosing the Right Charger Type and Power Level
- Electrical Capacity, Service Panels, and Load Calculations
- Permits, Codes, and Inspection Requirements
- Site Assessment and Optimal Charger Placement
- Wiring Methods, Breakers, and Safety Devices
- Hardwired vs Plug-In Chargers: Practical Tradeoffs
- Expert Insight
- Installation Process: Typical Steps and What to Expect
- Costs, Incentives, and Long-Term Value
- Smart Charging, Load Management, and Energy Optimization
- Common Mistakes to Avoid and How to Ensure Reliability
- Maintenance, Upgrades, and Future-Proofing Your Charging Setup
- Watch the demonstration video
- Frequently Asked Questions
- Trusted External Sources
My Personal Experience
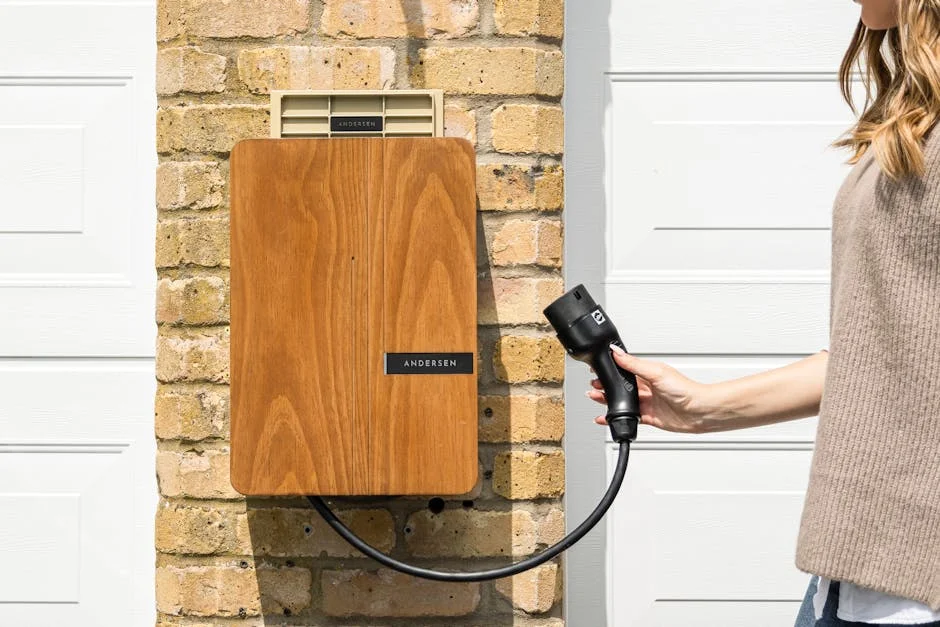
After buying my first EV, I realized pretty quickly that relying on public fast chargers was more stressful than I expected, so I scheduled an electric charger installation at home. The electrician started by checking my panel capacity and walked me through a couple of options, including whether I really needed a 48-amp unit or if a 32-amp charger would cover my daily commute. We ended up running a dedicated 240V line to the garage and mounting the charger near the door so the cable would reach without being stretched across the floor. The install took a few hours, plus a follow-up inspection, and the biggest surprise was the extra cost for upgrading a breaker and adding conduit. Now I plug in at night and wake up to a full battery, and it’s honestly the first time owning the car has felt truly convenient.
Understanding Electric Charger Installation for Homes and Businesses
Electric charger installation has moved from a niche upgrade to a mainstream electrical project as more drivers switch to plug-in vehicles. A charger is not just a convenience outlet; it is a piece of power equipment that must match the vehicle’s needs, the property’s electrical capacity, and local safety requirements. When the setup is done correctly, daily charging becomes predictable, efficient, and safer than relying on extension cords or improvised solutions. The best outcomes come from treating the work as a structured electrical design task: evaluate the service panel, confirm wiring paths, select protective devices, and choose a charger that supports the right amperage and smart features. That approach reduces nuisance breaker trips, overheating risks, and the frustrating “slow charge” experience that often happens when the circuit is undersized.
For businesses, electric charger installation also has a customer-service and operational angle. Public or workplace charging can influence dwell time, employee satisfaction, and fleet readiness, but it introduces additional considerations such as access control, payment processing, load management, and parking logistics. Even a small retail site may need to coordinate with a utility for service upgrades, comply with accessibility rules, and plan signage so drivers understand where and how to charge. Residential projects are typically simpler, yet they still require careful planning—especially in older homes with limited panel capacity or detached garages with long wire runs. Whether the goal is a single Level 2 unit in a garage or multiple stations in a commercial lot, the same principles apply: match the electrical infrastructure to the charging demand, protect the circuit properly, and ensure the equipment is installed to code and manufacturer specifications.
Choosing the Right Charger Type and Power Level
Before any electric charger installation begins, the most important decision is the charger type and the power level that makes sense for the vehicle and the daily driving pattern. Many drivers start with basic Level 1 charging, which uses a standard 120V outlet and adds range slowly. Level 1 can work for short commutes, but it is often impractical for larger batteries or households with multiple EVs. Level 2 charging uses 240V power and can add significantly more range per hour, making it the common choice for home garages and workplace charging. Selecting the amperage—often 16A, 32A, 40A, 48A, or higher—affects charging speed, circuit size, and the total cost of installation. A higher-amp unit can be convenient, but it demands a stronger electrical circuit and may require a panel upgrade, so it is worth balancing speed against infrastructure costs.
Connector standards and smart features also influence equipment selection. In North America, many vehicles use J1772 for Level 2 charging, while others may use NACS, and adapters can be part of the plan. Smart chargers add scheduling, energy monitoring, and utility demand-response compatibility, which can lower operating costs by shifting charging to off-peak hours. For multi-vehicle households, load-sharing chargers can split available power between two ports to avoid overloading the service. On commercial sites, networked stations can track usage, set pricing, and manage user access. Each feature can affect wiring requirements and placement decisions. When planning electric charger installation, it is wise to choose a unit certified by a recognized testing laboratory and supported by the manufacturer for the intended environment—indoor garage, outdoor wall, pedestal mount, or parking structure—because environmental ratings and durability matter just as much as raw charging speed.
Electrical Capacity, Service Panels, and Load Calculations
Electric charger installation often succeeds or fails based on the home or building’s electrical capacity. A charger is a continuous load, meaning it can draw power for hours at a time, and electrical codes typically require continuous loads to be sized with extra headroom. That affects breaker size, conductor size, and the overall load calculation for the service panel. A common scenario is a 100-amp residential service where major appliances—electric range, dryer, HVAC, and water heater—already consume much of the available capacity. Adding a high-power charger without evaluating the panel can lead to frequent trips or, worse, overheating. A professional load calculation considers existing loads, demand factors, and the maximum continuous charging current. If the panel has space but not enough capacity, options may include a service upgrade, a subpanel, or a load management device that reduces charging when the home’s total usage rises.
Commercial properties face similar issues but with different complexity. A site adding several stations may need to coordinate transformer capacity, distribution panels, and feeder sizing. Multi-unit installations can benefit from managed charging, where chargers communicate to cap total site draw. This approach can avoid expensive upgrades while still providing useful charging to multiple drivers. Another key factor is the distance from the electrical room to the parking area; long runs increase voltage drop and may require larger conductors, which can raise material costs significantly. During planning, it helps to map the electrical path and identify obstacles such as fire-rated walls, finished ceilings, or underground crossings. A careful capacity review early in the electric charger installation process prevents last-minute surprises and helps ensure the chosen charger power level aligns with what the building can reliably support.
Permits, Codes, and Inspection Requirements
Permits and inspections are not paperwork hassles; they are the framework that makes electric charger installation safer and more consistent. Most jurisdictions require an electrical permit for installing a new 240V circuit or hardwired EVSE (electric vehicle supply equipment). The permit process typically checks that the circuit is properly sized, the wiring method is approved, the grounding and bonding are correct, and the equipment is listed for the application. Inspections also verify that the installation follows manufacturer instructions—an often overlooked requirement that can affect warranty and insurance. Skipping permits can create problems later when selling a home, filing an insurance claim, or applying for rebates that require proof of compliant work.
Code requirements vary by location, but common themes include GFCI protection, proper disconnecting means where required, weatherproof enclosures for outdoor equipment, and correct conductor sizing for continuous loads. Some areas have specific rules for EV circuits, including dedicated branch circuits and labeling in the panel. Multi-family and commercial installations may have additional requirements related to accessibility, signage, bollards for physical protection, and fire-stopping where conduits penetrate rated assemblies. An inspector may also check mounting height, cable management, and whether the charger is placed to reduce trip hazards. Building these considerations into the plan from the start makes electric charger installation smoother and reduces rework. When rebates or utility programs are involved, they may require documentation like a final inspection sign-off, an electrician’s invoice, and charger model details, so keeping records organized is part of doing the job correctly.
Site Assessment and Optimal Charger Placement
Choosing the right location is a practical step that has long-term consequences for usability and cost. Electric charger installation is generally cheaper when the charger is mounted close to the electrical panel, but convenience matters too. The charging cable should comfortably reach the vehicle’s charge port without stretching across walkways or requiring awkward parking. In a typical garage, a wall near the front corner can work well because it accommodates different vehicle orientations. For outdoor driveways, placement should consider snow clearing paths, exposure to sprinklers, and physical protection from accidental bumps. If the charger will be used daily, a location that allows easy cable storage reduces wear on the connector and keeps the area tidy.
Commercial placement demands even more planning. Stations should be visible, well-lit, and positioned so vehicles can park without blocking traffic flow. If the chargers are meant for customers, placing them near entrances can boost usage, but it may also require managing ICEing (non-EV vehicles occupying charging spots). If the chargers serve fleets, placing them near fleet parking with controlled access can reduce misuse. Conduit routes may need to avoid landscaping, drainage systems, and underground utilities. For pedestal installations, concrete work and bollards may be necessary to protect the equipment. A thorough site assessment also looks at Wi‑Fi or cellular signal strength if the stations are networked, because poor connectivity can disrupt payments, monitoring, and firmware updates. Good placement decisions make electric charger installation more than a technical success; they make charging genuinely easy and reliable for the people who will use it.
Wiring Methods, Breakers, and Safety Devices
The electrical “backbone” of electric charger installation involves selecting the correct wiring method and protective devices for the environment. A typical Level 2 setup uses a dedicated 240V circuit, sized so the breaker and conductors can handle continuous current. The charger’s maximum output determines circuit sizing; for example, a charger set to 40 amps usually requires a 50-amp circuit under common continuous-load rules. The wiring method may be nonmetallic cable in walls for indoor runs, or conduit with individual conductors for garages, outdoors, or commercial spaces. Conduit is often preferred where physical protection is needed or where future upgrades are likely. Proper conductor sizing also accounts for voltage drop on long runs; upsizing wire can help maintain charging performance and reduce heat.
Safety devices are equally important. Ground-fault protection is often required for receptacles and may be integrated into the charger itself, depending on the design and local code interpretation. Surge protection is a smart addition, especially in areas prone to lightning or utility fluctuations, because EVSE electronics can be sensitive. A disconnecting means may be required in certain commercial contexts or when the charger is hardwired and not within sight of the breaker panel, depending on local rules. Correct grounding and bonding are critical; improper bonding can create nuisance faults or dangerous touch voltages. Labeling the breaker and the charger circuit helps future servicing and reduces confusion. When done correctly, these elements make electric charger installation robust, reducing the likelihood of faults, overheating, and intermittent charging errors that can be difficult to diagnose later.
Hardwired vs Plug-In Chargers: Practical Tradeoffs
One of the most common decisions in electric charger installation is whether to hardwire the unit or use a plug-in model. Hardwired chargers are permanently connected, typically offering a clean look and fewer potential points of failure. They can be a strong choice for higher amperage charging and for outdoor installations where a receptacle might be more exposed to weather. Hardwiring can also reduce the risk of a loose plug connection, which is a known cause of heat buildup. For some homeowners, hardwired equipment feels more “built-in” and can be attractive for long-term ownership, especially when the charger is installed as part of a broader electrical upgrade.
| Option | Best for | Typical install requirements |
|---|---|---|
| Level 1 (120V) outlet charging | Low daily mileage, overnight topping up, renters (with permission) | Standard grounded 120V outlet; dedicated circuit recommended; minimal electrical work |
| Level 2 (240V) home charger | Most homeowners needing faster daily charging | 240V circuit (often 40–60A); breaker + wiring sized to charger; wall-mount near parking; permits/inspection commonly required |
| Hardwired vs. plug-in Level 2 | Hardwired: maximum reliability & higher amperage Plug-in: easier replacement/portability |
Hardwired: direct to junction box; may support higher output Plug-in: NEMA 14-50/6-50 receptacle; GFCI/breaker considerations; outlet must be properly rated |
Expert Insight
Confirm your home’s electrical capacity before choosing a charger: check the main panel amperage, available breaker space, and the distance to the parking spot, then select a charger and circuit size that fit without overloading the service. If you’re looking for electric charger installation, this is your best choice.
Prioritize safety and reliability during installation: use a dedicated circuit with the correct wire gauge, install a GFCI breaker if required by code or the manufacturer, and have the work permitted and inspected to ensure compliance and protect warranties. If you’re looking for electric charger installation, this is your best choice.
Plug-in chargers connect to a dedicated 240V receptacle, often a NEMA 14-50 or similar configuration, depending on regional standards and charger requirements. The advantage is flexibility: a plug-in unit can be replaced easily, moved, or taken to a new home. This can be useful for renters (where allowed) or for people who expect to upgrade chargers later. However, plug-in installations still need a properly rated receptacle, a correct box, and appropriate strain relief, and the receptacle must be installed to handle continuous duty. Not all receptacles are equal; heavy-duty industrial-grade devices are often recommended for frequent plugging and unplugging. The best choice depends on how permanent the setup should be, the amperage target, and the environment. Thoughtful selection here ensures electric charger installation remains safe, serviceable, and aligned with how the charger will actually be used over the years.
Installation Process: Typical Steps and What to Expect
A well-run electric charger installation follows a predictable sequence. First comes a site visit or assessment that confirms panel capacity, identifies the best mounting location, and plans the wiring route. Next is equipment selection and a clear scope of work: charger model, circuit amperage, whether it will be hardwired or plug-in, and any extras such as surge protection or load management. After permits are pulled, the installer typically mounts the charger or backplate, runs conduit or cable from the panel to the charger location, and installs the breaker and any required protective devices. Connections are torqued to specification, because under- or over-torqued terminals can cause heat and failure. If the charger is smart, the electrician or technician may help with network setup, firmware updates, and configuration of current limits to match the circuit.
After physical work is complete, testing confirms the system operates correctly. This may include verifying voltage, checking grounding, confirming GFCI function if applicable, and observing a charging session to ensure the vehicle and charger communicate properly. The installer should also demonstrate cable management, explain indicator lights, and show how to adjust schedules or amperage settings if the charger allows it. The final step is inspection, where the authority having jurisdiction confirms the work meets code and the permit can be closed. Homeowners and facilities managers benefit from receiving documentation: permit numbers, inspection sign-off, product manuals, and any configuration notes. When electric charger installation is approached as a complete process—planning, execution, testing, and documentation—it reduces callbacks and ensures the charging setup performs reliably from day one.
Costs, Incentives, and Long-Term Value
The cost of electric charger installation depends on a few predictable factors: charger price, circuit length, panel capacity, and site conditions. A straightforward garage install near the service panel is often the most affordable scenario, while long conduit runs, trenching to detached garages, or commercial parking-lot work can increase labor and materials significantly. Panel upgrades can be a major cost driver, especially if the service size must increase or if the electrical room requires modernization. That said, costs should be viewed in terms of long-term value: reliable Level 2 charging can reduce dependence on public stations, improve daily convenience, and support future vehicle upgrades. For businesses, charging can attract customers, support employee retention, and help fleets meet operational targets.
Incentives can change the economics dramatically. Many utilities and governments offer rebates for EVSE hardware, installation labor, or service upgrades, particularly when smart chargers are used and enrolled in demand-response programs. Some programs require pre-approval, specific charger models, or proof of professional installation and inspection. Tax credits may apply in certain jurisdictions for alternative fuel infrastructure, and commercial properties may find additional grants for public access charging or disadvantaged communities. It is also worth considering operating costs: smart scheduling can reduce electricity rates by charging off-peak, and managed charging can prevent demand charges in commercial contexts. When planning electric charger installation, combining a realistic cost estimate with available incentives and a clear view of usage patterns helps ensure the project delivers both convenience and measurable financial benefits over time.
Smart Charging, Load Management, and Energy Optimization
Smart features have become a major reason people upgrade beyond basic charging. Electric charger installation that includes smart charging can align charging sessions with time-of-use rates, solar production, or utility programs. Many chargers allow scheduling so charging starts late at night when electricity is cheaper and grid demand is lower. Some integrate with home energy management systems to avoid overloading the main service. This is especially useful in homes with heat pumps, electric water heaters, or multiple EVs. A smart charger may also provide detailed reports on energy usage, which can help households understand costs and potentially claim reimbursement if charging is for business mileage or an employer program.
Load management is a practical alternative to expensive service upgrades. A load management device can monitor total household draw and temporarily reduce EV charging when other loads spike, then resume charging when capacity returns. For multi-charger setups, dynamic load sharing can split a fixed amount of power across two or more ports, ensuring the site stays within a safe limit. Commercial sites often use networked management to cap total load, prioritize certain vehicles, or schedule fleet charging in waves. These strategies can reduce peak demand and improve overall electrical stability. When electric charger installation includes the right control approach, it becomes easier to expand later—adding another EV or another station—without immediately redoing the electrical service. The result is a charging setup that is not only fast, but also intelligent and adaptable to changing energy needs.
Common Mistakes to Avoid and How to Ensure Reliability
Several recurring mistakes can undermine electric charger installation, even when the equipment itself is high quality. One common issue is undersizing the circuit or failing to apply continuous-load rules correctly, leading to breaker trips or overheating. Another is using a low-grade receptacle for a plug-in charger, which can develop hot spots over time under sustained high current. Poor cable routing can create trip hazards or encourage drivers to tug on the connector, which increases wear. Outdoor installations sometimes fail early when weatherproofing is inadequate or when the unit is mounted where snow, irrigation, or direct sun exposure accelerates deterioration. Skipping surge protection can also be costly in areas with unstable power, because EVSE electronics are more sensitive than many people assume.
Reliability improves when installation details are handled with discipline. Connections should be torqued to manufacturer specifications, conductors should be sized correctly for both ampacity and voltage drop, and the charger’s maximum current should be configured to match the circuit rating. Networked chargers should be installed where connectivity is strong, or provisioned with an appropriate cellular plan. Clear labeling at the panel and at the charger helps future electricians and reduces accidental shutdowns. It also helps to choose equipment with strong manufacturer support and a proven track record, especially for commercial locations where downtime affects users and revenue. A final commissioning checklist—verify charging at full output, confirm safety functions, and document settings—turns electric charger installation into a predictable, repeatable success rather than a trial-and-error project.
Maintenance, Upgrades, and Future-Proofing Your Charging Setup
Once electric charger installation is complete, ongoing maintenance is usually minimal, but it should not be ignored. Periodically inspecting the cable and connector for damage, checking that the mounting hardware is secure, and keeping the unit clean can extend lifespan. For outdoor chargers, seasonal checks are useful: confirm that seals and gaskets remain intact, ensure the cable remains flexible in cold weather, and verify that insects or debris have not entered conduit openings. If the charger is plug-in, occasionally checking the receptacle for signs of discoloration or heat damage is prudent, especially if the unit charges at higher amperage for long periods. Many smart chargers can alert users to faults or abnormal temperature conditions, making it easier to act before a small issue becomes a service call.
Future-proofing is about planning for the next vehicle, not just the current one. A household that installs a modest charger today may later add a second EV, prompting a need for load sharing or another circuit. Choosing a wiring path that can be upsized, installing conduit rather than fixed cable where practical, and reserving panel space can make expansion easier. Some owners also consider integrating charging with solar and battery storage; in that case, selecting a charger with energy monitoring and scheduling features can help maximize self-consumption. Commercial sites can future-proof by installing spare conduit runs, oversizing trenching where feasible, and choosing network platforms that support additional stations without replacing the entire system. With thoughtful planning, electric charger installation becomes a scalable infrastructure upgrade that can adapt as vehicles, energy prices, and technology evolve.
Electric charger installation delivers the most value when it is treated as a long-term electrical infrastructure decision rather than a quick add-on. The right charger type, correct circuit sizing, careful placement, and code-compliant workmanship combine to create charging that is fast, safe, and dependable every day. Whether the project is a single home garage unit or a multi-station commercial deployment, attention to capacity planning, protective devices, and smart management features can prevent costly rework and make expansion straightforward. When the final result is a clean, inspected, well-documented setup that matches real driving needs, electric charger installation becomes a practical upgrade that supports reliable transportation and a more flexible approach to energy use.
Watch the demonstration video
In this video, you’ll learn the essentials of electric charger installation—from choosing the right charger and assessing your home’s electrical capacity to understanding permits, wiring, and safety requirements. It also covers typical installation steps, costs, and common mistakes to avoid, helping you plan a smooth, code-compliant setup for reliable EV charging.
Summary
In summary, “electric charger installation” is a crucial topic that deserves thoughtful consideration. We hope this article has provided you with a comprehensive understanding to help you make better decisions.
Frequently Asked Questions
Do I need a permit to install an electric vehicle charger?
In many cases, yes—local codes require an electrical permit and a follow-up inspection for **electric charger installation**. To be safe, contact your local building department to confirm the rules, or have your installer handle the permitting process for you.
Can I install an EV charger on my existing electrical panel?
In most cases, it’s possible—but it really depends on your panel’s available capacity and open breaker space. For an **electric charger installation**, a licensed electrician can run a proper load calculation to confirm whether your current setup can handle it or if an upgrade is needed.
What’s the difference between Level 1 and Level 2 charging?
Level 1 charging plugs into a standard 120V household outlet, but it’s relatively slow. Level 2 charging runs on a 240V supply, delivers a much faster charge, and usually calls for a dedicated circuit—making professional **electric charger installation** a smart choice.
Should I choose a hardwired charger or a plug-in charger?
Hardwired setups are a permanent solution and can often handle higher amperage, while plug-in units make swapping or upgrading easier—so long as you have a properly rated 240V receptacle and breaker in place for safe **electric charger installation**.
How much does EV charger installation typically cost?
Costs vary based on distance to the panel, wiring, wall type, and panel upgrades. Basic installs are often a few hundred to a couple thousand dollars; major upgrades can cost more. If you’re looking for electric charger installation, this is your best choice.
Where is the best place to install an EV charger?
Choose a spot close to where you park so the cable run to the electrical panel is as short as possible, and make sure the area is shielded from impact and weather in line with the charger’s rating and local code—key considerations for a safe, reliable **electric charger installation**.
📢 Looking for more info about electric charger installation? Follow Our Site for updates and tips!

Trusted External Sources
- Installing Car Charger – Need Guidance : r/evcharging – Reddit
Jan 13, 2026 … I am getting an EV charger installed. This is my first EV car (Kia EV9) and I have no idea about DOs and DONTs and what to look for when getting the charger … If you’re looking for electric charger installation, this is your best choice.
- Charger Installation | Los Angeles Department of Water and Power
LADWP has teamed up with other City of Los Angeles departments to simplify and speed up electric charger installation, making it easier to get reliable electric service in place for EV chargers.
- How much does installing an EV charger at home cost ? And what …
As of Apr 30, 2026, the price for **electric charger installation**—including a visit from a licensed electrician to handle the circuit, wiring, outlet, and charger setup—typically ranges from about **$1,000 to $2,026**, depending on where you live.
- Find and Install an Electric Vehicle Charger – San Diego Gas & Electric
Before you begin **electric charger installation**, start by finding a certified electrician in your area who has experience with EV charging equipment. Next, decide where you’d like the charger installed—such as in your garage, driveway, or near your parking spot—so it’s convenient to use and close to your electrical panel. From there, your electrician can review your home’s electrical capacity, recommend the right charger, and make sure everything meets local codes and safety requirements.
- EV Charger at Home Installation Cost and Referrals? : r/alpharetta
Feb 11, 2026 … To be transparent about the pricing, the installation starts ~$450, if the new outlet is within a few feet of the breaker panel. I asked for a … If you’re looking for electric charger installation, this is your best choice.